Showing posts with label white. Show all posts

Wednesday, June 29, 2011

Happy Father's Day!

This was a quick and fun little cake to do to show a certain special someone how loved he is!  I saw a cake with generic handprints on it while browsing Father's Day cakes on Bing images.  It's just a one layer yellow cake with vanilla buttercream frosting.  The decorations?  Actual handprints from his 3 of his 4 kids and wife (the youngest was sleeping when they came by).  I frosted the cake and let it crust, then pressed their hands into the finished frosting layer about 2cm deep.  Then I painted the buttercream indents with colors they chose beforehand.  It was fun and easy.  What a cute cake!  I didn't have a chance to photograph it, but I got a few pictures they posted for me on Facebook.
Happy Father's Day!

Wednesday, March 23, 2011

The Castle Cake that keeps on giving...

I have made a few of these cakes to where I now have them down to science!  The color for this was was to be Barbie Purple (or as the birthday girl described it, pink-purple).  Neither of the photos I took captured the color just right (flash and low light) but you get the general idea.
The shoes here were the color I was going for:


Yes, they are amazing shoes and the price is $129.  I looked them up.  Fabulous shoes.
Here's with the flash:

And here's without the flash in my low light house:

It was a pretty fun and easy cake and I loved making it!

Sunday, January 16, 2011

Crown and Draping

I should have posted this days ago!  I am a slacker :)

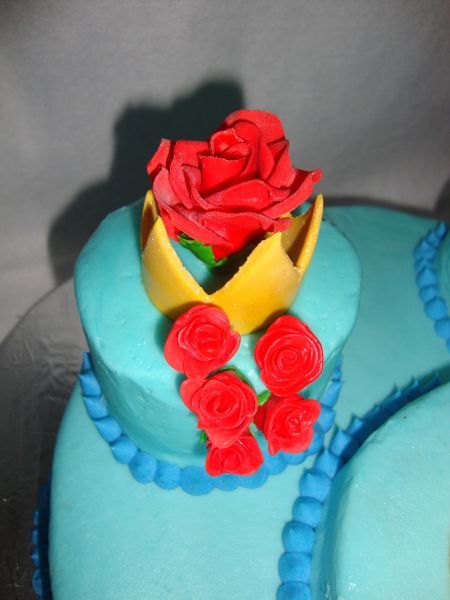
  This cake is a 2-layer 10" round, yellow cake with vanilla buttercream frosting and filling.  The accents are fondant.  The crown is fondant with a smidge of GumTex mixed in to help it harden.
  The crown was a hassle to make, but I figured it out. I wrapped it around an oatmeal container after cutting out the basic shape and sealed the back edge.  I wanted the tips to point outward but without support they would just flop down, so I decided to place the fondant wrapped oatmeal container into a large salad bowl and fill it with flour, then mound up the flour where necessary.  I left it to dry for a whole day then carefully removed it and brushed off the flour.  I painted it with a thick mixture of vodka and gold luster dust (the alcohol evaporates completely).
  The quilting was much faster this time, as I'd done it on the previous cake.  It's time consuming but simple once you get the distances marked.

  This was my first time making a drape, and it was fun and informative.  I love the way it looks.
  I made the rosettes by rolling a thin strip of fondant, shaping and rolling it up, then forming the frills.
  It still needed a little something, so I cut out about 40 little flowers, shaped them, and dusted the centers with red and pink petal dust.  I attached them using a smidge of buttercream.
  This was a fun cake and I had a blast making it.  It still surprises me that I love doing this so much.  What a blessing!
  I took a bunch of time off to concentrate on family stuff, but now I have quite a few cakes coming up and I'm really looking forward to them.  This is a blast.

Monday, November 1, 2010

A Halloween Anniversary!

This cake was pretty straight forward, and I very much enjoyed it.  I used the leftover navy blue BC from the last cake and made black by adding yellow, red, and brown coloring gels and more black powder.  The cake itself is two 10" decadent chocolate cake layers with vanilla BC filling and frosting.  See the baking powder can?  That's for size analysis (Thank you Christyl!  I keep forgetting!)  The numbers on top are gumpaste painted with gold edible shimmer dust.

This cake also had a specialty sturdy box.  I hate commercial cake boxes.  Something always goes wrong with them.  I'm so glad I've started making my own.

Tuesday, October 12, 2010

Hair Stylist Cake

The cake is 2-10" yellow rounds with vanilla buttercream frosting and filling.  The blow dryer and straightener are RKT covered in marshmallow fondant.  The red clip is made of fondant, but the silver clip is gumpaste.  The scissors are gumpaste as well, and everything silver was painted silver with silver shimmer dust and lemon juice mixed together.

The cake itself was very simple, as it required no mixing of colors for the base.  Just plain white BC frosting plugs.  I think I need to post a link to the SeriousCakes video about that, as it's the bestest, most wonderful thing I've ever seen.
Aw heck I'll just post her video.  Te frosting plug part starts at 1:35.  I love her videos!  I don't pull the plastic wrap all the way through the tip.  I cut it off up close to the frosting before I plop it in the bag, but it still makes for super fast cleanup and changing of colors.
Anyway, I smoothed the cake and set the objects on top, ran a ribbon around it, wrote "Happy Birthday Cedric" (On a side note, I love LOVE the name Cedric), placed the "cords", and called it a cake!

Friday, July 23, 2010

Peas in a Pod Cake

So I had a super fun little cake this week.  It is based on two pictures.  One was a belly cake, the other was a one-tier round.  Each of these pictures featured only one baby, but this cake is for a baby shower for TWINS!
  I have been taking some time to perfect my recipe amounts.  I found the right amount of batter to make my cakes as tall as possible with as little waste as possible.  Before, I have been cutting the tops flat for a nice level surface.  For this cake I took the two 10" chocolate and two 6" yellow cakes right out of the oven and flipped them so the dome was sitting on a platter - face side down, I guess you would say.  Doing this made a completely level surface on both top and bottom without wasting any cake.  This is good for two reasons: 1.  The cake has maximum volume with no wasted ingredients.  2. I'm not eating the leftover tops of cakes anymore.  I'm sure my hubster will be upset with no leftovers around, but c'est la vie, non?  When I make cakes, I usually fill the pan about 2/3 full.  Each recipe has a different rise, so each new recipe has to be tested to make sure you're getting the full potential height but not overfilling to the point of overflow during baking.
  Well, at any rate, the cakes were baked and the strawberry filling was made.  I made the cake board by putting together three stiff foam poster boards and cutting out a 12.5" diameter circle.  I use a razor blade for this.  I have found that this kind of poster board is great for cake boards.  The technique I use for making the cake board has evolved over time.  I recently picked up a compass, which has made making perfect circles SO much easier.  It was 2 bucks at Walmart, and it was the best 2 bucks I've ever spent!
  So I filled the cake, let it settle (filled cakes are going to settle a bit, so it's best to wait a while after putting on the 2nd layer to finish the tier off.  Otherwise the filling will make a bump in your cake.  I just learned this) and rolled out my fondant on a counter lightly coated with shortening.  Wilton has a fondant coverage chart that deals with weights, and while it allows for a little more than I require usually to cover a cake, it makes sure that I have enough.  This fondant was white, so no problems coloring it.  I placed and smoothed the bottom tier and put cut wooden dowels into the bottom tier for the top to sit upon.  I did the 6" top tier next in much the same way.  After I finished covering it with fondant, I placed the top tier onto the bottom tier's dowel system, then I cut a dowel large enough to go through the entire cake, made a point on one end so it could go through the board under the 6", and put it through to give more strength to the overall structure.  I covered the remaining cake board with fondant, then I made ribbons out of green fondant and placed them.
  Making the babies and the peas with the pod was easier than I thought it would be.  It's like playing with playdough!  The vines were fun to make and to place.  I used my edible gumpaste glue to put them and the dots on the cake, created some leaves, and VOILA, there it is.  I had an excellent time!

Saturday, July 17, 2010

Another Princess Castle Cake

This week went by so quickly.  My son is talking more and more each day and while I have been taking moments to step outside our everyday routine to enjoy the process, it feels like everything is either speeding or crawling by.  Does that make any sense?  No?  Well, I guess I should just stick to the caking of it all, then. :)

I had made a castle cake before for Dollbaby when she turned 4.  She just loved it.  This cake was for a first birthday party!  I did make a 3D crown smash cake, but dang it I forgot to take a picture of it!  Ah well.  Life goes on.  ANYway.  Today I tried out the hot knife technique.  Since it is ridiculously humid here (and hot), my buttercream hasn't been crusting the way I'm used to in order to do the VIVA paper towel smoothing I do.  Thus, I reverted to the hot knife trick.  You just get the frosting on the cake, then dip the spatula in HOT water and smooth.  It's very fast but it takes some getting used to and some practice.  I used that technique on the crown smash, so you don't even get to see the results!  I'm sorry!  Well, anyway, the castle cake was pretty much a repeat of the first time I made it, with a few small (or large, depending on how you look at them) exceptions.  This time I offset the 6" 2nd tier to the back so I could use the steeple roof.  I baked the cakes taller so I could use the provided door (last time my tier was too short and the door was too tall to fit properly, so I just frosted a door on).  I used fondant to cover the turret roofs, which proved much easier for me to do and much easier to transport for the client.
Last time I did this cake, I had such a hard time getting the towers to stay in place.  Last night, I was about to lose my cool when the new plans failed (using gumpaste to hold in place, using melted chocolate to hold them in place.  These just didn't stand up to it).  My INCREDIBLY SMART hubster came up with the brilliant idea to drill holes in the bottom of the towers, just large enough for the dowels I was using to fit through.  IT WORKED!  He is SO great!  He drilled every last tower to make my life easier.  I lurve him.
I worked as I went, placing a tower, decorating around it, then placing another.  I covered the cake board with fondant this time, which I like the effect of.  I used florist's tape around the cake board border to cover the raw edges.  The leaves were made using tip #67 and a bit darker green than the accent.  The bottom of the cake is 2-10" layers of yellow cake and the top is 2-6" layers of chocolate.  SO GOOD!  One problem I had was with the placing of the top towers.  They should have been placed farther apart to take into account the width of the tops.
I think next time I will try out another method of baking and preparing the cakes that I found online and review it for you.  It is a way of baking so you don't have to remove cake from the top of the layers to make it level.  I'll let you know.
I very much enjoyed making this cake after my husband helped me out so dramatically.  THANK YOU SWEETHEART!

Tuesday, July 13, 2010

Under the Sea Cake

I made one major mistake while making this 8", 2 tier cake-  I forgot the dowels in the bottom tier to keep the cake from squishing!  Thankfully, the squishing was kept to a minimum by keeping the cake refrigerated, as I pipe a border of buttercream to contain the filling.
It's a Decadent Chocolate cake with Strawberry-Blueberry filling - YUM!  The Ariel figurine is actually a candle I picked up at a party supply store.  Too cute!  The underwater effect was made by mixing green and blue frosting and layering it side by side in the piping bag, then squeezing it on thick and smoothing in only one direction with the spatula.  I was pleased with how it came out.  I was going for pink sea anemones with the flowers but I didn't want to detract from the figurine, so I kept them very small.  The seaweed was done with swirly green frosting (just frosting with the green not mixed completely in) and a leaf tip, I think #67.  I took two pictures only of this cake...I know, bad foresight!  One has the flash off and one has the flash on...I think I'm going to put both in here.
Why?  Well, just because I can!  :)
It was a fun little cake and the birthday girl was so pleased!

Friday, July 9, 2010

Happy Un-Birthday to Aquarius!

This cake, while quite small, is just TOO CUTE!  I found it on SugarMamaTreats.com and had to try out a version of it.
It's a 2 layer, 6" Decadent Chocolate cake with vanilla butercream filling and frosting with fondant and gumpaste decor.  The "water" is fondant, and the Aquarius symbol and jar are gumpaste.  I started this cake by making the gumpaste structure first.  I freehand drew what I wanted and cut it out, let it dry, then painted it using color gel and vodka.  I use vodka instead of water because it both leaves a cleaner line, and dries quickly and completely.
Using water on gumpaste sometimes causes collapse.  Anyhow.  I achieved the shimmery gold effect by dry painting shimmer dust onto the places I wanted it and let it dry thoroughly again.  Then I baked the cakes, filled, stacked, and frosted.  I used the paper towel technique I posted about on the cake, then let it set in the fridge until it was hard.  The fondant I split into three sections and colored each one differently for the multi-colored effect.  My husband and I watched True Blood (HBO series) while I painstakingly made little snakes of fondant and curled them around upon themselves to set on the cake and the board.  I used fondant for the lettering as well.  This cake is a birthday cake for someone whose birthday it ISN'T, so it was just a super fun cake to let myself experiment with.

Saturday, June 26, 2010

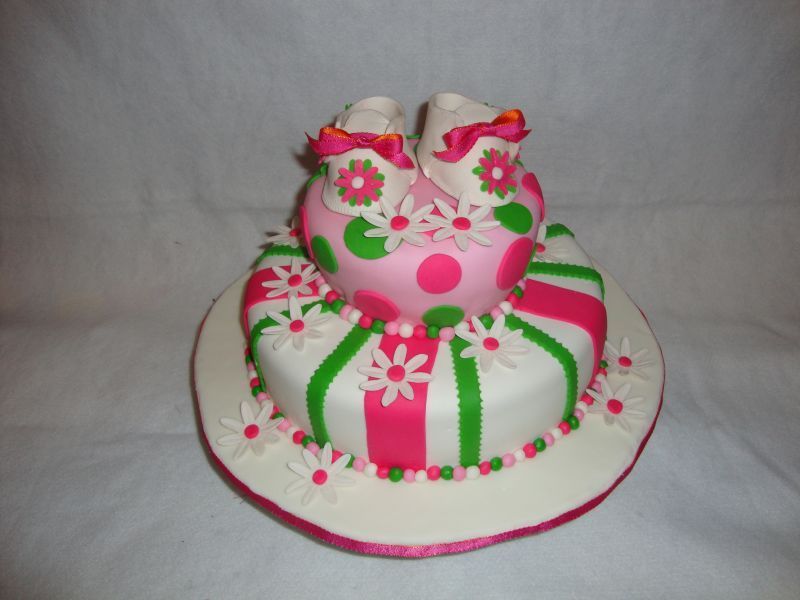
Catching Up, Part Deux - Pink and Green Daisies Cake

Welcome to the world, little one!  I had an amazing time making this uber cute baby shower cake.  I followed the booties template from CakeCentral.com to make the shoes.  Those ladies are FANTABULOUS!  They're great at answering questions and there's a wealth of cake decorating information available on there.  If you ever have any caking questions, do a quick search on there and you will find answers.  There's also a lot of tips and tricks, such as my new favorite thing - using a flower nail (you know, the ones you're supposed to use to pipe roses on?) as a baking core.  When you bake a cake that's larger than 8" round, you need something to conduct the heat to the center of the cake, otherwise you will burn the edges of the cake and the center will still be gooey.  Anyway, you just coat it with cooking spray and set it in the middle of your cake batter, and your cake cooks perfectly every time.  It's amazing, and a little sad, that I had just bought a heating core from Wilton for $15 which was more work and less efficient for the sad results.  That's my little tip, just for you guys!
You start with a cake.  This one is yellow on bottom and chocolate on top.  I covered this one with marshmallow fondant in white and pale pink.  This cake is based off a picture that was provided to me by the client.  I made the booties ahead of time out of gumpaste to give them ample time to dry, as well as the daisies.

I dyed some fondant green, and some hot pink, and started to decorate away.  The little balls take a lot of time to get all the same size, but I watched Court TV shows during Stinkie's nap and rolled away.  There are about 100 little balls on this cake.  Anyhowzit, I covered the exposed cake board with white fondant, placed the balls, and placed the booties and the daisies.
I had decorated the booties with little flowers in pink and green.  Aren't they precious?!  This is where I found that humidity and fondant do NOT mix well.  I decorated up the booties a few days in advance, and the day after I did so, I came downstairs to find that the heat had melted the flowers off!  I was able to salvage them, though, and I kept the AC on for the next few days.  Fondant does not do well in the refrigerator, so I needed the whole house cooler.  My hubby did not complain, as he's always the one telling me we need to freeze in the Summer.  He's a cool cat.  Well, I placed all the elements together and this is what I call the Pink and Green Daisies Cake!

Catching Back Up - Part 1- Strawberry Hill Races

Hey everyone!  It's been a very long time!  I've slacked off on the cake thing for a while, just taking it easy and enjoying time with my kiddo, but I have done a few and I'm ready to show them off!  This one was a special order for the Strawberry Hill Races, the Preakness Race.  I'm not a horse racing fan, so when my Aunt-In-Law called to ask about this cake, I had to scour the internet for information.  I found out that each of the races in the Triple Crown have a special flower, so I decided to go with that theme.
The Kentucky Derby's flower is the Red Rose,
Preakness is the Black Eyed Susan,
and the Belmont Stakes is the White Carnation.

  To represent the Triple Crown theme, I made, you guessed it, three crowns out of gumpaste.  I messed up NUMEROUS times getting this right.  I think I should have gone with thicker gumpaste.  Then I needed the crowns to be, well, gold.  I tried a variety of things, and nothing worked very well until I used a lot of gold shimmer dust on top of yellow crowns.  Anyhoo, I made the flowers, baked up the cake (this cake is yellow and chocolate cakes.  Instead of one layer being yellow and one being chocolate, stacked on one another, I cut each cake in half and made the left side the chocolate cake and the right side the yellow cake.  The cakes on top were chocolate) and frosted it with buttercream.  I piped the letters and voila, there was a cake!

Saturday, May 1, 2010

My First Wedding Cake!

My Aunt-in-Law wanted me to do a wedding cake for a portfolio she's helping me put together, so I needed to do a wedding cake...FAST!  I posted on Craigslist in the free section that I'd make a wedding cake at cost (ended up being $65 delivered and set up).  I received quite a few responses, but many of them were for things like baby showers, or birthdays, or things of that nature.  I really wanted to do a WEDDING cake so I could get that kind of experience.  After reading through a few responses, I got an email from a couple getting married on the 24th (of April) that had not ordered a cake yet.  We met up, had some cupcakes, and talked about what they wanted.  The chose a calla lily and roses cake.  Their colors were candy apple red and white, the lilies white and the roses red.  This woman had a seriously beautiful dress picked out!  They were just a very sweet couple and I enjoyed making the cake for this special day.  The stakes were high, so I was a little stressed and it seemed that everything that could go wrong with the fondant, did.  It wasn't stretchy, then it was too humid, then there were little sugar clumps in it, then it tore, etc etc etc.  But I'm getting ahead of myself...
I made the calla lilies by starting with the pistils.  I cut wire the length of the pistil and stem, then rolled out thin, long cones of yellow gumpaste and shoved them on the wire.  I set those in that florists' foam to dry completely overnight.
The next day I cut out about 30 hearts out of white gumpaste and wrapped them around inverted sno-cone cups, flipped the edges, and let them dry for two days.  They were difficult to take off and I broke a few of them.  The gumpaste dried onto the cups themselves.  Next time I will make sure I rotate them a few times during the drying process.
Then I took the petals off the cups, put on a dab of "glue" (gumpaste dissolved in water), and stuck the wire through the hole at the bottom of the petal so the pistil was properly placed.  I then hung them up, upside down, for three days (just to be sure they were dry).  The roses were fairly easy, but time consuming.
I found a tutorial on YouTube that was helpful.  I placed the rosettes on precut wires and stuck them in the foam to dry, then the next day I cut out the green leafy bud stuff that goes on the bottom (I'm too lazy right now to look up the term, so I hope you know what I mean!)  I let those dry.  Flowers were pretty much done.
The fondant was difficult for some reason.  Maybe it's because it's all white and there's no room for error, I don't know.  But it was a PAIN!  I finally got it all stacked and placed the red ribbon around the tiers.
I got some florists' tape and bound the lilies together in a pleasing fashion, bound the rosettes with them, and placed them on the cake, holding them into the cake with wires inserted into the cake itself.  It came out surprisingly sturdy.
The couple had dropped off a cake topper, so I put two rosettes in it to tie the cake into it and placed it.  I wasn't too sure I liked the topper, so I took a picture with just two lilies and two rosettes on top as well.  I did use the topper for the wedding, but I'm putting both pictures on here.  I'm not sure why the picture of the cake with the topper is coming out funky, and I wish it wouldn't do that, but I'm too pooped out right now to figure it out.  Please forgive me!

All in all, it was a fun cake, but I think I'll stick to birthdays and fun stuff for now.  I just love to giggle when I'm making a cake, it's like an extra ingredient.  I know, I know, wedding cakes are where the big bucks are, but perhaps I'm just a silly little doe...I'm okay with that!

Monday, April 12, 2010

Pop Up Birthday

One of my favorite clients called me on Monday or Tuesday and asked if I could make her a cake for Saturday for her boss' Fathers' 70th Birthday.  I didn't have much going on that week so I told her, "of course!"  She emailed me a picture of what she wanted and I got started on Friday evening, baking the yellow cake.  I tried a new recipe that looked pretty good.  I really liked the texture of this cake.  It had structure but still had a great crumb.  The original recipe called for shortening as the fat but I substituted butter for half the fat.  I also read something that said the fat and sugar should be SUPER creamed, so I stuck it in the KitchenAid for about 7 minutes (much longer than I normally cream the sugar).  I think that will be my thing to do from now on, as I was really pleased with this cake.

It's one 10" round (one layer only) topped with the numbers cut out of yellow cake and covered in vanilla buttercream frosting.  I did not level the top of the round because the inspiration photo kept it.  I think I much prefer the flat top, as it makes decorating evenly much easier (you can see where you're thick or thin in the icing department much more easily).  I froze an 8" round for carving, then scaled and carved the numbers.  After I crumbcoated the cakes, I smoothed the top only of the 10" cake and the zero.  I used tip number...well gosh it's the large leaf tip, I don't remember the number!  74?  Something like that.  Anyway, I used that tip to put on the vertical lines around the sides of the 10" round.  I then decorated the numbers (except the edging and flowers) with tip #16 (medium star tip), placed them on the cake (CAREFULLY!) and piped the swirl edge border around them and at the top and bottom of the round.  After spaceing the letters and marking the placement on the cake with a toothpick, I piped the letters in black.  I also used that color for the lines on the numbers.
The flowers I made out of rolled "buttercream".  It's pretty much just shortening and powdered sugar, and I happened to already have some on hand.  I used my floral cutters to cut out the shapes and rolled them gently larger, then placed and painted on the centers with food gel coloring, thinned slightly with vodka.
I did all the decorating on Saturday morning while my wonderful hubby was out with E.  I wanted this cake to be as fresh as possible!  They came to get it at around 1pm and they loved it!  I always enjoy people getting a kick out of what I do.
Coming up next I am going to make a wedding cake.  I'm going to post on Craigslist in the free section and see if there's anyone out there who wants a big ol' beautiful cake before the end of the month, only having to pay for the ingredients.  I hope someone bites, as I need to get a wedding cake under my belt and I am hoping to advertise with A. Chris' wedding photography business and I need a wedding cake picture for that!  Wish me luck!

Sunday, March 21, 2010

My Busy Weekend, Part 1

I'm still recovering from this weekend.  I had three cakes due, one on Friday, one on Saturday, and one due today (Sunday).  I'm not sure even how to start describing it all, so I guess I'll just dig in!
  I had a Striped Kitty Cat Cake due on Friday.  It's yellow cake with chocolate filling and crumbcoat, covered with vanilla buttercream applied with the grass tip to look like fur.  The inspiration photo was pretty boring and the Client pretty much gave me free reign with design, which was nice.  Two of the cakes this weekend were for her.  She has twins that are turning 8, and she was inspired by the figure 8 shape in the two cakes she picked out.  I decided to do a tye-dyed fondant cake board to add flair.  Baking and layering was very simple, and this was a pretty straightforward cake.  It did take me a while to stick the "hair" on (not to mention my carpal tunnel was going nuts on me by the end!) but it was a very relaxing activity.  I did end up putting green cat eyes on it after I took the picture, but forgot to take another afterward, so this is what I have!  As I was looking at the inspiration picture vs. the picture of my cake after she left, I realized I didn't add whiskers!  I hope nobody really noticed...well I guess I just called myself out on it anyway!
The next cake was due on Saturday.  There is such a long and drawn out story to this cake, so I'll condense it as much as possible.  The Clients were a very sweet couple and they wanted the Bucket of Bud Light cake.  It looked pretty straightforward so I went to work.  Everything went wrong that could!
During our consultation, I told them I'd use rice krispie treats covered in chocolate for the bottles...then I saw something online that I really wanted to try and I went out and bought this paintable latex molding compound and spent two days making a mold out of a beer bottle and letting it dry.
Then I poured super hot sugar into the mold and these wonderful bottles came out!  I was so excited, so I wrote the client and asked if she wanted the sugar bottles...good thing I did, because she was pretty excited about the rice krispie treat/chocolate combo!  I do have to admit, the RKT bottles were much more tasty!  So I set about making the bottles by making a 1/3 recipe of regular RKT and molding it to look like a very skinny bottle (to allow for the extra layers of chocolate to be painted on top).  Each bottle took 1/3 recipe of RKT.  The secret to making them hold their form is to pack them very tightly!
Then I coated each one with milk chocolate, two layers, by brushing it on.  Mmmmmmm.  The labels on the bottles are painted rolled buttercream.  The labels on the top were SO tiny, even my super small brush was too big to use very easily!  I did multiple labels trying to get them better...with no avail.  Instead of freaking out, I just went with the best I could do.  I overshot my abilities on this one, I think!
When the time came to stack the tiers (3 tiers of 2-layer chocolate cake with strawberry filling and vanilla buttercream frosting) I realized I had drastically underestimated the sheer weight and top-heaviness of the cake.  I tried setting the bottles in the top and the whole top tier broke into little pieces.  And I realized that the party was in Petersburg and there would be a stop in-between...the cake needed strength!  So that night I stayed up until 2am (usual bedtime on the weekends?  10 LOL) baking more cakes and re-stacking using 1/4" dowels hammered through the reinforced 2-layer foam boards (replaced the cardboard I had used before) and into the new 4-layer (up from 2) foam cake board at the bottom.  I measured, cut, and sharpened the dowels and actually used a HAMMER to push them through all the layers.  Then I made a pilot hole in the the bottles by pushing a dowel through the bottom center of all the bottles and placed those on four of the five 1/4" dowels.  The top tier broke into pieces AGAIN.  The picture is right before things got really ugly.  I realized the bottles had to set very lightly into the cake, not set in as was described in the tutorials I'd seen.  At this point I was going nuts, so I boiled some sugar and corn syrup to the hard crack stage and poured it into the cracks.  MISTAKE!  lol I am so lucky I didn't ruin the bottom two tiers.  I was so tired at this point that I put it in the fridge and went to bed.  The next morning I woke up at 7am and started baking again.  I made the label for the bucket out of regular fondant and coloring gel and placed it.
The ice is 1/2c sugar and 1/2c corn syrup melted down and boiled until just before it turns yellow.  I crinkled up a piece of nonstick tin foil (nonstick part is CRUCIAL) and made little ice cube trays of sorts out of it. Then I poured the hot hot sugar into the "mold" I had made and let them cool, then popped them out and set them on the cake.  Voila, ice in the bucket.  And you know what?  They tasted like cotton candy to me! 
The cake was done.  Gosh, that was the condensed version, and I'm pooped out!  I wish I was more proud of it than I am, you know?  I spent SO much time and energy on it.  At least it tasted good!  I did get an email from the Clients today that told me that everyone LOVED the cake and it was SOOOO good, so that makes me feel really great...but I really wish I could have knocked this one out of the park for these people.  But, as a good friend of mine told me about this situation, we have to have bad experiences in order to appreciate the good ones.  She is so smart! :)
I will post later today or tomorrow about the Race Track Cake.  The Client is bringing little matchbox cars for the top, and I want a picture of it all finished!

Sunday, February 28, 2010

Flower Power!

  Another week, and another cake!  After last week, my housework got WAY behind, and I was sort of looking forward to just chilling out and cleaning the house...okay.  Maybe not looking forward to cleaning the house, but you get the picture.  Then I got an email from a lady asking about a rush job for another Sweet 16 cake!  I love these kind of things.  You have people that have almost given up hope on getting the cake they want.  You can almost feel the resignation that they will end up either paying $600 or just going to Walmart for their cake through the internet.  At any rate, They sent me a few pictures, and I gladly accepted the challenge!
  I had a heck of a time with the fondant.  The first two tiers I covered I messed up on.  They just dried out too quickly.  In order to re-do them, I had to make more fondant and wait 8 hours for the batch to cure.  ARGH!  But I eventually got it and covered and stacked the tiers.  Blank slate.  White cake.
I rolled out a black fondant ribbon 1.5" wide and wound it around the bottom tier.  Then I started putting on the vines.  It was relaxing work, but definitely something different.  After putting on the vines, I placed the ribbons around the cake and secured them at the back.  Since they are satin, I couldn't use water or gumpaste glue under them.  I secured one end, wrapped the cake, and secured the other end with a dab of the glue.  This left an ugly little mess at the back of the cake.  Probably not noticeable to anyone but me, but gosh I didn't want to leave it there.  Anyhoos.  I cut and placed the flowers.  I had moulded the numbers for the top of the cake on Monday night, the night the clients came over, so they had ample time to dry.  They had craft sticks pushed up into them before they dried, so they were pretty secure.  I wound a few vines around them and attached flowers.  Then I covered the cake board with black fondant and placed the bottom (orange) ribbon.  I made a template for the name on the board, then scrapped that.
Block lettering didn't seem to fit the vibe of this cake, so I rolled out another long snake of fondant and wrote her name in cursive.  For the tittle, I made a little tye dye fondant using all the colors I used on the cake and cut out a little flower.  It was uber cute, I think!
  I then turned my attention to the back of the cake.  It was very plain.  The birthday girl had told me she didn't mind if it was just plain, but I really wanted to spruce it up and I had extra fondant, so I started playing with it.  I cut out a massive amount of flowers and went to work sprucing it up!
I love how the back turned out.  It reminds me of the back of a wedding dress, you know the ones that have the buttons going all the way down the middle of the back and down the skirt?  Anyway.  I had a good time!
Then when the Mamma and Daughter came to get the cake, they LOVED it and the girl gave me a wonderful letter telling me how pleased she was and how thankful she was.  It truly made my week!  My husband was so happy for me, too.  That is just really thoughtful for a 16 year old, you know what I mean?
Well, this week is over and I made another cake for a family member, but we ended up not getting together, so I'm probably going to give this cake away on Craigslist tonight.  It's kind of a bummer but no real biggie.  It was a fun little cake and I really enjoyed doing buttercream grass on it.
  With the leftover cake from the soccer cake, I experimented for the first time with cake balls.  What you do it crumble up cake, mix it with buttercream frosting, and ball it up on the end of a stick.  Then you freeze it nice and hard.  Then you take milk chocolate and melt it on a double boiler, add a teaspoon of shortening, and stir it up.  Then you swirl the frozen cake balls into the chocolate until they are nice and covered, then you put them in the fridge, then...you eat them!  I'm really looking forward to making these more often.
What a good use of that extra cake you cut off the top of the domed cakes and the extra little bit of buttercream you're invariably left with.
  I'm contemplating using ganache to cover the next cake.  I'll keep you posted.

Saturday, February 20, 2010

Wu-Tang parties with SpongeBob

 This week I had two cakes on my agenda. There was a SpongeBob smashcake for a little boy's 1st birthday and a Sweet 16 cake for a big party!  SpongeBob first, because I'm just aching to write about the Wu-Tang  cake and it's such sweet expectation!
  Dean is turning 1!  Grandma wanted a special cake just for him.  It's nothing incredibly outlandish, but it was a fun little cake.  It measures 7"x5".  I never watch SpongeBob so I had to go completely off of pictures, but I think it came out well.  The original cake we decided on was out of fondant, but of course, the one year old doesn't want fondant!  So this is me trying to make buttercream look more fondant-y.
The Wu-Tang cake was a MONSTER cake!  It weighed about 50 pounds.  The tiers are 12", 10", 8", and 6".  It took over 15 hours to decorate this cake (without baking times included).  It is all yellow cake with two layers of buttercream filling and two layers of strawberry filling.  There were five pictures we took inspiration from when the clients came to order.  From those five we came up with this concept drawing that became the Wu-Tang cake.  Why Wu-Tang?  Do you see the tops of the Wu-Tang symbol?
Well, I do!  It was truly wonderful working on this cake and I was so happy to see it's completion.  It feels like I haven't done laundry or answered emails since Tuesday!  On this cake I tried out a new technique of covering the cake board with fondant.  It was fairly simple and I really enjoy doing something new.  The stars were difficult to figure out how to put on.  I made the stars out of gumpaste and pressed two together to sandwich the wire, then painted them and let them dry.  I was going for a more "puffy" kind of look to the positioning of the wires, but the gumpaste proved to be just a little too heavy for the gauge of wire I selected.  I think it looks pretty good anyway, though!  The clients loved it, and that was the best part!
Well, my back aches and I'm ready to cuddle on the couch with my hubby for a while.  Long days and pleasant nights, everyone!