So I had a super fun little cake this week. It is based on two pictures. One was a belly cake, the other was a one-tier round. Each of these pictures featured only one baby, but this cake is for a baby shower for TWINS!
I have been taking some time to perfect my recipe amounts. I found the right amount of batter to make my cakes as tall as possible with as little waste as possible. Before, I have been cutting the tops flat for a nice level surface. For this cake I took the two 10" chocolate and two 6" yellow cakes right out of the oven and flipped them so the dome was sitting on a platter - face side down, I guess you would say. Doing this made a completely level surface on both top and bottom without wasting any cake. This is good for two reasons: 1. The cake has maximum volume with no wasted ingredients. 2. I'm not eating the leftover tops of cakes anymore. I'm sure my hubster will be upset with no leftovers around, but c'est la vie, non? When I make cakes, I usually fill the pan about 2/3 full. Each recipe has a different rise, so each new recipe has to be tested to make sure you're getting the full potential height but not overfilling to the point of overflow during baking.
Well, at any rate, the cakes were baked and the strawberry filling was made. I made the cake board by putting together three stiff foam poster boards and cutting out a 12.5" diameter circle. I use a razor blade for this. I have found that this kind of poster board is great for cake boards. The technique I use for making the cake board has evolved over time. I recently picked up a compass, which has made making perfect circles SO much easier. It was 2 bucks at Walmart, and it was the best 2 bucks I've ever spent!
So I filled the cake, let it settle (filled cakes are going to settle a bit, so it's best to wait a while after putting on the 2nd layer to finish the tier off. Otherwise the filling will make a bump in your cake. I just learned this) and rolled out my fondant on a counter lightly coated with shortening. Wilton has a fondant coverage chart that deals with weights, and while it allows for a little more than I require usually to cover a cake, it makes sure that I have enough. This fondant was white, so no problems coloring it. I placed and smoothed the bottom tier and put cut wooden dowels into the bottom tier for the top to sit upon. I did the 6" top tier next in much the same way. After I finished covering it with fondant, I placed the top tier onto the bottom tier's dowel system, then I cut a dowel large enough to go through the entire cake, made a point on one end so it could go through the board under the 6", and put it through to give more strength to the overall structure. I covered the remaining cake board with fondant, then I made ribbons out of green fondant and placed them.
Making the babies and the peas with the pod was easier than I thought it would be. It's like playing with playdough! The vines were fun to make and to place. I used my edible gumpaste glue to put them and the dots on the cake, created some leaves, and VOILA, there it is. I had an excellent time!
Showing posts with label tips. Show all posts
Friday, July 23, 2010
Peas in a Pod Cake
Labels:
babies,
baby shower,
fondant,
green,
peas,
strawberry filling,
tips,
twins,
white
Saturday, July 17, 2010
Another Princess Castle Cake
This week went by so quickly. My son is talking more and more each day and while I have been taking moments to step outside our everyday routine to enjoy the process, it feels like everything is either speeding or crawling by. Does that make any sense? No? Well, I guess I should just stick to the caking of it all, then. :)
I had made a castle cake before for Dollbaby when she turned 4. She just loved it. This cake was for a first birthday party! I did make a 3D crown smash cake, but dang it I forgot to take a picture of it! Ah well. Life goes on. ANYway. Today I tried out the hot knife technique. Since it is ridiculously humid here (and hot), my buttercream hasn't been crusting the way I'm used to in order to do the VIVA paper towel smoothing I do. Thus, I reverted to the hot knife trick. You just get the frosting on the cake, then dip the spatula in HOT water and smooth. It's very fast but it takes some getting used to and some practice. I used that technique on the crown smash, so you don't even get to see the results! I'm sorry! Well, anyway, the castle cake was pretty much a repeat of the first time I made it, with a few small (or large, depending on how you look at them) exceptions. This time I offset the 6" 2nd tier to the back so I could use the steeple roof. I baked the cakes taller so I could use the provided door (last time my tier was too short and the door was too tall to fit properly, so I just frosted a door on). I used fondant to cover the turret roofs, which proved much easier for me to do and much easier to transport for the client.
Last time I did this cake, I had such a hard time getting the towers to stay in place. Last night, I was about to lose my cool when the new plans failed (using gumpaste to hold in place, using melted chocolate to hold them in place. These just didn't stand up to it). My INCREDIBLY SMART hubster came up with the brilliant idea to drill holes in the bottom of the towers, just large enough for the dowels I was using to fit through. IT WORKED! He is SO great! He drilled every last tower to make my life easier. I lurve him.
I worked as I went, placing a tower, decorating around it, then placing another. I covered the cake board with fondant this time, which I like the effect of. I used florist's tape around the cake board border to cover the raw edges. The leaves were made using tip #67 and a bit darker green than the accent. The bottom of the cake is 2-10" layers of yellow cake and the top is 2-6" layers of chocolate. SO GOOD! One problem I had was with the placing of the top towers. They should have been placed farther apart to take into account the width of the tops.
I think next time I will try out another method of baking and preparing the cakes that I found online and review it for you. It is a way of baking so you don't have to remove cake from the top of the layers to make it level. I'll let you know.
I very much enjoyed making this cake after my husband helped me out so dramatically. THANK YOU SWEETHEART!
I had made a castle cake before for Dollbaby when she turned 4. She just loved it. This cake was for a first birthday party! I did make a 3D crown smash cake, but dang it I forgot to take a picture of it! Ah well. Life goes on. ANYway. Today I tried out the hot knife technique. Since it is ridiculously humid here (and hot), my buttercream hasn't been crusting the way I'm used to in order to do the VIVA paper towel smoothing I do. Thus, I reverted to the hot knife trick. You just get the frosting on the cake, then dip the spatula in HOT water and smooth. It's very fast but it takes some getting used to and some practice. I used that technique on the crown smash, so you don't even get to see the results! I'm sorry! Well, anyway, the castle cake was pretty much a repeat of the first time I made it, with a few small (or large, depending on how you look at them) exceptions. This time I offset the 6" 2nd tier to the back so I could use the steeple roof. I baked the cakes taller so I could use the provided door (last time my tier was too short and the door was too tall to fit properly, so I just frosted a door on). I used fondant to cover the turret roofs, which proved much easier for me to do and much easier to transport for the client.
Last time I did this cake, I had such a hard time getting the towers to stay in place. Last night, I was about to lose my cool when the new plans failed (using gumpaste to hold in place, using melted chocolate to hold them in place. These just didn't stand up to it). My INCREDIBLY SMART hubster came up with the brilliant idea to drill holes in the bottom of the towers, just large enough for the dowels I was using to fit through. IT WORKED! He is SO great! He drilled every last tower to make my life easier. I lurve him.
I think next time I will try out another method of baking and preparing the cakes that I found online and review it for you. It is a way of baking so you don't have to remove cake from the top of the layers to make it level. I'll let you know.
I very much enjoyed making this cake after my husband helped me out so dramatically. THANK YOU SWEETHEART!
Saturday, June 26, 2010
Catching Up, Part Deux - Pink and Green Daisies Cake
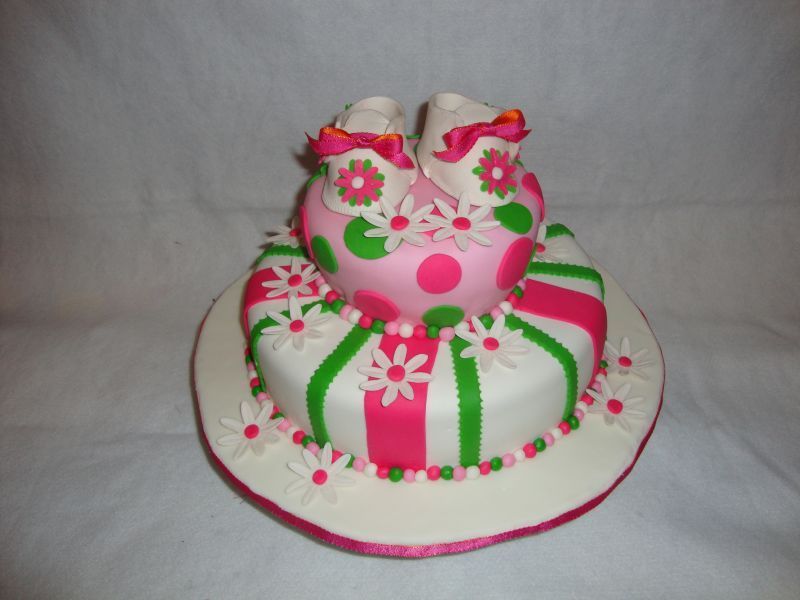
Welcome to the world, little one! I had an amazing time making this uber cute baby shower cake. I followed the booties template from CakeCentral.com to make the shoes. Those ladies are FANTABULOUS! They're great at answering questions and there's a wealth of cake decorating information available on there. If you ever have any caking questions, do a quick search on there and you will find answers. There's also a lot of tips and tricks, such as my new favorite thing - using a flower nail (you know, the ones you're supposed to use to pipe roses on?) as a baking core. When you bake a cake that's larger than 8" round, you need something to conduct the heat to the center of the cake, otherwise you will burn the edges of the cake and the center will still be gooey. Anyway, you just coat it with cooking spray and set it in the middle of your cake batter, and your cake cooks perfectly every time. It's amazing, and a little sad, that I had just bought a heating core from Wilton for $15 which was more work and less efficient for the sad results. That's my little tip, just for you guys!
You start with a cake. This one is yellow on bottom and chocolate on top. I covered this one with marshmallow fondant in white and pale pink. This cake is based off a picture that was provided to me by the client. I made the booties ahead of time out of gumpaste to give them ample time to dry, as well as the daisies.
I dyed some fondant green, and some hot pink, and started to decorate away. The little balls take a lot of time to get all the same size, but I watched Court TV shows during Stinkie's nap and rolled away. There are about 100 little balls on this cake. Anyhowzit, I covered the exposed cake board with white fondant, placed the balls, and placed the booties and the daisies.
I had decorated the booties with little flowers in pink and green. Aren't they precious?! This is where I found that humidity and fondant do NOT mix well. I decorated up the booties a few days in advance, and the day after I did so, I came downstairs to find that the heat had melted the flowers off! I was able to salvage them, though, and I kept the AC on for the next few days. Fondant does not do well in the refrigerator, so I needed the whole house cooler. My hubby did not complain, as he's always the one telling me we need to freeze in the Summer. He's a cool cat. Well, I placed all the elements together and this is what I call the Pink and Green Daisies Cake!
You start with a cake. This one is yellow on bottom and chocolate on top. I covered this one with marshmallow fondant in white and pale pink. This cake is based off a picture that was provided to me by the client. I made the booties ahead of time out of gumpaste to give them ample time to dry, as well as the daisies.
I dyed some fondant green, and some hot pink, and started to decorate away. The little balls take a lot of time to get all the same size, but I watched Court TV shows during Stinkie's nap and rolled away. There are about 100 little balls on this cake. Anyhowzit, I covered the exposed cake board with white fondant, placed the balls, and placed the booties and the daisies.
I had decorated the booties with little flowers in pink and green. Aren't they precious?! This is where I found that humidity and fondant do NOT mix well. I decorated up the booties a few days in advance, and the day after I did so, I came downstairs to find that the heat had melted the flowers off! I was able to salvage them, though, and I kept the AC on for the next few days. Fondant does not do well in the refrigerator, so I needed the whole house cooler. My hubby did not complain, as he's always the one telling me we need to freeze in the Summer. He's a cool cat. Well, I placed all the elements together and this is what I call the Pink and Green Daisies Cake!
Saturday, January 30, 2010
Spiderman Cake and Cookies!
So I decided to try something new, since I do happen to love every little kind of cooking and baking. A client asked if I could make a Spiderman cake, and of course I agreed. Then she asked if I could make cookies for the kiddos, and of course I couldn't refuse! I had found a super yummy sugar cookie with hard icing on Zaar for Christmas, so I decided to use that. It's a great recipe by a woman dubbed "Kittencal". The client dropped off the monies and things, and gave me a paper with a picture of what she was wanting, and I got to work. But more on that later.
The cake was a Spiderman cake, as I said before. I decided to try making it 13" by 13"...a size I don't own in bakeware! So I made 9x13 pans, cut and pieced. By the time I got the shape right, they were only 11" around anyway...ARGH! I have 12" cake pans and could have not had to waste the cake! I ended up making 3 boxes of mix, just to realize that they wouldn't have enough cake for the party! AH! So I made another 10" round cake and put on another layer (that's 3 layers for anyone who's counting) and that should make it much more useful.
I was really pleased with the buttercream I made. It just seemed wonderfully consistent and creamy. Each batch comes out a little different, even though there's the same ingredients, because of how much you let the mixer work on it. Anyway. I was pleased.
Another thing I liked was how the red turned out. I have had many problems getting a good red frosting color using the Wilton No-Taste Red...it always comes out pink, no matter what I do! I searched and scoured the interwebz for the answer, and it was...start using the pink coloring, add a little tiny bit of yellow, THEN add the red. I can't believe it took me this long to just buckle down and research it! I had been using a TON of the coloring gel and not even getting close. Now, I can just use two or three big glops on a craft stick and voila!
I've also decided that I love to color frosting yellow. It's just beautiful.
A few days ago, I got three cake orders in one day. That's the first time that's happened to me! As far as this week is concerned, as it stood on Wednesday, I had the Spiderman Cake on Friday, a baby shower cake on Saturday, and my Best Girl's birthday cake on Monday! Whew! Talk about full! We have snow in the forecast, so the Spiderman cake may be on hold due to weather. The baby shower has been postponed until next weekend (breathing a sigh of relief. I would have gotten it done just fine, but now I can spend more time on the decor, since it's got moulded flowers and stuff on it). I am super excited for Doll Baby's cake. It's going to knock her socks off!
So, back to the cookies. I found myself very disappointed in them. They are SO messy! I decided to hold off on doing them so they would be as fresh as possible for the kiddos. I tried to bake them on popsicle sticks, but the dough just got too warm when I tried to insert the sticks, it mushed the shape out of proportion, and they had to be pretty thick which changed the cookie texture. I tried securing the sticks with royal icing, but it just wasn't strong enough to hold up to a kid eating the cookie. Does anyone have any tips or pointers to do this easily?
I did the red background on Thursday night (the night I baked them) and planned on doing the final decorating on Friday, the pickup date, during nap time. If I finished them at 3pm, they would have about three or four hours to harden completely before I had to pack them up. The client emailed to ask when she could get them (the earliest) so I said 3 and went to work, working FURIOUSLY FAST so they would have time to dry. I didn't wait for a confirmation email...D'oh! She didn't end up getting off work and coming over until after 7, so I could have taken my time and made these look better. She liked them, though. I don't know if I'll do cookies from now on because they are SO labor intensive and I'm not great at mass amounts of freehand (the nerve damage in my hands starts to act up), but they were fun anyway! There were 31...no, wait, there were 32. I gave one to a little boy I sit for to share with Stinkie. They loved them.
Well, it snowed today and it's supposed to snow until tomorrow. It's beautiful, but it makes me concerned about having all the necessary ingredients for Doll Baby's cake. I'm not sure if her party will continue as scheduled (Monday morning), but I'm going to make it anyway so she can have a beautiful cake like I promised her.
Long days and pleasant nights, everyone!
The cake was a Spiderman cake, as I said before. I decided to try making it 13" by 13"...a size I don't own in bakeware! So I made 9x13 pans, cut and pieced. By the time I got the shape right, they were only 11" around anyway...ARGH! I have 12" cake pans and could have not had to waste the cake! I ended up making 3 boxes of mix, just to realize that they wouldn't have enough cake for the party! AH! So I made another 10" round cake and put on another layer (that's 3 layers for anyone who's counting) and that should make it much more useful.
I was really pleased with the buttercream I made. It just seemed wonderfully consistent and creamy. Each batch comes out a little different, even though there's the same ingredients, because of how much you let the mixer work on it. Anyway. I was pleased.
Another thing I liked was how the red turned out. I have had many problems getting a good red frosting color using the Wilton No-Taste Red...it always comes out pink, no matter what I do! I searched and scoured the interwebz for the answer, and it was...start using the pink coloring, add a little tiny bit of yellow, THEN add the red. I can't believe it took me this long to just buckle down and research it! I had been using a TON of the coloring gel and not even getting close. Now, I can just use two or three big glops on a craft stick and voila!
I've also decided that I love to color frosting yellow. It's just beautiful.
A few days ago, I got three cake orders in one day. That's the first time that's happened to me! As far as this week is concerned, as it stood on Wednesday, I had the Spiderman Cake on Friday, a baby shower cake on Saturday, and my Best Girl's birthday cake on Monday! Whew! Talk about full! We have snow in the forecast, so the Spiderman cake may be on hold due to weather. The baby shower has been postponed until next weekend (breathing a sigh of relief. I would have gotten it done just fine, but now I can spend more time on the decor, since it's got moulded flowers and stuff on it). I am super excited for Doll Baby's cake. It's going to knock her socks off!
So, back to the cookies. I found myself very disappointed in them. They are SO messy! I decided to hold off on doing them so they would be as fresh as possible for the kiddos. I tried to bake them on popsicle sticks, but the dough just got too warm when I tried to insert the sticks, it mushed the shape out of proportion, and they had to be pretty thick which changed the cookie texture. I tried securing the sticks with royal icing, but it just wasn't strong enough to hold up to a kid eating the cookie. Does anyone have any tips or pointers to do this easily?
I did the red background on Thursday night (the night I baked them) and planned on doing the final decorating on Friday, the pickup date, during nap time. If I finished them at 3pm, they would have about three or four hours to harden completely before I had to pack them up. The client emailed to ask when she could get them (the earliest) so I said 3 and went to work, working FURIOUSLY FAST so they would have time to dry. I didn't wait for a confirmation email...D'oh! She didn't end up getting off work and coming over until after 7, so I could have taken my time and made these look better. She liked them, though. I don't know if I'll do cookies from now on because they are SO labor intensive and I'm not great at mass amounts of freehand (the nerve damage in my hands starts to act up), but they were fun anyway! There were 31...no, wait, there were 32. I gave one to a little boy I sit for to share with Stinkie. They loved them.
Well, it snowed today and it's supposed to snow until tomorrow. It's beautiful, but it makes me concerned about having all the necessary ingredients for Doll Baby's cake. I'm not sure if her party will continue as scheduled (Monday morning), but I'm going to make it anyway so she can have a beautiful cake like I promised her.
Long days and pleasant nights, everyone!
Subscribe to:
Posts (Atom)