Showing posts with label blue. Show all posts

Friday, August 26, 2011

Thomas the Train!

Here's another cake I made for Cartwheels and Coffee.  Stinkie was dying to put the train on the cake...so I LET HIM!  He was so careful and did such a great job, don't you think?
The cake is Chocolate Sour Cream cake, a new recipe that I am in love with that bakes up like a dream and tastes lovely.  The filling and frosting are vanilla buttercream, with fondant accents.  Everything is edible except the Happy Birthday sign and the Thomas, which I got on sale at Walmart for $3!  It's not the regular Thomas train for the tracks, though.  It's...wait for it....MEGA BLOCKS!  It comes apart into 5 pieces.  Stinkie loved it but I wouldn't let him play with it.  I hope James has the best birthday ever!  The party is tomorrow morning.
  This was my first time doing a spiral carving on a cake, so it was a little nerve-wracking.  Thankfully, I had to carve out enough cake so there was a lot of "leftovers" to snack on!  The technique ended up being pretty simple and I didn't have too stressful a time with it.
The hardest part of this, believe it or not, was the mountains.  The funnest part was the clouds.
HAPPY BIRTHDAY, JAMES!

Wednesday, June 29, 2011

Happy Father's Day!

This was a quick and fun little cake to do to show a certain special someone how loved he is!  I saw a cake with generic handprints on it while browsing Father's Day cakes on Bing images.  It's just a one layer yellow cake with vanilla buttercream frosting.  The decorations?  Actual handprints from his 3 of his 4 kids and wife (the youngest was sleeping when they came by).  I frosted the cake and let it crust, then pressed their hands into the finished frosting layer about 2cm deep.  Then I painted the buttercream indents with colors they chose beforehand.  It was fun and easy.  What a cute cake!  I didn't have a chance to photograph it, but I got a few pictures they posted for me on Facebook.
Happy Father's Day!

Congratulations, Class of 2011!


  This cake was inspired by another cake of mine from back in 2009 (maybe early 2010?)  The graduate-to-be's school colors were blue and green, and she informed me she is "In Love With Pink".  She was so cute!  She wanted yellow cake with fondant, so I got going on it and cranked out this fun, whimsical cake.

  It's been a while since I did fondant, and I realized yet again that while I don't ejnoy cooking with a microwave, they really are quite useful for warming fondant for easier rolling and for making it have more elasticity.  I think I will have to finally cave and buy one for cake use.
  My camera batteries died the second I tried to take a picture of this cake, so I was stuck with a very bad picture taken with my webcam.  Thankfully, my client agreed to send me a couple of pictures she took so I'd have something to show here.  Thank you!
  I tried to make up a decent sugar-free cake recipe for the top tier, but I fell short after two completely botched tries.  The second one wasn't as embarassing, but still pretty bad.  I did purchase a huge bag of granulated Splenda and I plan on finding something that tastes as good as my special yellow cake...it's just going to take time and patience.
  Congratulations, Class of 2011!  You Did It!

Monday, June 13, 2011

Toy Story Cake

This cake is vanilla cake with vanilla buttercream frosting and filling, fondant accents, and plastic figurines.  The Toy Story logo is fondant that I made a week in advance to let it dry and harden.
It was a fun and straight-forward cake and I really enjoyed making it.  I got to go to the birthday party at Chuck-E-Cheese's and I got to see the birthday boy's face light up like a Christmas tree when he saw the cake.
I must start remembering to carry my cards around with me.  I always forget and there were many people asking for my information.

Sunday, January 30, 2011

A Bow and a Baby Shower

This is the first time I've done two cakes for an event, and it was pretty fun coordinating them without having them be too matchy-matchy.
This was also the first time I made a large loop bow for a cake, so it was a learning experience.  I mixed some GumTex into my pretty blue fondant and got going.  I wrapped a brand new (and clean) broom handle in wax paper and set it up near my work area and rolled my fondant, then cut strips just the right size and looped them and glued them on the broomstick.  Then I set the broom out of the way for the strips to dry for a few days.  When they were fully dried, I took them off carefully and arranged them into a bow pattern, and allowed that to dry for a few days.
  The letters are the same fast-drying fondant that I used for the bow, cut to shape and dried on the curled wires.  I put small straws in around the wires in the cake for stability during transport.  When I delivered this cake, the springs (of course) were bouncing around.  This was a fun cake but also stressful at times.

The baby and blanket were fun to do.  The fondant is chocolate fondant and SOOOOO yummy!  I broke off a piece at the beginning of shaping to set aside to nibble on later!  I just LOVE chocolate marshmallow fondant.

The most challenging part of these cakes (aside from the new experience with the bow) was trying to match fondant and buttercream colors perfectly.  I think I did pretty good!  The day before delivery, I baked up the cakes and clean frosted them (the coat of buttercream) and piped the little designs, let the frosting harden in the fridge for a few minutes, and wrapped them in Saran wrap.  The next day I put the fondant toppers on and sealed them up in their special boxes.  The box for the 10" round was a whopping 13"x13"x13"!  The smaller cake is a 6" round.  Both cakes are my super awesome yellow cake with vanilla buttercream frosting and filling.

Wednesday, December 8, 2010

My First Cube/Block Cake!

This cake was a different sort of challenge that I really enjoyed.  The cake itself is 5 (5!) layers of chocolate cake with vanilla buttercream frosting and filling, with fondant accents.  I decided to go with three layers on the bottom for stability, then a cake board, then the top two layers.  The cake itself measures 8" on all sides.  That may not sound very big, but TRUST ME, it's really really big and heavy!
I decided on a color palette using the color wheel and the split contrast color chart.  The birthday was for a little girl, so I wanted some pink in there, so I went with a dark fuchsia, sky blue, and a bright lime for the base.
The picture I have here I took without the flash...the ones I took with flash came out fuzzy.  I was hurrying to get the pictures taken so we could go, as my three year old was demanding we go to Cartwheels and Coffee.   The coloring in the photo of the back of the cake is closer to the true shades.

I've notoriously had a problem getting my reds really red.  It takes me forever to finally get it.  I followed the directions by SeriousCakes to get red buttercream, but used it on the fondant instead, starting with the colors rose, golden yellow (she uses orange but I didn't have that) and the AmeriColor Super Red.  That stuff is no joke!  I dyed my hands like crazy, but in the end I did have a nice Elmo red to work with.
Other than the sheer size of this cake and the issues of making sure it measured the same on width and height, it was a pretty straightforward cake.  I am so glad to have done one of these now!

Note:  Elmo's eyes fell off when I put the cake in the car.  I nixed those eyes and re-did them (with my engine running no less!) and after I took this picture I fixed the mouth to be more...puppet-like, I guess.  I was in a hurry though so I didn't get a picture of the finished Elmo.  It's not much different anyway.
I really hope they like their cake and enjoy eating cake for days!

Sunday, October 17, 2010

Tie Dye Insides

This was a little personal cake for Stinkie's real birth day.  It was fun to make, but it did take some time.  I made my regular yellow cake to start off with, but I used two egg whites in place of one whole egg.  This cake is only 6" round, so it didn't take nearly as long as I suppose a larger cake would.  I'm thinking I might save this technique for family and friends' cakes.  Anyway, I divided the batter up into three separate bowl equally.  I added blue color to one and started pouring the cake.  One spoonful in the center of a sprayed-with-Baker's Joy 6" Wilton round cake pan.  I let it settle while I colored the yellow.  Then a spoonful of yellow directly in the center of the blue batter already in there, then I dyed the red and spooned in a little of that.  
I did have to rotate the pan (slowly!  Don't disturb the batter!) to make the batter spread evenly.  My counters are crooked :(.  Between each spoonful, I waited about 10 seconds to give the batter proper time to spread out.  Consistency of your batter is pretty important.  It must be able to spread but must not be too loose.  Finally finished, I stuck it in the oven and let it bake for about 30 minutes.  When I took it out, I was SO tickled pink!  I love the tie dye effect at the edges.  I think I might do some dragging from the center before baking next time for a more incorporated look.  Ethan of course had a special cake for his birthday party (see WordWorld cake post) but this little cake was just for his actual birth day, the day after his party.  I didn't put frosting on it, but left it as is to show off the pretty colors.  He dug into it like a boy possessed.  It was fun!
 I had been worried about the texture of the cake, as I had never substituted two whites for one egg in this recipe, but it baked up just fine (other than these little pinprick bubble looking things on the top...don't know what caused these, but it may have just been the layering of the batters gave rise to air trapped in the batter in the pan?)  I cannot wait to try this again and I am going to have the BEST time ever.  I might do zebra stripes.
I picked up a copy of Bakerella's Cake Pops book yesterday at Barnes and Noble.  It's so cool to hear her story and see all the wonderful things she's been creating.  I know I want to do some designed and decorated cake pops sometime soon...they are TOO great!

Saturday, September 25, 2010

Going Bananas and I Love It!


The cake itself is vanilla pound cake with chocolate butter filling and vanilla butter frosting.  I say butter instead of buttercream because this cake was made without hydrogenated oils per the client's request.  Many of the ingredients were organic as well.  I didn't have a recipe I could depend on for this cake, so I had to test out a bit and I wasted 3 entire 10" rounds to testing.  ACK!  Now I have it, though, for future reference.
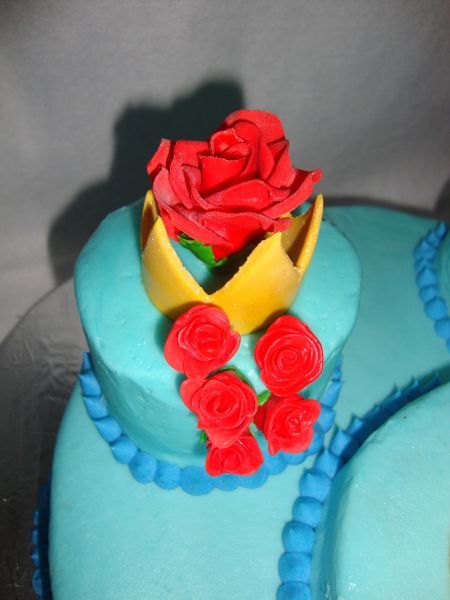
The frosting was made without shortening, and I wasn't sure how it would behave, but it came out great.  The only difference was that once it crusted, it crusted a little harder than I was used to and was not very malleable.  I loved the blue color of the background.
The decorations on this cake are MMF.  The monkey is sitting on top of an inverted cupcake.  He was very fun to put together, and is made out of chocolate MMF.  I just need to take a second here to reiterate how much I love moulding fondant.  It is super fun, like playing with playdoh.  Speaking of, when my son is around and I need to work on cakes, I let him play with playdoh while I play with fondant.  HA!
The bananas were labor intensive but also a blast.  They're little crescents, each hand shaped and painted, then piled up on top of each other.  There's something like 60 bananas on this cake.  The "peels" are my favorite.  You just take the crescent shape, slice one end into four parts lengthwise, then flatten them out, paint them, and plop them on.  Easy peasy and oh so fun.
I have been using the hot knife technique combined with the paper towel technique recently.  I first pipe in the filling, hot knife it smooth, plop the top layer on, pipe a large, very close spiral on the top layer all the way out to over the edges, hot knife that, then go around the cake sides with a #12 tip to distribute the frosting evenly, filling in any weird gaps.  Then I hot knife that ONCE or TWICE maybe around.  If you take off too much frosting, then you're going to spend hours adding more frosting.  NOT fun.  Then I let it crust, use the paper towel trick, and continue decorating.
That was a long winded paragraph.  I'm done now!  I really enjoyed making this cake and it was fun to do a different sort of monkey cake.

Friday, July 9, 2010

Happy Un-Birthday to Aquarius!

This cake, while quite small, is just TOO CUTE!  I found it on SugarMamaTreats.com and had to try out a version of it.
It's a 2 layer, 6" Decadent Chocolate cake with vanilla butercream filling and frosting with fondant and gumpaste decor.  The "water" is fondant, and the Aquarius symbol and jar are gumpaste.  I started this cake by making the gumpaste structure first.  I freehand drew what I wanted and cut it out, let it dry, then painted it using color gel and vodka.  I use vodka instead of water because it both leaves a cleaner line, and dries quickly and completely.
Using water on gumpaste sometimes causes collapse.  Anyhow.  I achieved the shimmery gold effect by dry painting shimmer dust onto the places I wanted it and let it dry thoroughly again.  Then I baked the cakes, filled, stacked, and frosted.  I used the paper towel technique I posted about on the cake, then let it set in the fridge until it was hard.  The fondant I split into three sections and colored each one differently for the multi-colored effect.  My husband and I watched True Blood (HBO series) while I painstakingly made little snakes of fondant and curled them around upon themselves to set on the cake and the board.  I used fondant for the lettering as well.  This cake is a birthday cake for someone whose birthday it ISN'T, so it was just a super fun cake to let myself experiment with.

Saturday, June 26, 2010

Catching Back Up - Part 1- Strawberry Hill Races

Hey everyone!  It's been a very long time!  I've slacked off on the cake thing for a while, just taking it easy and enjoying time with my kiddo, but I have done a few and I'm ready to show them off!  This one was a special order for the Strawberry Hill Races, the Preakness Race.  I'm not a horse racing fan, so when my Aunt-In-Law called to ask about this cake, I had to scour the internet for information.  I found out that each of the races in the Triple Crown have a special flower, so I decided to go with that theme.
The Kentucky Derby's flower is the Red Rose,
Preakness is the Black Eyed Susan,
and the Belmont Stakes is the White Carnation.

  To represent the Triple Crown theme, I made, you guessed it, three crowns out of gumpaste.  I messed up NUMEROUS times getting this right.  I think I should have gone with thicker gumpaste.  Then I needed the crowns to be, well, gold.  I tried a variety of things, and nothing worked very well until I used a lot of gold shimmer dust on top of yellow crowns.  Anyhoo, I made the flowers, baked up the cake (this cake is yellow and chocolate cakes.  Instead of one layer being yellow and one being chocolate, stacked on one another, I cut each cake in half and made the left side the chocolate cake and the right side the yellow cake.  The cakes on top were chocolate) and frosted it with buttercream.  I piped the letters and voila, there was a cake!

Saturday, May 1, 2010

Two Dino Siblings on a Cake

A good friend of mine wanted me to make a cake for her kids' birthday party.  There's a five year old boy and a three year old girl, and their birthdays are very close together.  She had SO much on her plate, getting stuff ready for the party, and I just honestly really wanted to do this cake for them (it was my birthday gift lol).  We looked at a few different inspiration photos online and picked the best one, and I went to work.
The cake itself is just chocolate cake with strawberry filling on the bottom 12" tier.  The top tier is just one 10" layer of chocolate cake.  The frosting is vanilly buttercream.  The dinos are completely made out of fondant and coloring gels.  I was a little worried that I wouldn't be able to pull off this look, but I think I nailed it!  This cake had me giddy for a whole day.
I did mess up the strawberry filling, but I salvaged it (we had no more strawberries in the house and I had no way to get to the store, so salvaged filling it is!)  I tiered the cakes and covered them with light green frosting, let it crust (read: waited 20 minutes) and smoothed it with Viva paper towels.  I had leftover fondant from the wedding cake on the 24th and that's what I used for this cake.
I wanted it to be obvious that there was an older boy dino and a younger, very girly girl dino so that her daughter would be able to tell which one was hers.  I just had a blast with this cake.  I got the shine going by smoothing quite a bit on the counter with a little shortening.  I plopped the bodies on, then the necks and heads, then the tails and paws.  I rolled some half and half (colored and white) balls for the eyes and eyelids, and painted on coloring gels for eyelashes, pupils, and mouths.
Note the cute little lipsticked girl!  The spikes on the boy dino were next.  The four largest spikes were fashioned on wires and inserted into the cake.  I did the boy spots and called that dino finished.  I then piped on the moss/grass with the grass tip so I wouldn't have to deal with going in-between the spikes of the two dinos.
The girl dino's spines were next.  They are just triangles of fondant, attached with my favorite gumpaste glue.  Then I did her spots.  Girly girl accomplished!  I glued on some claws and painted the girl's "fingernails" red, then filled in with the darker green grassy/mossy stuff.  For some reason I liked to look at it as moss, I don't know why.  I piped their names and ages on the side of the cake, ran electrical tape along the edges of the cake board (I know, tacky, but you can't tell and honestly who cares?!) to finish it off and called it a cake.  I am so pleased with how this cake came out and the kids loved it.  Stinkie ran around like crazy and started to have mini meltdowns because we were cutting into his nap by hanging out at the party, so we had to leave early, but we had the BEST time!  It is so wonderful to have friends, isn't it?

Monday, April 12, 2010

Pop Up Birthday

One of my favorite clients called me on Monday or Tuesday and asked if I could make her a cake for Saturday for her boss' Fathers' 70th Birthday.  I didn't have much going on that week so I told her, "of course!"  She emailed me a picture of what she wanted and I got started on Friday evening, baking the yellow cake.  I tried a new recipe that looked pretty good.  I really liked the texture of this cake.  It had structure but still had a great crumb.  The original recipe called for shortening as the fat but I substituted butter for half the fat.  I also read something that said the fat and sugar should be SUPER creamed, so I stuck it in the KitchenAid for about 7 minutes (much longer than I normally cream the sugar).  I think that will be my thing to do from now on, as I was really pleased with this cake.

It's one 10" round (one layer only) topped with the numbers cut out of yellow cake and covered in vanilla buttercream frosting.  I did not level the top of the round because the inspiration photo kept it.  I think I much prefer the flat top, as it makes decorating evenly much easier (you can see where you're thick or thin in the icing department much more easily).  I froze an 8" round for carving, then scaled and carved the numbers.  After I crumbcoated the cakes, I smoothed the top only of the 10" cake and the zero.  I used tip number...well gosh it's the large leaf tip, I don't remember the number!  74?  Something like that.  Anyway, I used that tip to put on the vertical lines around the sides of the 10" round.  I then decorated the numbers (except the edging and flowers) with tip #16 (medium star tip), placed them on the cake (CAREFULLY!) and piped the swirl edge border around them and at the top and bottom of the round.  After spaceing the letters and marking the placement on the cake with a toothpick, I piped the letters in black.  I also used that color for the lines on the numbers.
The flowers I made out of rolled "buttercream".  It's pretty much just shortening and powdered sugar, and I happened to already have some on hand.  I used my floral cutters to cut out the shapes and rolled them gently larger, then placed and painted on the centers with food gel coloring, thinned slightly with vodka.
I did all the decorating on Saturday morning while my wonderful hubby was out with E.  I wanted this cake to be as fresh as possible!  They came to get it at around 1pm and they loved it!  I always enjoy people getting a kick out of what I do.
Coming up next I am going to make a wedding cake.  I'm going to post on Craigslist in the free section and see if there's anyone out there who wants a big ol' beautiful cake before the end of the month, only having to pay for the ingredients.  I hope someone bites, as I need to get a wedding cake under my belt and I am hoping to advertise with A. Chris' wedding photography business and I need a wedding cake picture for that!  Wish me luck!

Saturday, February 20, 2010

Wu-Tang parties with SpongeBob

 This week I had two cakes on my agenda. There was a SpongeBob smashcake for a little boy's 1st birthday and a Sweet 16 cake for a big party!  SpongeBob first, because I'm just aching to write about the Wu-Tang  cake and it's such sweet expectation!
  Dean is turning 1!  Grandma wanted a special cake just for him.  It's nothing incredibly outlandish, but it was a fun little cake.  It measures 7"x5".  I never watch SpongeBob so I had to go completely off of pictures, but I think it came out well.  The original cake we decided on was out of fondant, but of course, the one year old doesn't want fondant!  So this is me trying to make buttercream look more fondant-y.
The Wu-Tang cake was a MONSTER cake!  It weighed about 50 pounds.  The tiers are 12", 10", 8", and 6".  It took over 15 hours to decorate this cake (without baking times included).  It is all yellow cake with two layers of buttercream filling and two layers of strawberry filling.  There were five pictures we took inspiration from when the clients came to order.  From those five we came up with this concept drawing that became the Wu-Tang cake.  Why Wu-Tang?  Do you see the tops of the Wu-Tang symbol?
Well, I do!  It was truly wonderful working on this cake and I was so happy to see it's completion.  It feels like I haven't done laundry or answered emails since Tuesday!  On this cake I tried out a new technique of covering the cake board with fondant.  It was fairly simple and I really enjoy doing something new.  The stars were difficult to figure out how to put on.  I made the stars out of gumpaste and pressed two together to sandwich the wire, then painted them and let them dry.  I was going for a more "puffy" kind of look to the positioning of the wires, but the gumpaste proved to be just a little too heavy for the gauge of wire I selected.  I think it looks pretty good anyway, though!  The clients loved it, and that was the best part!
Well, my back aches and I'm ready to cuddle on the couch with my hubby for a while.  Long days and pleasant nights, everyone!

Tuesday, February 9, 2010

Happy Birthday to my Husband!

My husband is a truly special sort of guy.  He works full time, goes to school nights, and is a great daddy when he's home.  I wanted to get him something really special this birthday.  He has wanted a T5-1000 Voltmeter for about two years now, but hasn't wanted to spend the money on it.  Perfect gift idea, right?  So I got him one ($60 off!) on EBay.  I let it slip that, well, IF I had gotten him, say, an 8GB Ipod, would he use it?  He started to get all excited...the trap was set!
Two days later I told him I'd opened the Ipod to charge it for him and put some songs on it, and the screen was broken and I'd had to send it back and hopefully the guy would fix it and not rip us off.  (Tee hee hee, I was all upset).  So then I set about making his cake.  I used that same spice cake I made last time I wrote.  I had cut it to size and frozen it.  Then I placed the voltmeter in the middle of the plate and decorated it to look like an Ipod.  Last year we were pretty broke and I made him a cake that looked like a voltmeter, so I thought it would totally throw him off.  We sang Happy Birthday, and he cut into the cake.
Only, the knife stopped and he couldn't cut any more!  So the jig was up!  He knew something was going on, but he thought I had an Ipod in there!  He scraped off the top of the cake and, VOILA!  Only the best present EVER!  He was so excited.  I'm pleased.  Notice the empty battery, that made me laugh for about an hour.  The cake was sort of a rush job, but I like it anyway!

Thursday, February 4, 2010

Gumpaste Flowers and Basketweave

This cake is for a baby shower.  I am so pleased to be able to be a tiny part of this!  I was given a few pictures and pretty much free reign to design this cake.  I have been in love with basketweave for so long, so I decided to do the topper as a basket of gumpaste flowers.
The yellow cake recipe I've been making recently has baked funky and has been incredibly domed (which means more cake gets tossed out to level the cakes) the last few times I've made it, so a new recipe was in order.  I found it on Zaar, baked it up, and taste tested it.  Really really good.  I think it's better than the SeriousCakes yellow cake recipe.
 
This past week I made a cake aptly named "Eggless, Butterless, Milkless Cake."  I was a tad concerned that it would come out gross...boy was I mistaken!  The recipe came about during WW1, when those three items were in very short supply.  It was an amazingly flavored spice cake.  I made up some fresh blueberry syrup and layered it in, then topped it with some freshly whipped cream.  My hubby was so pleased!  I baked it in a jelly roll pan and layered it 4 layers high.  I had to add two dowels to keep it from toppling.  We ate up 2/3 of it right there...after Stinkie went to bed...we are mean parents!  The next morning, I ate the remaining third for breakfast.  I kept telling myself it was good for me somehow because it had blueberries on it.  Yeah that doesn't make sense!  Anyhow, I'm off like a dirty shirt!  Be back another time with my husband's birthday cake!
Edited to add:  The person who ordered this cake did a no-call, no-show for pickup, so I gave it away on Craigslist in the free section.  I will ALWAYS collect 1/2 down from now on!