Showing posts with label flowers. Show all posts

Thursday, February 21, 2013

Cascading Flowers Rush Cake

I received a call at 9:15am asking for a cake for a 21st birthday - needed before 4:30pm today!  I got to work, baking 8" rounds of Decadent Chocolate cake and putting butter out to soften to room temperature for the buttercream.  By 3:15pm, I had finished putting together this pretty little cake!

I like the cascade of flowers, but I really love the swirly numbers.  I used the same sort of technique from my last post with the striped number.  I am so very much in love with doing lettering this way!  I had been in such a rush all day with the different things I was doing (I also had previous engagements already scheduled that I had to work in) that I forgot to take a picture of the finished cake.  The customer was very kind and took a photo for me, or this one might have falled into the black hole of cakes I've made and will never see again.

Friday, December 28, 2012

Yet Another Catch Up Post

Here are a few cakes I've done and haven't blogged about.  The Barbie Doll cake is actually a Bratz Doll Cake.  I made it for my niece MPie.  I love my airbrush kit.  The whole dress is covered in pearl and was so pretty.

She looks like she's dancing in a garden of little flowers!
The cupcakes were simple and classy.


Batman and Robin cake for a birthday party!

Pocoyo and Terminator cake for a Daddy and Daughter combo party.  If you haven't seen this show, you totally have to.  The episode I used for inspiration was a dance-off.

The back was "torn" looking to look like the cake is a robot inside.
A nautical Steampunk Octopus cake.  This was really fun to do and I used my airbrush on the whole thing.  The octopus and gears are gumpaste and the cake is wrapped in a mixture of modeling chocolate and fondant.

The gold was very shiny and the silver was standout, the copper was my favorite though.  I bought a wood grain impression mat for the sides and I didn't really like how it turned out.  I had to airbrush the "seams" of the wood to make the lines visible.
I love the gears on the side!  I made them using the daisy cutter and a round cutter.  First, cut a daisy, then use the appropriately sized round cutter to cut the tips off.
I made these cupcakes for Icing Smiles, this great organization that gathers volunteers from all over the place to make cakes for gravely ill children and their siblings.  These cupcakes went to the Ronald McDonald house and I just happened to have a Cat in the Hat movie that I was able to give them for a fun themed movie night.  I really look forward to my next cake with Icing Smiles. The staff there is awesome and I love giving a little of myself to bring a smile.


Wednesday, January 4, 2012

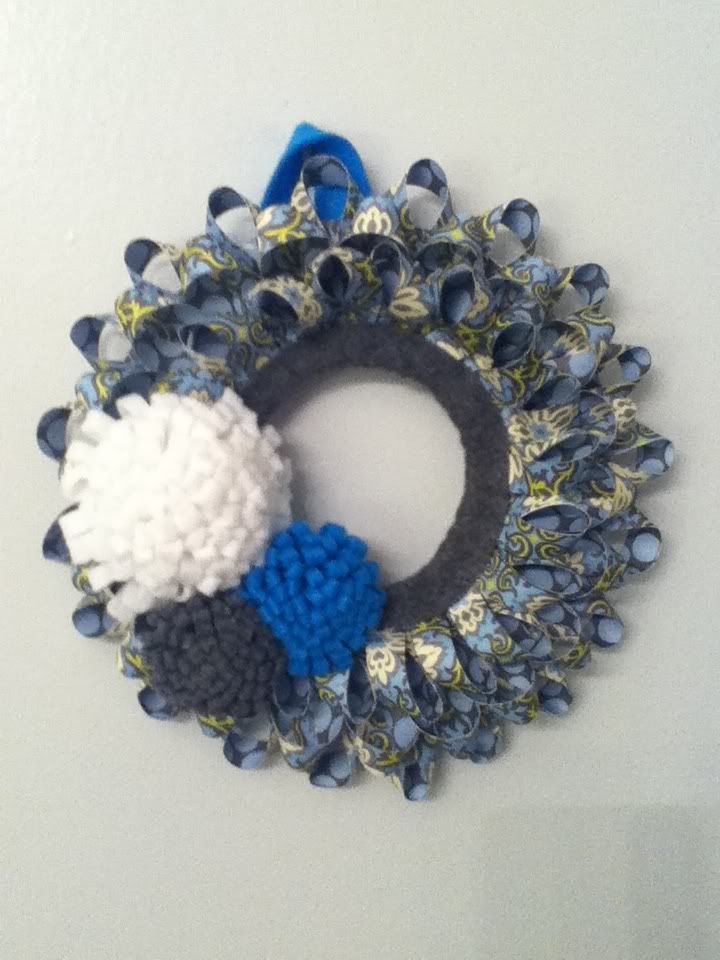
Paper and Felt Wreath

I wanted (needed?  Maybe) something to put in the upstairs bathroom.  It's in shades of blue grey, so I wanted something that could pop but that would at the same time look fancy schmancy.  I took a few ideas I'd found on the interwebs herehere and here and smooshed them together using stuff I had lying around the house.  The result was too cute!

It's pretty small (about 8" diameter in all) for wall art, but I am thinking this is my prototype and I'm going to make a collection of these for the large wall space available in the bathroom.  I might put a mirror in the center of the largest one...I'm just not sure.  Maybe a mirror in all of them.
Anyway, that's the craft for today.  I did have a craft that didn't come out.  I tried making a re-useable swiffer cloth but it was too small to fit.  I had to make another craft, I couldn't end the day in disappointment.

Thursday, September 8, 2011

American Girl and Calla Wedding Cakes!

It's getting late and I'm rushed to get this post written, so I'm sorry for my brevity.

The first cake here is an American Girl cake.  It's yellow cake with vanilla buttercream frosting and filling, and gumpaste and fondant topper and fondant diamonds.  The "pearl" necklace is non-pariels, painstakingly put in place one by one.  It was a fun cake and I loved making it!  The photo is a little blurry, but the bag says "American Girl" on it.

This cake was for my husband's Godmother's wedding last weekend.  It is Deep Chocolate and Yellow Almond cake with vanilla buttercream filling and marshmallow fondant.  The flowers are all hand made, about 40 of them, out of gumpaste.  Getting the dark blue color was difficult, so after making the flowers, I used Wilton spray to get them a more vibrant shade of blue.  For the berry colored flowers I painted over a more matte color after the flowers were formed.  The stenciling was done with matching buttercream.  This was my first attempt at stenciling and I was pleased with the outcome.  The wedding was beautiful and the cake was delicious.  The bride said of the cake: "That was the best cake I've ever put in my mouth!"  What a wonderful day.  Congratulations, April!

Wednesday, June 29, 2011

Congratulations, Class of 2011!


  This cake was inspired by another cake of mine from back in 2009 (maybe early 2010?)  The graduate-to-be's school colors were blue and green, and she informed me she is "In Love With Pink".  She was so cute!  She wanted yellow cake with fondant, so I got going on it and cranked out this fun, whimsical cake.

  It's been a while since I did fondant, and I realized yet again that while I don't ejnoy cooking with a microwave, they really are quite useful for warming fondant for easier rolling and for making it have more elasticity.  I think I will have to finally cave and buy one for cake use.
  My camera batteries died the second I tried to take a picture of this cake, so I was stuck with a very bad picture taken with my webcam.  Thankfully, my client agreed to send me a couple of pictures she took so I'd have something to show here.  Thank you!
  I tried to make up a decent sugar-free cake recipe for the top tier, but I fell short after two completely botched tries.  The second one wasn't as embarassing, but still pretty bad.  I did purchase a huge bag of granulated Splenda and I plan on finding something that tastes as good as my special yellow cake...it's just going to take time and patience.
  Congratulations, Class of 2011!  You Did It!

Saturday, October 9, 2010

Gardener's Birthday Cake

I am bone tired right now, but I'm pushing through it to get my blog up to date!  This cake was 12" round on bottom and 8" round on top.  I was advised by a friend to start giving a size reference for my cakes, such as a picture of a coke can or something so you can tell how big they are, so I'll be doing that from now on.  For these next two cakes, no dice.  Sorry!  The dimensions of this cake were 15" cake board, 12" cake round that was 4" high, then the 8" round on top that was 4" high, then 2" of decorations, so all in all the cake was 10" high.  It was pretty heavy.  There were almost 5 pounds of frosting on this sucker!
  The story for this cake is there is a woman who is turning 55 today and she has NEVER had a birthday party!  Can you imagine?  So her daughter sought my services to make a beautiful cake for her.  We all settled on this design and I got to it.

  The pots and tools are made out of gumpaste and the figure is fondant.  I used marshmallow creme for the fondant instead of melting mini marshmallows, and I have to say I'm not too pleased with how it turned out.  It was difficult to shape correctly.  The figure came out fine, but it was hard to get that way.  For the silver, I used lemon juice and silver edible shimmer dust, and painted it on with a food safe brush.
  There are a LOT of details on this cake.  I spent about 8 and a half hours making the decorations and putting the cake together.
  I used the Wilton cake board foil for the first time, and I have to say I really liked it.  I like the fondant look around the edges as well (and it's very customizable) but it's very time consuming.
  I used ground up chocolate chips for the dirt.  It was fun!  I used my Magic Bullet to grind them up and a silver baby spoon as my "shovel" to place the dirt where I wanted it.  The moss is just buttercream applied with the grass tip.  I forget the number.
  I really love this butterfly.  It was painstaking to make (it's made out of gumpaste) but I love it anyway.  I had about 4 heart attacks during the making of this butterfly.  Once my kiddo grabbed it off the shelf and started flying it around the room, once I kicked the tray it was drying on...the list goes on.  But it survived and so did I.  Did I mention I love it?
  Someday I will post on here about the frosting plugs I've been using.  They have saved me SO much time.  What you do is, basically, get a rectangle of plastic wrap, lay it flat.  Put a big old spatula full of frosting near the right edge and roll it up and shape it into a cone shape.  Then you roll it all the way up so you have a bullet of frosting.  When you want to use it, you cut the plastic wrap near the small cone end and put it in a disposable decorator's bag with a tip attached.  It makes the cleaning SO quick and if you want to switch colors, it's REALLY fast.  SO useful.  There's a video on SeriousCakes on YouTube if you're interested.
  Well, not much else to tell.  I set all the decor together on the beautifully frosted cake, said voila, took some pictures, and delivered it.  FUN stuff!  See you later!

Saturday, September 25, 2010

Hello Kitty!

The cake is 2-10" rounds tiered together with vanilla buttercream filling and frosting.  The kitty is made out of fondant, the flowers on the top are made out of fondant, but the flowers on the sides are made out of gumpaste.  The ribbon is simply food safe ribbon.
I am pooped.  This week has been so full, with my kiddo getting sick in the beginning of the week and myself not feeling too hot for a couple of days.  I knew I had to muscle through it, though, so I pulled myself up by the bootstraps and got down to it.  There's not much to tell, this cake was pretty routine, but I did stay up until 1:30 in the morning to finish it so that my nieces could come over this morning and we all could hang out, have a picnic, etc.  It was fun!  The client loved the cake and the kids in her car seemed overjoyed, so I'm happy!

Monday, August 23, 2010

Pregnant Mamma Silhouette Cake

I saw this technique online and so badly wanted to try it out.
Thankfully, I got an opportunity!  The cake itself is just yellow cake with vanilla buttercream filling and frosting.  The dark pink medallions are fondant leftover from a previous cake I made.  Fondant can stay good for up to 3 months in the refrigerator if stored properly.
In making a cake that is tall and thin, you need to have an ample support system.  I use wooden dowels for this support system in a thin cake like this one.  The cake is 4-6" round layers sitting atop one 8" square layer.  It is basically two 2-layer cakes on top of one another.  I use wax paper on the bottom of each cake board for (hopefully) easier removal of the layer without damage to the underlying frosting.
Getting a violet is touchy.  It is very easy to go from white to purple without using much color.  I use a very small amount of color, mix it in, then a little more as needed.
The silhouette I printed off the computer and cut out carefully, then rolled gumpaste very thinly and painstakingly removed the main section using a decorator's wheel, a razor blade, and a few other gumpaste instruments.  After the silhouette was cut out to my satisfaction, I marbled a piece of white gumpaste with light pink and rolled it thinly, then "glued" the silhouette to it with gumpaste glue (basically, gumpaste glue is a small piece of gumpaste dissolved in very little water until it's easy to paint on).  I laid the malleable gumpaste silhouette onto a sugar canister to give it a 6" curvature, and let it dry for a few days.
The daisies were pretty easy to do.  I let them dry on an egg crate I reserve just for that purpose to give them shape.
Overall, I am pleased with this cake and I learned a few new techniques along the way.

Saturday, July 17, 2010

Another Princess Castle Cake

This week went by so quickly.  My son is talking more and more each day and while I have been taking moments to step outside our everyday routine to enjoy the process, it feels like everything is either speeding or crawling by.  Does that make any sense?  No?  Well, I guess I should just stick to the caking of it all, then. :)

I had made a castle cake before for Dollbaby when she turned 4.  She just loved it.  This cake was for a first birthday party!  I did make a 3D crown smash cake, but dang it I forgot to take a picture of it!  Ah well.  Life goes on.  ANYway.  Today I tried out the hot knife technique.  Since it is ridiculously humid here (and hot), my buttercream hasn't been crusting the way I'm used to in order to do the VIVA paper towel smoothing I do.  Thus, I reverted to the hot knife trick.  You just get the frosting on the cake, then dip the spatula in HOT water and smooth.  It's very fast but it takes some getting used to and some practice.  I used that technique on the crown smash, so you don't even get to see the results!  I'm sorry!  Well, anyway, the castle cake was pretty much a repeat of the first time I made it, with a few small (or large, depending on how you look at them) exceptions.  This time I offset the 6" 2nd tier to the back so I could use the steeple roof.  I baked the cakes taller so I could use the provided door (last time my tier was too short and the door was too tall to fit properly, so I just frosted a door on).  I used fondant to cover the turret roofs, which proved much easier for me to do and much easier to transport for the client.
Last time I did this cake, I had such a hard time getting the towers to stay in place.  Last night, I was about to lose my cool when the new plans failed (using gumpaste to hold in place, using melted chocolate to hold them in place.  These just didn't stand up to it).  My INCREDIBLY SMART hubster came up with the brilliant idea to drill holes in the bottom of the towers, just large enough for the dowels I was using to fit through.  IT WORKED!  He is SO great!  He drilled every last tower to make my life easier.  I lurve him.
I worked as I went, placing a tower, decorating around it, then placing another.  I covered the cake board with fondant this time, which I like the effect of.  I used florist's tape around the cake board border to cover the raw edges.  The leaves were made using tip #67 and a bit darker green than the accent.  The bottom of the cake is 2-10" layers of yellow cake and the top is 2-6" layers of chocolate.  SO GOOD!  One problem I had was with the placing of the top towers.  They should have been placed farther apart to take into account the width of the tops.
I think next time I will try out another method of baking and preparing the cakes that I found online and review it for you.  It is a way of baking so you don't have to remove cake from the top of the layers to make it level.  I'll let you know.
I very much enjoyed making this cake after my husband helped me out so dramatically.  THANK YOU SWEETHEART!

Saturday, June 26, 2010

Tropical Beach Birthday Cake

I will be the first to admit that the idea of gumpaste flowers sounds daunting.  It is a time consuming task, no doubt, and the road to victory is paved with failure and broken hard work, but the payoff is amazing.  I was provided with a concept picture and told that the flowers should be prettier (the original design had pretty awful flowers on it).  I really like this client, so I just went all out making this the prettiest cake I've ever made.  It's so FUN!  The cake itself is just chocolate cake with strawberry filling and vanilla buttercream, with graham crackers crushed up to make the "sand".  I think the pictures speak for themselves!  The client just came to pick it up and she was so pleased!  I'm very very happy, and I'm gloating now.  Humor me!


My son is about to wake up from his nap and we're going to go play in the pool, and I've spent the whole nap catching up on this blog!  I think this should be a lesson to me to update more often.  If you have any questions about the flowers or techniques I use, don't hesitate to email me at alesharaelane@yahoo.com or leave a comment below.

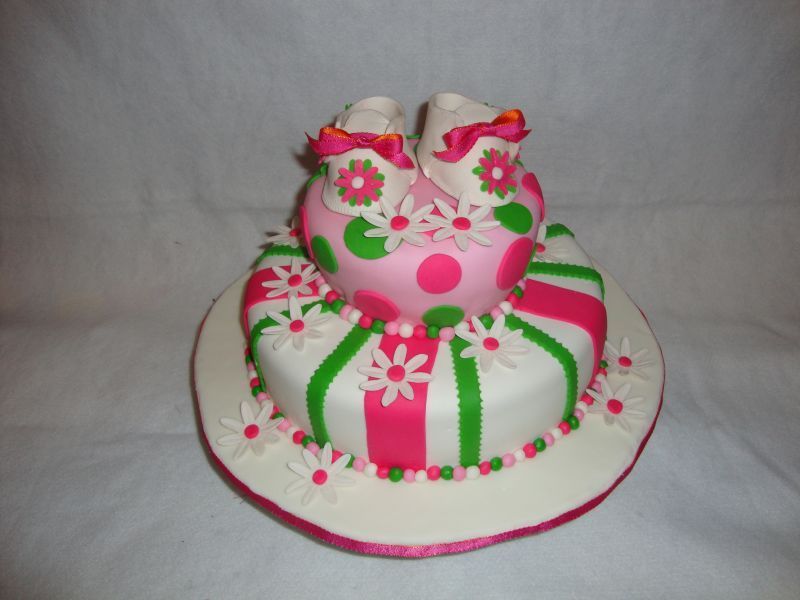
Catching Up, Part Deux - Pink and Green Daisies Cake

Welcome to the world, little one!  I had an amazing time making this uber cute baby shower cake.  I followed the booties template from CakeCentral.com to make the shoes.  Those ladies are FANTABULOUS!  They're great at answering questions and there's a wealth of cake decorating information available on there.  If you ever have any caking questions, do a quick search on there and you will find answers.  There's also a lot of tips and tricks, such as my new favorite thing - using a flower nail (you know, the ones you're supposed to use to pipe roses on?) as a baking core.  When you bake a cake that's larger than 8" round, you need something to conduct the heat to the center of the cake, otherwise you will burn the edges of the cake and the center will still be gooey.  Anyway, you just coat it with cooking spray and set it in the middle of your cake batter, and your cake cooks perfectly every time.  It's amazing, and a little sad, that I had just bought a heating core from Wilton for $15 which was more work and less efficient for the sad results.  That's my little tip, just for you guys!
You start with a cake.  This one is yellow on bottom and chocolate on top.  I covered this one with marshmallow fondant in white and pale pink.  This cake is based off a picture that was provided to me by the client.  I made the booties ahead of time out of gumpaste to give them ample time to dry, as well as the daisies.

I dyed some fondant green, and some hot pink, and started to decorate away.  The little balls take a lot of time to get all the same size, but I watched Court TV shows during Stinkie's nap and rolled away.  There are about 100 little balls on this cake.  Anyhowzit, I covered the exposed cake board with white fondant, placed the balls, and placed the booties and the daisies.
I had decorated the booties with little flowers in pink and green.  Aren't they precious?!  This is where I found that humidity and fondant do NOT mix well.  I decorated up the booties a few days in advance, and the day after I did so, I came downstairs to find that the heat had melted the flowers off!  I was able to salvage them, though, and I kept the AC on for the next few days.  Fondant does not do well in the refrigerator, so I needed the whole house cooler.  My hubby did not complain, as he's always the one telling me we need to freeze in the Summer.  He's a cool cat.  Well, I placed all the elements together and this is what I call the Pink and Green Daisies Cake!

Saturday, May 1, 2010

My First Wedding Cake!

My Aunt-in-Law wanted me to do a wedding cake for a portfolio she's helping me put together, so I needed to do a wedding cake...FAST!  I posted on Craigslist in the free section that I'd make a wedding cake at cost (ended up being $65 delivered and set up).  I received quite a few responses, but many of them were for things like baby showers, or birthdays, or things of that nature.  I really wanted to do a WEDDING cake so I could get that kind of experience.  After reading through a few responses, I got an email from a couple getting married on the 24th (of April) that had not ordered a cake yet.  We met up, had some cupcakes, and talked about what they wanted.  The chose a calla lily and roses cake.  Their colors were candy apple red and white, the lilies white and the roses red.  This woman had a seriously beautiful dress picked out!  They were just a very sweet couple and I enjoyed making the cake for this special day.  The stakes were high, so I was a little stressed and it seemed that everything that could go wrong with the fondant, did.  It wasn't stretchy, then it was too humid, then there were little sugar clumps in it, then it tore, etc etc etc.  But I'm getting ahead of myself...
I made the calla lilies by starting with the pistils.  I cut wire the length of the pistil and stem, then rolled out thin, long cones of yellow gumpaste and shoved them on the wire.  I set those in that florists' foam to dry completely overnight.
The next day I cut out about 30 hearts out of white gumpaste and wrapped them around inverted sno-cone cups, flipped the edges, and let them dry for two days.  They were difficult to take off and I broke a few of them.  The gumpaste dried onto the cups themselves.  Next time I will make sure I rotate them a few times during the drying process.
Then I took the petals off the cups, put on a dab of "glue" (gumpaste dissolved in water), and stuck the wire through the hole at the bottom of the petal so the pistil was properly placed.  I then hung them up, upside down, for three days (just to be sure they were dry).  The roses were fairly easy, but time consuming.
I found a tutorial on YouTube that was helpful.  I placed the rosettes on precut wires and stuck them in the foam to dry, then the next day I cut out the green leafy bud stuff that goes on the bottom (I'm too lazy right now to look up the term, so I hope you know what I mean!)  I let those dry.  Flowers were pretty much done.
The fondant was difficult for some reason.  Maybe it's because it's all white and there's no room for error, I don't know.  But it was a PAIN!  I finally got it all stacked and placed the red ribbon around the tiers.
I got some florists' tape and bound the lilies together in a pleasing fashion, bound the rosettes with them, and placed them on the cake, holding them into the cake with wires inserted into the cake itself.  It came out surprisingly sturdy.
The couple had dropped off a cake topper, so I put two rosettes in it to tie the cake into it and placed it.  I wasn't too sure I liked the topper, so I took a picture with just two lilies and two rosettes on top as well.  I did use the topper for the wedding, but I'm putting both pictures on here.  I'm not sure why the picture of the cake with the topper is coming out funky, and I wish it wouldn't do that, but I'm too pooped out right now to figure it out.  Please forgive me!

All in all, it was a fun cake, but I think I'll stick to birthdays and fun stuff for now.  I just love to giggle when I'm making a cake, it's like an extra ingredient.  I know, I know, wedding cakes are where the big bucks are, but perhaps I'm just a silly little doe...I'm okay with that!

Monday, April 12, 2010

Pop Up Birthday

One of my favorite clients called me on Monday or Tuesday and asked if I could make her a cake for Saturday for her boss' Fathers' 70th Birthday.  I didn't have much going on that week so I told her, "of course!"  She emailed me a picture of what she wanted and I got started on Friday evening, baking the yellow cake.  I tried a new recipe that looked pretty good.  I really liked the texture of this cake.  It had structure but still had a great crumb.  The original recipe called for shortening as the fat but I substituted butter for half the fat.  I also read something that said the fat and sugar should be SUPER creamed, so I stuck it in the KitchenAid for about 7 minutes (much longer than I normally cream the sugar).  I think that will be my thing to do from now on, as I was really pleased with this cake.

It's one 10" round (one layer only) topped with the numbers cut out of yellow cake and covered in vanilla buttercream frosting.  I did not level the top of the round because the inspiration photo kept it.  I think I much prefer the flat top, as it makes decorating evenly much easier (you can see where you're thick or thin in the icing department much more easily).  I froze an 8" round for carving, then scaled and carved the numbers.  After I crumbcoated the cakes, I smoothed the top only of the 10" cake and the zero.  I used tip number...well gosh it's the large leaf tip, I don't remember the number!  74?  Something like that.  Anyway, I used that tip to put on the vertical lines around the sides of the 10" round.  I then decorated the numbers (except the edging and flowers) with tip #16 (medium star tip), placed them on the cake (CAREFULLY!) and piped the swirl edge border around them and at the top and bottom of the round.  After spaceing the letters and marking the placement on the cake with a toothpick, I piped the letters in black.  I also used that color for the lines on the numbers.
The flowers I made out of rolled "buttercream".  It's pretty much just shortening and powdered sugar, and I happened to already have some on hand.  I used my floral cutters to cut out the shapes and rolled them gently larger, then placed and painted on the centers with food gel coloring, thinned slightly with vodka.
I did all the decorating on Saturday morning while my wonderful hubby was out with E.  I wanted this cake to be as fresh as possible!  They came to get it at around 1pm and they loved it!  I always enjoy people getting a kick out of what I do.
Coming up next I am going to make a wedding cake.  I'm going to post on Craigslist in the free section and see if there's anyone out there who wants a big ol' beautiful cake before the end of the month, only having to pay for the ingredients.  I hope someone bites, as I need to get a wedding cake under my belt and I am hoping to advertise with A. Chris' wedding photography business and I need a wedding cake picture for that!  Wish me luck!

Sunday, February 28, 2010

Flower Power!

  Another week, and another cake!  After last week, my housework got WAY behind, and I was sort of looking forward to just chilling out and cleaning the house...okay.  Maybe not looking forward to cleaning the house, but you get the picture.  Then I got an email from a lady asking about a rush job for another Sweet 16 cake!  I love these kind of things.  You have people that have almost given up hope on getting the cake they want.  You can almost feel the resignation that they will end up either paying $600 or just going to Walmart for their cake through the internet.  At any rate, They sent me a few pictures, and I gladly accepted the challenge!
  I had a heck of a time with the fondant.  The first two tiers I covered I messed up on.  They just dried out too quickly.  In order to re-do them, I had to make more fondant and wait 8 hours for the batch to cure.  ARGH!  But I eventually got it and covered and stacked the tiers.  Blank slate.  White cake.
I rolled out a black fondant ribbon 1.5" wide and wound it around the bottom tier.  Then I started putting on the vines.  It was relaxing work, but definitely something different.  After putting on the vines, I placed the ribbons around the cake and secured them at the back.  Since they are satin, I couldn't use water or gumpaste glue under them.  I secured one end, wrapped the cake, and secured the other end with a dab of the glue.  This left an ugly little mess at the back of the cake.  Probably not noticeable to anyone but me, but gosh I didn't want to leave it there.  Anyhoos.  I cut and placed the flowers.  I had moulded the numbers for the top of the cake on Monday night, the night the clients came over, so they had ample time to dry.  They had craft sticks pushed up into them before they dried, so they were pretty secure.  I wound a few vines around them and attached flowers.  Then I covered the cake board with black fondant and placed the bottom (orange) ribbon.  I made a template for the name on the board, then scrapped that.
Block lettering didn't seem to fit the vibe of this cake, so I rolled out another long snake of fondant and wrote her name in cursive.  For the tittle, I made a little tye dye fondant using all the colors I used on the cake and cut out a little flower.  It was uber cute, I think!
  I then turned my attention to the back of the cake.  It was very plain.  The birthday girl had told me she didn't mind if it was just plain, but I really wanted to spruce it up and I had extra fondant, so I started playing with it.  I cut out a massive amount of flowers and went to work sprucing it up!
I love how the back turned out.  It reminds me of the back of a wedding dress, you know the ones that have the buttons going all the way down the middle of the back and down the skirt?  Anyway.  I had a good time!
Then when the Mamma and Daughter came to get the cake, they LOVED it and the girl gave me a wonderful letter telling me how pleased she was and how thankful she was.  It truly made my week!  My husband was so happy for me, too.  That is just really thoughtful for a 16 year old, you know what I mean?
Well, this week is over and I made another cake for a family member, but we ended up not getting together, so I'm probably going to give this cake away on Craigslist tonight.  It's kind of a bummer but no real biggie.  It was a fun little cake and I really enjoyed doing buttercream grass on it.
  With the leftover cake from the soccer cake, I experimented for the first time with cake balls.  What you do it crumble up cake, mix it with buttercream frosting, and ball it up on the end of a stick.  Then you freeze it nice and hard.  Then you take milk chocolate and melt it on a double boiler, add a teaspoon of shortening, and stir it up.  Then you swirl the frozen cake balls into the chocolate until they are nice and covered, then you put them in the fridge, then...you eat them!  I'm really looking forward to making these more often.
What a good use of that extra cake you cut off the top of the domed cakes and the extra little bit of buttercream you're invariably left with.
  I'm contemplating using ganache to cover the next cake.  I'll keep you posted.