I received a call at 9:15am asking for a cake for a 21st birthday - needed before 4:30pm today! I got to work, baking 8" rounds of Decadent Chocolate cake and putting butter out to soften to room temperature for the buttercream. By 3:15pm, I had finished putting together this pretty little cake!
I like the cascade of flowers, but I really love the swirly numbers. I used the same sort of technique from my last post with the striped number. I am so very much in love with doing lettering this way! I had been in such a rush all day with the different things I was doing (I also had previous engagements already scheduled that I had to work in) that I forgot to take a picture of the finished cake. The customer was very kind and took a photo for me, or this one might have falled into the black hole of cakes I've made and will never see again.
Showing posts with label pink. Show all posts
Thursday, February 21, 2013
Friday, February 15, 2013
Pink Ruffles Cake
I underestimated how much buttercream I would need for this 10" and 8" two tiered cake. It was OVER FIVE POUNDS. Let that sink in for a minute. Because it is a LOT!
The cake itself is Vanilla cake with pink buttercream frosting and filling.
I found the best thing to do was to crumb coat the cake and let it sit in the fridge for about 30 minutes. Then I used the biggest petal tip I had to create the ruffles. It was tedious but overall an easy technique. I think on the next one I'd like to add a large ruffled flower made of gumpaste, perhaps out of black, and perhaps add a black ribbon of some kind.
The cake itself is Vanilla cake with pink buttercream frosting and filling.
I found the best thing to do was to crumb coat the cake and let it sit in the fridge for about 30 minutes. Then I used the biggest petal tip I had to create the ruffles. It was tedious but overall an easy technique. I think on the next one I'd like to add a large ruffled flower made of gumpaste, perhaps out of black, and perhaps add a black ribbon of some kind.
Sunday, March 18, 2012
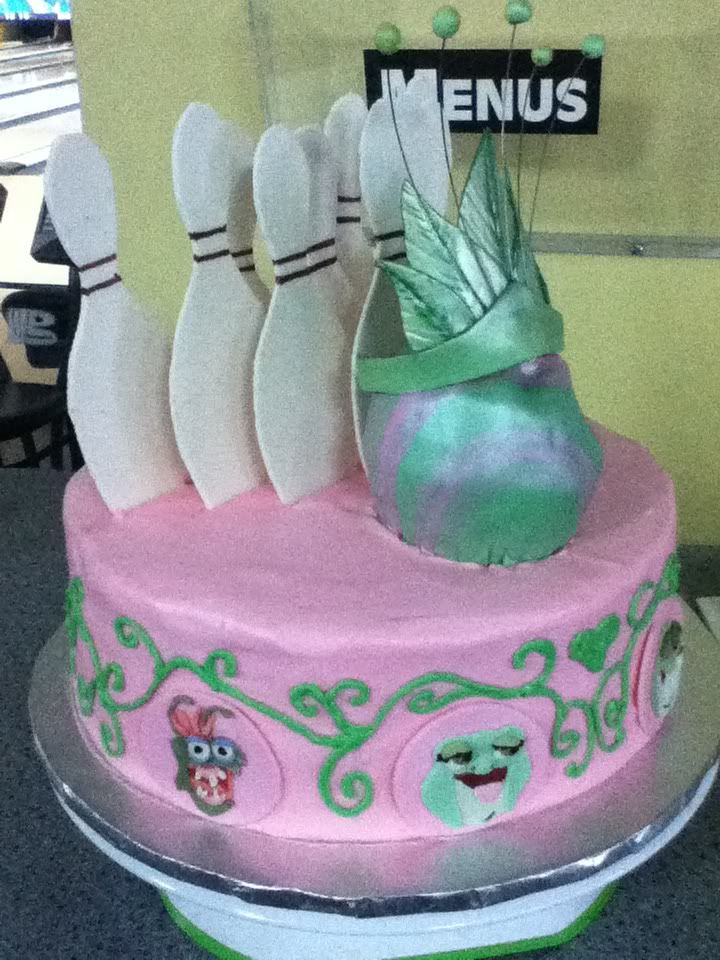
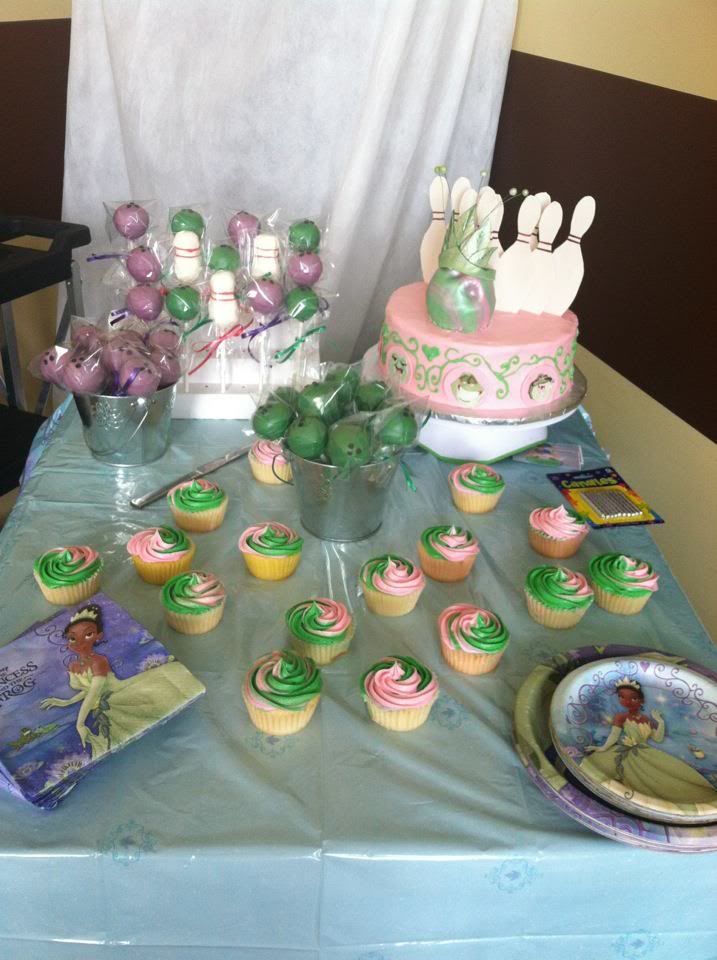
Princess and the Frog go Bowling!
Let me start off saying that I had a major case of zero confidence when I started this cake. The first thing I made was the crown, and I got to use my brand new silicone flower/leaf impression mat. This thing is awesome. So anyway, it was really fun. It's been a while since I made a cake and I got back into the spirit of things really quickly. I made up the bowling pins by making a template out of paper and using that to guide my cuts on the gumpaste. I made the bottom part of the pins long, so there is gumpaste sticking into the cake as well as wooden picks. I thought it would give a little extra stability. The characters were fun to make. I was giggling as I made Ray, the Cajun firefly. I love the teeth.
I used my old recipe and I have to say I think I'm going back to it. It took me over a year to develop it and it is dense and moist. The new recipe is a little easier to make and it is more consistent, but goodness, this cake was good!
The bowling ball is two little cakes I made in my Wilton Wonder Mold, layered with buttercream and carved into a ball, and covered in marbled marshmallow fondant.
I also made 16 cupcakes to complement the cake. The cake pops in this photo were made by another amazing cake lady! It was fun to talk cake for a while. The kids had a ball eating the bowling pins and the characters.
I used my old recipe and I have to say I think I'm going back to it. It took me over a year to develop it and it is dense and moist. The new recipe is a little easier to make and it is more consistent, but goodness, this cake was good!
The bowling ball is two little cakes I made in my Wilton Wonder Mold, layered with buttercream and carved into a ball, and covered in marbled marshmallow fondant.
I also made 16 cupcakes to complement the cake. The cake pops in this photo were made by another amazing cake lady! It was fun to talk cake for a while. The kids had a ball eating the bowling pins and the characters.
Labels:
bowling ball,
bowling pin,
cake,
cupcakes,
green,
gumpaste,
louis,
naveen,
pink,
princess and the frog,
ray,
tiana
Tuesday, February 28, 2012
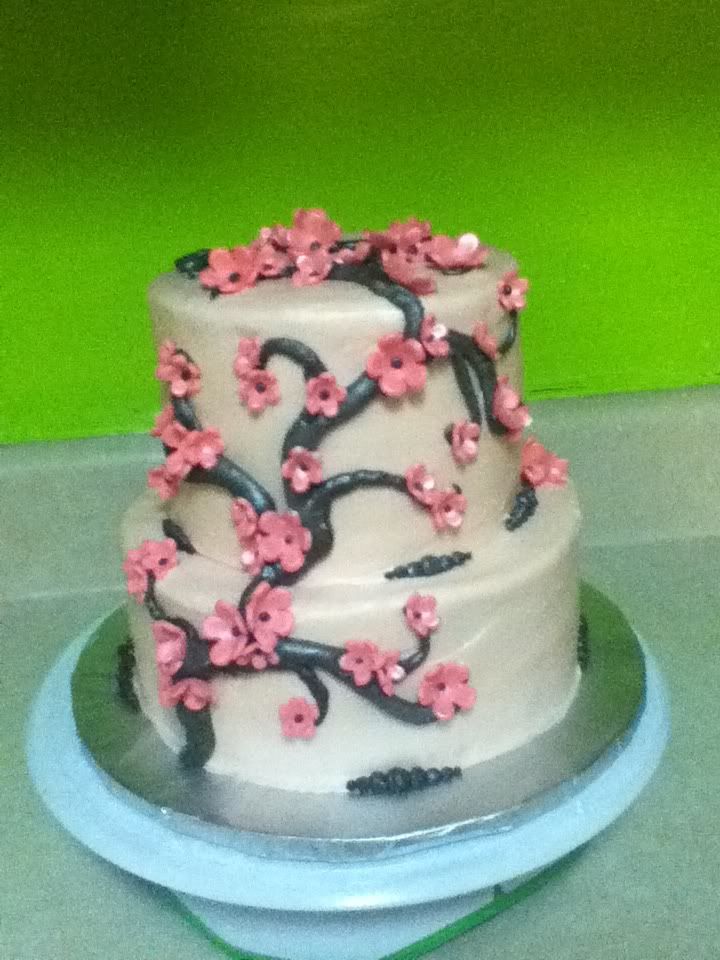
Sakura Cake
I really enjoyed making this simple Sakura cake. Cherry blossoms are too cute and pretty! The cake itself is my old yellow recipe. There is a monogrammed letter at the top, "K" for Kristen, my sister-in-law. I was given zero direction for her birthday cake, just that it was her 30th birthday (yay!) I frosted the whole cake (the light pink) and used my airbrush to pearlize the whole thing, then added chocolate frosting "branches" and border dots. I liked the idea of the randomness of them. The flowers are fondant with chocolate buttercream centers. As a finishing touch, I airbrushed some silver on the branches for highlighting and pearlized the blossoms.
One tip I would like to share about tiered cakes is how to stack them without making it impossible to remove the top tier without tearing off the buttercream on the top of the bottom tier. I make the dowels just a tiny bit taller than they should be and put a massive amount of (sifted) powdered sugar where the top tier will rest. The powdered sugar absorbs perfectly into the bottom buttercream and makes it a little more durable.
YAY for cakes!
Labels:
branches,
cherry blossom,
cherry tree,
monogram,
pearl,
pink,
Sakura,
silver,
tree
Saturday, February 4, 2012
Shopping and Cars Cakes
Interesting sidenote: I thought the cake that was due was a Barney cake. I even made green frosting and frosted the cake before I realized! So I scraped off the green and made up a fresh batch of soft pink. I'm so glad I caught my mistake! I really like the way it turned out. I did shopping bags with tissue "paper" (actually gumpaste) on my American Girl cake and I really love the way fondant and gumpaste move and lay.
| Looks like he's saying "Ka-CHOW!" |
The Lightning McQueen cake is for my niece Dollbaby. Her mom and I have been planning her party and working on the decorations for a while now, so this was like the climax of all that planning. My hubby hung out with me in the kitchen while I caked it up. We had a good time talking and just being around each other (he's been working 7 days a week, 10 hour days for a while now, and he's going to school two nights a week!) I didn't have a real "plan" for this cake, other than the few things that Dollbaby told me she wanted. She said she wanted red on top, blue on the bottom, lightning zigzags, and "a Lightning Mcqueen on top, but not a plastic one. One made out of frosting". Oh my. Me thinks I have spoilt the child! :) It makes my little heart pitter patter. The McQueen on top is made out of smooshed cake and frosting (think: inside of a cake pop) and is covered in fondant. The cake itself is iced in buttercream with fondant decor. I wanted it to be an impressive size, so I went with three tiers, 10, 8, and 6 inches. The middle tier I tied to the party decorations (I'm going to write another post about that later. The party is today so I will take lots of pictures!) The candles were pretty cool, they are spirals and I got them in the cake decorating section at, you guessed it, Walmart.
Well, lovelies, I'm still covered in powdered sugar and I am going to get cleaned up. Till next time!
Labels:
cars,
checkerboard,
clouds,
high heel,
lightning,
lightning mcqueen,
pink,
road,
shoe,
shopping,
shopping bags,
tissue
Thursday, February 2, 2012
Princess Birthday Cake
The flowers have inedible gem centers. I just liked the look so much more than piped centers, it gave a certain pizzazz.
I think I like the back better than the front!
I have a lot of cake stuff coming up and I'm feeling the pressure! Tomorrow is a Barney cake, then a Lightning McQueen cake for Dollbaby's birthday, and next weekend is busy busy busy too! Everyone is having a birthday in February!
Ah yes. I made this little smash cake for Stinkie's friend last weekend. I also made another cake, but I lost my iPod so I didn't get a picture of it :(. That's okay, everything was SO frustrating about those two cakes, so I'm not incredibly happy with how they came out. It's okay. Both cakes were loved by their owners, and this princess cake made up for it!
Saturday, May 28, 2011
Babybug Baby Shower Cake
Last week I released 1000 ladybugs into my aphid-ridden, tiny garden. So it seemed fitting that this week's cake was a fun take on a ladybug.
The cake is yellow cake with chocolate BC frosting and filling. The face, antennae, and butterfly are fondant.
I never thought much about how difficult it would be to sculpt a baby's face out of fondant. I kept trying and failing miserably. After an hour and a half, I had come up with a dozen or so ways NOT to do it. Every face I made looked like an adult. I watched YouTube videos and pulled up pages on CakeCentral.com but had no luck. I just couldn't get the lips right. So I finally tried something completely different and came up with the finished product here. I think I can do better next time, but I think it looks pretty good and it's definitely a far cry from what I started with!
I carved the cakes and did a crumb coat, which I usually don't do but this time I got the urge for ease. I set the crumb-coated cake into the freezer for about 15 minutes before doing the final frosting.
The antennae are fondant shaped on wires. Pretty easy peasy. The leaves the babybug is laying on are buttercream. The butterfly was fun to make. I love making butterflies. This one I wanted to be simple and pretty, so I put a simple pattern on the back in a darker pink and sprinkled it with shimmer dust. I added GumTex to the fondant so it would dry hard and set it to dry on balled up cotton. It works well.
My client loved it and said "It's PERFECT!" when she saw it, and made my day. It was a fun little cake and I learned that I need more work with my sculpting. I'm very much looking forward to this next few weeks and the cakes I'm going to do.
The cake is yellow cake with chocolate BC frosting and filling. The face, antennae, and butterfly are fondant.
I never thought much about how difficult it would be to sculpt a baby's face out of fondant. I kept trying and failing miserably. After an hour and a half, I had come up with a dozen or so ways NOT to do it. Every face I made looked like an adult. I watched YouTube videos and pulled up pages on CakeCentral.com but had no luck. I just couldn't get the lips right. So I finally tried something completely different and came up with the finished product here. I think I can do better next time, but I think it looks pretty good and it's definitely a far cry from what I started with!
I carved the cakes and did a crumb coat, which I usually don't do but this time I got the urge for ease. I set the crumb-coated cake into the freezer for about 15 minutes before doing the final frosting.
The antennae are fondant shaped on wires. Pretty easy peasy. The leaves the babybug is laying on are buttercream. The butterfly was fun to make. I love making butterflies. This one I wanted to be simple and pretty, so I put a simple pattern on the back in a darker pink and sprinkled it with shimmer dust. I added GumTex to the fondant so it would dry hard and set it to dry on balled up cotton. It works well.
My client loved it and said "It's PERFECT!" when she saw it, and made my day. It was a fun little cake and I learned that I need more work with my sculpting. I'm very much looking forward to this next few weeks and the cakes I'm going to do.
Wednesday, March 23, 2011
The Castle Cake that keeps on giving...
I have made a few of these cakes to where I now have them down to science! The color for this was was to be Barbie Purple (or as the birthday girl described it, pink-purple). Neither of the photos I took captured the color just right (flash and low light) but you get the general idea.
The shoes here were the color I was going for:

Yes, they are amazing shoes and the price is $129. I looked them up. Fabulous shoes.
Here's with the flash:
And here's without the flash in my low light house:
It was a pretty fun and easy cake and I loved making it!
The shoes here were the color I was going for:

Yes, they are amazing shoes and the price is $129. I looked them up. Fabulous shoes.
Here's with the flash:
And here's without the flash in my low light house:
It was a pretty fun and easy cake and I loved making it!
Labels:
barbie purple,
black buttercream,
castle,
dowels,
pink,
purple,
white,
wilton castle
Sunday, February 6, 2011
A few Tinkerbells for your viewing pleasure!
The first cake was a doll cake (duh). It's yellow cake with vanilla frosting, and since I made it just for a very small family gathering at Chick-Fil-A, I used up my "old" buttercream for the filling. It was pink and blue inside! I even made the cake board out of scraps I had left over (you can see the flat spot. I'm so embarassed! But, it WAS just for family!) I baked the skirt in a Pyrex bowl (I have as yet to actually purchase the Wonder Mold pan, to my eternal shame) and stacked it on top of a 6" round cake. I used the trimmings mixed with some buttercream to mold the top to my desired height and shape because well, I just felt too dang lazy to bake another 6" cake! Dollbaby loved it and we had a great time. I love Chick-Fil-A.
The cake for her party was a little more involved and a little more fun to make. I had seen the inspiration photo of this cake a long time ago and wanted to make it for forever, but I didn't have anyone wanting a Tinkerbell cake. FINALLY! I got to make it for Dollbaby's Tinkerbell party. The lily is a fondant/gumpaste mix, as is the bow and grass blades. It surprised me how little time this cake actually took to put together compared to what I thought it would. Of course, the Tinkerbell on top is just a candle and not hand molded or anything, so that cut out time right there. The little mushrooms were so fun and easy. I molded them on toothpicks. The candles are those trick sparkling candles. I liked that they looked like bamboo or grass blades so they fit into the motif of the cake.
I made another cake this past week too, but it was a cake I've made before. It was cute and the party was at Cartwheels and Coffee, one of my favorite places in Richmond. There's always a good vibe going around there. Anyway, I could not for the life of me find my camera, so I had to take this with my webcam and it came out all washed out. It's a very fun little cake and I loved making it again!
Sunday, January 16, 2011
Crown and Draping
I should have posted this days ago! I am a slacker :)

This cake is a 2-layer 10" round, yellow cake with vanilla buttercream frosting and filling. The accents are fondant. The crown is fondant with a smidge of GumTex mixed in to help it harden.
The crown was a hassle to make, but I figured it out. I wrapped it around an oatmeal container after cutting out the basic shape and sealed the back edge. I wanted the tips to point outward but without support they would just flop down, so I decided to place the fondant wrapped oatmeal container into a large salad bowl and fill it with flour, then mound up the flour where necessary. I left it to dry for a whole day then carefully removed it and brushed off the flour. I painted it with a thick mixture of vodka and gold luster dust (the alcohol evaporates completely).
The quilting was much faster this time, as I'd done it on the previous cake. It's time consuming but simple once you get the distances marked.
This was my first time making a drape, and it was fun and informative. I love the way it looks.
I made the rosettes by rolling a thin strip of fondant, shaping and rolling it up, then forming the frills.
It still needed a little something, so I cut out about 40 little flowers, shaped them, and dusted the centers with red and pink petal dust. I attached them using a smidge of buttercream.
This was a fun cake and I had a blast making it. It still surprises me that I love doing this so much. What a blessing!
I took a bunch of time off to concentrate on family stuff, but now I have quite a few cakes coming up and I'm really looking forward to them. This is a blast.
This cake is a 2-layer 10" round, yellow cake with vanilla buttercream frosting and filling. The accents are fondant. The crown is fondant with a smidge of GumTex mixed in to help it harden.
The crown was a hassle to make, but I figured it out. I wrapped it around an oatmeal container after cutting out the basic shape and sealed the back edge. I wanted the tips to point outward but without support they would just flop down, so I decided to place the fondant wrapped oatmeal container into a large salad bowl and fill it with flour, then mound up the flour where necessary. I left it to dry for a whole day then carefully removed it and brushed off the flour. I painted it with a thick mixture of vodka and gold luster dust (the alcohol evaporates completely).
The quilting was much faster this time, as I'd done it on the previous cake. It's time consuming but simple once you get the distances marked.
This was my first time making a drape, and it was fun and informative. I love the way it looks.
I made the rosettes by rolling a thin strip of fondant, shaping and rolling it up, then forming the frills.
It still needed a little something, so I cut out about 40 little flowers, shaped them, and dusted the centers with red and pink petal dust. I attached them using a smidge of buttercream.
This was a fun cake and I had a blast making it. It still surprises me that I love doing this so much. What a blessing!
I took a bunch of time off to concentrate on family stuff, but now I have quite a few cakes coming up and I'm really looking forward to them. This is a blast.
Labels:
buttercream,
crown,
draping,
gold,
non pariels,
pink,
rosettes,
white
Monday, November 15, 2010
Storybook Cake
M-Pie turned 3 just recently and I made her this fairytale storybook cake. The cake is my yellow recipe with buttercream frosting. I was expecting a very small intimate family gathering, so imagine my surprise when we pull up to my Mother-In-Law's house and there are easily 8 cars parked outside her house! At a mere 1-layer, 9x13 inches, the cake was too small for everyone to have some, but the kids all got a piece and some of the adults got one too. It was a really fun event and everyone raved about my "skillz" and how good the cake was. It made me feel so great!
As I mentioned, I baked the cake in a regular rectangular 9x13 pan, then trimmed the short sides so there was a gentle angle. The scraps I mixed with frosting and shaped the humped areas where the "pages" would naturally fall bowed. I then frosted the top of the cake with pink and the edges with purple and did the Viva paper towel trick. The princess was made out of a small wonder mold cake. The body of the princess is fondant molded onto a dowel, then shoved through the top of the little half-egg shaped cake, then dressed in a gown of red fondant. I hand rolled the hair thin and attached with regular water. The crown and mouse are made of fondant as well. The little princess gems were bought at the dollar store (admitted sheepishly). It was very fun to make, even though the first princess I made was too big for the cake and I had to do it over again!
Happy Birthday M-Pie!
As I mentioned, I baked the cake in a regular rectangular 9x13 pan, then trimmed the short sides so there was a gentle angle. The scraps I mixed with frosting and shaped the humped areas where the "pages" would naturally fall bowed. I then frosted the top of the cake with pink and the edges with purple and did the Viva paper towel trick. The princess was made out of a small wonder mold cake. The body of the princess is fondant molded onto a dowel, then shoved through the top of the little half-egg shaped cake, then dressed in a gown of red fondant. I hand rolled the hair thin and attached with regular water. The crown and mouse are made of fondant as well. The little princess gems were bought at the dollar store (admitted sheepishly). It was very fun to make, even though the first princess I made was too big for the cake and I had to do it over again!
Happy Birthday M-Pie!
Saturday, September 25, 2010
Hello Kitty!
The cake is 2-10" rounds tiered together with vanilla buttercream filling and frosting. The kitty is made out of fondant, the flowers on the top are made out of fondant, but the flowers on the sides are made out of gumpaste. The ribbon is simply food safe ribbon.
I am pooped. This week has been so full, with my kiddo getting sick in the beginning of the week and myself not feeling too hot for a couple of days. I knew I had to muscle through it, though, so I pulled myself up by the bootstraps and got down to it. There's not much to tell, this cake was pretty routine, but I did stay up until 1:30 in the morning to finish it so that my nieces could come over this morning and we all could hang out, have a picnic, etc. It was fun! The client loved the cake and the kids in her car seemed overjoyed, so I'm happy!
Labels:
buttercream,
flowers,
fondant,
Hello Kitty,
pink,
red,
ribbon,
yellow cake
Friday, September 10, 2010
Frog and Monkey Girls
Both bows were made out of fondant. If you look at the frog in the monkey closeup, you can see her blush. She really is too dang cute.
Instead of doing the dots out of fondant, I did buttercream. They don't look as polished as I would have liked, but I think they look okay too. I very much enjoyed this cake. I find that I love moulding fondant ever so much. It really is my favorite thing about cakes.
All in all, this was a really fun cake and I look forward to the next challenge this amazing and consuming activity brings me.
Labels:
brown,
buttercream,
chocolate MMF,
fondant,
frog,
green,
monkey,
pink,
rice krispie treats,
RKT,
wire
Monday, August 23, 2010
Pregnant Mamma Silhouette Cake
I saw this technique online and so badly wanted to try it out.
Thankfully, I got an opportunity! The cake itself is just yellow cake with vanilla buttercream filling and frosting. The dark pink medallions are fondant leftover from a previous cake I made. Fondant can stay good for up to 3 months in the refrigerator if stored properly.
In making a cake that is tall and thin, you need to have an ample support system. I use wooden dowels for this support system in a thin cake like this one. The cake is 4-6" round layers sitting atop one 8" square layer. It is basically two 2-layer cakes on top of one another. I use wax paper on the bottom of each cake board for (hopefully) easier removal of the layer without damage to the underlying frosting.
Getting a violet is touchy. It is very easy to go from white to purple without using much color. I use a very small amount of color, mix it in, then a little more as needed.
The silhouette I printed off the computer and cut out carefully, then rolled gumpaste very thinly and painstakingly removed the main section using a decorator's wheel, a razor blade, and a few other gumpaste instruments. After the silhouette was cut out to my satisfaction, I marbled a piece of white gumpaste with light pink and rolled it thinly, then "glued" the silhouette to it with gumpaste glue (basically, gumpaste glue is a small piece of gumpaste dissolved in very little water until it's easy to paint on). I laid the malleable gumpaste silhouette onto a sugar canister to give it a 6" curvature, and let it dry for a few days.
The daisies were pretty easy to do. I let them dry on an egg crate I reserve just for that purpose to give them shape.
Overall, I am pleased with this cake and I learned a few new techniques along the way.
Thankfully, I got an opportunity! The cake itself is just yellow cake with vanilla buttercream filling and frosting. The dark pink medallions are fondant leftover from a previous cake I made. Fondant can stay good for up to 3 months in the refrigerator if stored properly.
In making a cake that is tall and thin, you need to have an ample support system. I use wooden dowels for this support system in a thin cake like this one. The cake is 4-6" round layers sitting atop one 8" square layer. It is basically two 2-layer cakes on top of one another. I use wax paper on the bottom of each cake board for (hopefully) easier removal of the layer without damage to the underlying frosting.
Getting a violet is touchy. It is very easy to go from white to purple without using much color. I use a very small amount of color, mix it in, then a little more as needed.
The silhouette I printed off the computer and cut out carefully, then rolled gumpaste very thinly and painstakingly removed the main section using a decorator's wheel, a razor blade, and a few other gumpaste instruments. After the silhouette was cut out to my satisfaction, I marbled a piece of white gumpaste with light pink and rolled it thinly, then "glued" the silhouette to it with gumpaste glue (basically, gumpaste glue is a small piece of gumpaste dissolved in very little water until it's easy to paint on). I laid the malleable gumpaste silhouette onto a sugar canister to give it a 6" curvature, and let it dry for a few days.
The daisies were pretty easy to do. I let them dry on an egg crate I reserve just for that purpose to give them shape.
Overall, I am pleased with this cake and I learned a few new techniques along the way.
Labels:
baby shower,
buttercream,
flowers,
fondant,
gumpaste,
pink,
purple,
silhouette,
support
Tuesday, August 3, 2010
A Different Take on a Castle Cake
Well good Tuesday to you all! I didn't get much of a chance to take a good picture of this cake, so I took it while I was in the car, on the way to deliver it. It's for a little girl's birthday party, and she loves Sleeping Beauty! The figurine I bought had on a BLUE dress, and as everyone knows, the dress is supposed to be PINK! So I covered the dress in gumpaste (tedious work, I tell you), let it dry, then painted it pink. Baking the cakes was a challenge. SIX cakes worth of ingredients got wasted because I got cheap with the cocoa (didn't go Hershey's like I usually do, I went store brand). UGH! That was a very irritating night, let me tell you! The cakes baked up rubbery. It was very very sad!
I made another castle cake a little while back, and I haven't been able to get in touch with the client to get the hardware back, so I bought a partial set off Craigslist so I could mold some gumpaste to make the towers. It was a long process, as I had to wrap the gumpaste around the mold, let it dry, then remove and do it again. I made two extra just in case of breakage (something I've learned full well to do!). After they were dry, I painted them lightly with gumpaste glue and sprinkled them with sprinkles. The piping was done with tube #17 in a rope pattern. The stars were made out of gumpaste and sprinkled with edible shimmer dust. The ones sticking up from the towers were two stars, glued together around wire and stuck in the tops of the gumpaste towers.
Happy Birthday, Princess Veda!
I made another castle cake a little while back, and I haven't been able to get in touch with the client to get the hardware back, so I bought a partial set off Craigslist so I could mold some gumpaste to make the towers. It was a long process, as I had to wrap the gumpaste around the mold, let it dry, then remove and do it again. I made two extra just in case of breakage (something I've learned full well to do!). After they were dry, I painted them lightly with gumpaste glue and sprinkled them with sprinkles. The piping was done with tube #17 in a rope pattern. The stars were made out of gumpaste and sprinkled with edible shimmer dust. The ones sticking up from the towers were two stars, glued together around wire and stuck in the tops of the gumpaste towers.
Happy Birthday, Princess Veda!
Labels:
buttercream,
castle,
gumpaste,
non pariels,
pink,
princess,
purple,
Sleeping Beauty,
stars
Saturday, July 17, 2010
Another Princess Castle Cake
This week went by so quickly. My son is talking more and more each day and while I have been taking moments to step outside our everyday routine to enjoy the process, it feels like everything is either speeding or crawling by. Does that make any sense? No? Well, I guess I should just stick to the caking of it all, then. :)
I had made a castle cake before for Dollbaby when she turned 4. She just loved it. This cake was for a first birthday party! I did make a 3D crown smash cake, but dang it I forgot to take a picture of it! Ah well. Life goes on. ANYway. Today I tried out the hot knife technique. Since it is ridiculously humid here (and hot), my buttercream hasn't been crusting the way I'm used to in order to do the VIVA paper towel smoothing I do. Thus, I reverted to the hot knife trick. You just get the frosting on the cake, then dip the spatula in HOT water and smooth. It's very fast but it takes some getting used to and some practice. I used that technique on the crown smash, so you don't even get to see the results! I'm sorry! Well, anyway, the castle cake was pretty much a repeat of the first time I made it, with a few small (or large, depending on how you look at them) exceptions. This time I offset the 6" 2nd tier to the back so I could use the steeple roof. I baked the cakes taller so I could use the provided door (last time my tier was too short and the door was too tall to fit properly, so I just frosted a door on). I used fondant to cover the turret roofs, which proved much easier for me to do and much easier to transport for the client.
Last time I did this cake, I had such a hard time getting the towers to stay in place. Last night, I was about to lose my cool when the new plans failed (using gumpaste to hold in place, using melted chocolate to hold them in place. These just didn't stand up to it). My INCREDIBLY SMART hubster came up with the brilliant idea to drill holes in the bottom of the towers, just large enough for the dowels I was using to fit through. IT WORKED! He is SO great! He drilled every last tower to make my life easier. I lurve him.
I worked as I went, placing a tower, decorating around it, then placing another. I covered the cake board with fondant this time, which I like the effect of. I used florist's tape around the cake board border to cover the raw edges. The leaves were made using tip #67 and a bit darker green than the accent. The bottom of the cake is 2-10" layers of yellow cake and the top is 2-6" layers of chocolate. SO GOOD! One problem I had was with the placing of the top towers. They should have been placed farther apart to take into account the width of the tops.
I think next time I will try out another method of baking and preparing the cakes that I found online and review it for you. It is a way of baking so you don't have to remove cake from the top of the layers to make it level. I'll let you know.
I very much enjoyed making this cake after my husband helped me out so dramatically. THANK YOU SWEETHEART!
I had made a castle cake before for Dollbaby when she turned 4. She just loved it. This cake was for a first birthday party! I did make a 3D crown smash cake, but dang it I forgot to take a picture of it! Ah well. Life goes on. ANYway. Today I tried out the hot knife technique. Since it is ridiculously humid here (and hot), my buttercream hasn't been crusting the way I'm used to in order to do the VIVA paper towel smoothing I do. Thus, I reverted to the hot knife trick. You just get the frosting on the cake, then dip the spatula in HOT water and smooth. It's very fast but it takes some getting used to and some practice. I used that technique on the crown smash, so you don't even get to see the results! I'm sorry! Well, anyway, the castle cake was pretty much a repeat of the first time I made it, with a few small (or large, depending on how you look at them) exceptions. This time I offset the 6" 2nd tier to the back so I could use the steeple roof. I baked the cakes taller so I could use the provided door (last time my tier was too short and the door was too tall to fit properly, so I just frosted a door on). I used fondant to cover the turret roofs, which proved much easier for me to do and much easier to transport for the client.
Last time I did this cake, I had such a hard time getting the towers to stay in place. Last night, I was about to lose my cool when the new plans failed (using gumpaste to hold in place, using melted chocolate to hold them in place. These just didn't stand up to it). My INCREDIBLY SMART hubster came up with the brilliant idea to drill holes in the bottom of the towers, just large enough for the dowels I was using to fit through. IT WORKED! He is SO great! He drilled every last tower to make my life easier. I lurve him.
I think next time I will try out another method of baking and preparing the cakes that I found online and review it for you. It is a way of baking so you don't have to remove cake from the top of the layers to make it level. I'll let you know.
I very much enjoyed making this cake after my husband helped me out so dramatically. THANK YOU SWEETHEART!
Tuesday, July 13, 2010
Under the Sea Cake
I made one major mistake while making this 8", 2 tier cake- I forgot the dowels in the bottom tier to keep the cake from squishing! Thankfully, the squishing was kept to a minimum by keeping the cake refrigerated, as I pipe a border of buttercream to contain the filling.
It's a Decadent Chocolate cake with Strawberry-Blueberry filling - YUM! The Ariel figurine is actually a candle I picked up at a party supply store. Too cute! The underwater effect was made by mixing green and blue frosting and layering it side by side in the piping bag, then squeezing it on thick and smoothing in only one direction with the spatula. I was pleased with how it came out. I was going for pink sea anemones with the flowers but I didn't want to detract from the figurine, so I kept them very small. The seaweed was done with swirly green frosting (just frosting with the green not mixed completely in) and a leaf tip, I think #67. I took two pictures only of this cake...I know, bad foresight! One has the flash off and one has the flash on...I think I'm going to put both in here.
Why? Well, just because I can! :)
It was a fun little cake and the birthday girl was so pleased!
Why? Well, just because I can! :)
It was a fun little cake and the birthday girl was so pleased!
Labels:
bubbles,
buttercream,
candle,
green,
Little Mermaid,
pink,
swirl,
underwater,
white
Saturday, June 26, 2010
Tropical Beach Birthday Cake
I will be the first to admit that the idea of gumpaste flowers sounds daunting. It is a time consuming task, no doubt, and the road to victory is paved with failure and broken hard work, but the payoff is amazing. I was provided with a concept picture and told that the flowers should be prettier (the original design had pretty awful flowers on it). I really like this client, so I just went all out making this the prettiest cake I've ever made. It's so FUN! The cake itself is just chocolate cake with strawberry filling and vanilla buttercream, with graham crackers crushed up to make the "sand". I think the pictures speak for themselves! The client just came to pick it up and she was so pleased! I'm very very happy, and I'm gloating now. Humor me!

My son is about to wake up from his nap and we're going to go play in the pool, and I've spent the whole nap catching up on this blog! I think this should be a lesson to me to update more often. If you have any questions about the flowers or techniques I use, don't hesitate to email me at alesharaelane@yahoo.com or leave a comment below.
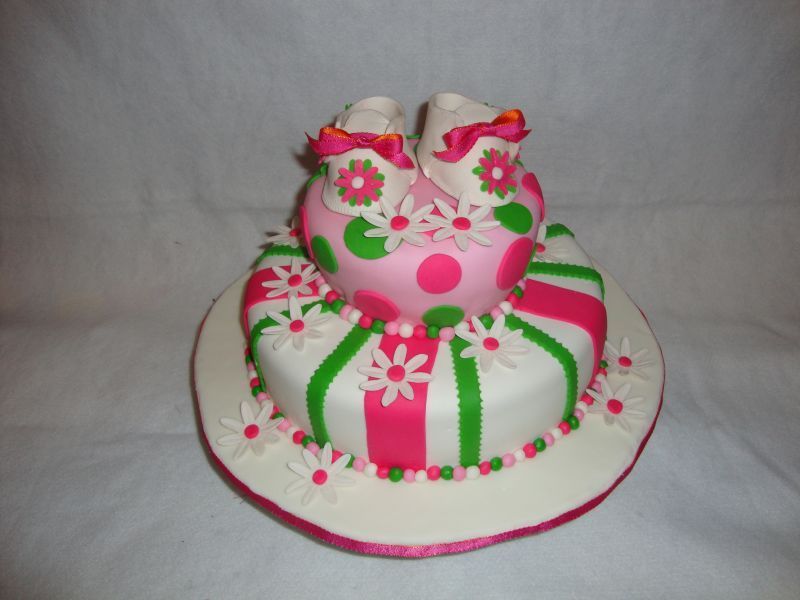
Catching Up, Part Deux - Pink and Green Daisies Cake
Welcome to the world, little one! I had an amazing time making this uber cute baby shower cake. I followed the booties template from CakeCentral.com to make the shoes. Those ladies are FANTABULOUS! They're great at answering questions and there's a wealth of cake decorating information available on there. If you ever have any caking questions, do a quick search on there and you will find answers. There's also a lot of tips and tricks, such as my new favorite thing - using a flower nail (you know, the ones you're supposed to use to pipe roses on?) as a baking core. When you bake a cake that's larger than 8" round, you need something to conduct the heat to the center of the cake, otherwise you will burn the edges of the cake and the center will still be gooey. Anyway, you just coat it with cooking spray and set it in the middle of your cake batter, and your cake cooks perfectly every time. It's amazing, and a little sad, that I had just bought a heating core from Wilton for $15 which was more work and less efficient for the sad results. That's my little tip, just for you guys!
You start with a cake. This one is yellow on bottom and chocolate on top. I covered this one with marshmallow fondant in white and pale pink. This cake is based off a picture that was provided to me by the client. I made the booties ahead of time out of gumpaste to give them ample time to dry, as well as the daisies.
I dyed some fondant green, and some hot pink, and started to decorate away. The little balls take a lot of time to get all the same size, but I watched Court TV shows during Stinkie's nap and rolled away. There are about 100 little balls on this cake. Anyhowzit, I covered the exposed cake board with white fondant, placed the balls, and placed the booties and the daisies.
I had decorated the booties with little flowers in pink and green. Aren't they precious?! This is where I found that humidity and fondant do NOT mix well. I decorated up the booties a few days in advance, and the day after I did so, I came downstairs to find that the heat had melted the flowers off! I was able to salvage them, though, and I kept the AC on for the next few days. Fondant does not do well in the refrigerator, so I needed the whole house cooler. My hubby did not complain, as he's always the one telling me we need to freeze in the Summer. He's a cool cat. Well, I placed all the elements together and this is what I call the Pink and Green Daisies Cake!
You start with a cake. This one is yellow on bottom and chocolate on top. I covered this one with marshmallow fondant in white and pale pink. This cake is based off a picture that was provided to me by the client. I made the booties ahead of time out of gumpaste to give them ample time to dry, as well as the daisies.
I dyed some fondant green, and some hot pink, and started to decorate away. The little balls take a lot of time to get all the same size, but I watched Court TV shows during Stinkie's nap and rolled away. There are about 100 little balls on this cake. Anyhowzit, I covered the exposed cake board with white fondant, placed the balls, and placed the booties and the daisies.
I had decorated the booties with little flowers in pink and green. Aren't they precious?! This is where I found that humidity and fondant do NOT mix well. I decorated up the booties a few days in advance, and the day after I did so, I came downstairs to find that the heat had melted the flowers off! I was able to salvage them, though, and I kept the AC on for the next few days. Fondant does not do well in the refrigerator, so I needed the whole house cooler. My hubby did not complain, as he's always the one telling me we need to freeze in the Summer. He's a cool cat. Well, I placed all the elements together and this is what I call the Pink and Green Daisies Cake!
Subscribe to:
Posts (Atom)