Showing posts with label silver. Show all posts

Tuesday, February 28, 2012

Sakura Cake


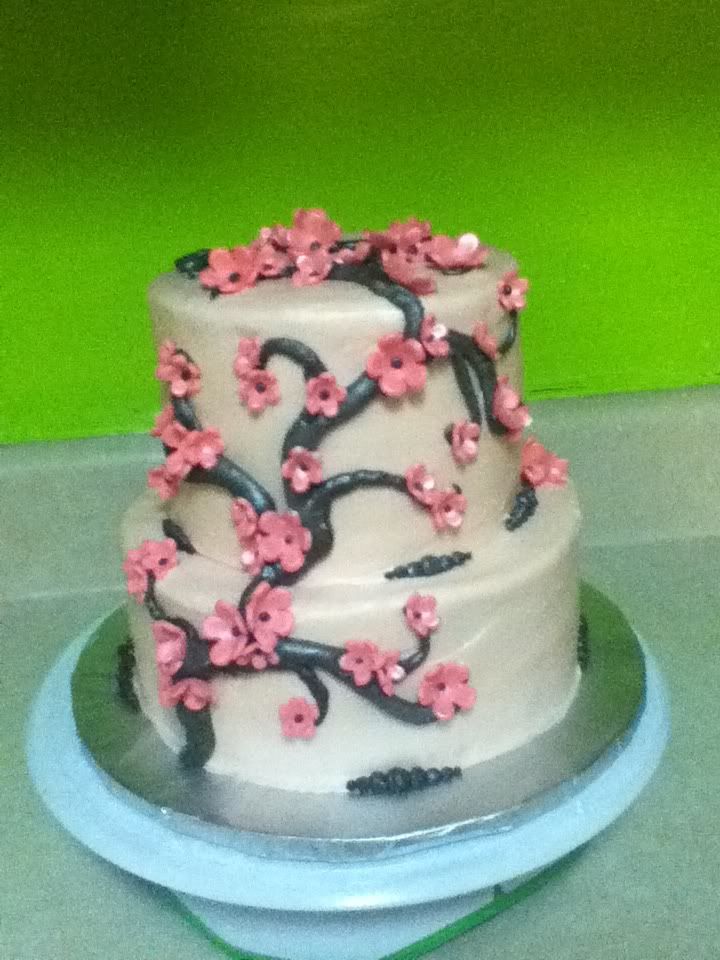
I really enjoyed making this simple Sakura cake.  Cherry blossoms are too cute and pretty!  The cake itself is my old yellow recipe.  There is a monogrammed letter at the top, "K" for Kristen, my sister-in-law.  I was given zero direction for her birthday cake, just that it was her 30th birthday (yay!)  I frosted the whole cake (the light pink) and used my airbrush to pearlize the whole thing, then added chocolate frosting "branches" and border dots.  I liked the idea of the randomness of them.  The flowers are fondant with chocolate buttercream centers. As a finishing touch, I airbrushed some silver on the branches for highlighting and pearlized the blossoms.
  One tip I would like to share about tiered cakes is how to stack them without making it impossible to remove the top tier without tearing off the buttercream on the top of the bottom tier.  I make the dowels just a tiny bit taller than they should be and put a massive amount of (sifted) powdered sugar where the top tier will rest. The powdered sugar absorbs perfectly into the bottom buttercream and makes it a little more durable.
  YAY for cakes!

Monday, November 15, 2010

1967 Dodge Coronet R/T - AKA MY FIRST CAR!

I've been wanting to make a car for a while now but I haven't had the occasion.  Luckily, I got this order and I was SO excited to start!
The cake is 2-10" yellow cake layers with vanilla buttercream frosting and filling.  The car is RKT covered and decorated with fondant.

I put the Rice Krispies in my little Magic Bullet and ground up about 2/3 of them before adding them to the melted marshmallows.  I did this so that the finished RKT would be a smoother surface for my fondant.  I printed off a good side view of the R/T, scaled it by hand, and cut out two, then laid them against the RKT and carved the side view shape, minus the tire wells at first.  Then I carved the tire wells, and put small ribbons of fondant where the shape of the body needed swells and dips.  The windows are chocolate fondant dyed black with powdered food coloring.  I love the black powdered food coloring.  It is more spendy but has no taste.  The black gel smells awful and tastes very bitter.  The same goes with the red.  Anyway, I rolled it thin and cut it to fit the top half of the car, then used my powder puff (a nylon stocking, never been worn of course, that I fill with powdered sugar and tie off so I can easily dust my fondant evenly) to dust it.  This made it so the gray fondant I laid on top wouldn't stick to it and I could carve out the windows easily.  I made the accent pieces out of fondant, except the license plate which is gumpaste.  There is a board under the middle of the car (fully wrapped in foil) that is holding it above the cake so the tires won't sink into the frosting.

I found myself so proud of my lettering on this one.  My son came in the kitchen while I was finishing it off and wanted to help me, so I had him read off the letters and make sure I spelled everything right by comparing it to the "Happy 60th Birthday" I had written on regular paper to make sure of the size of the message so it would be centered.  This was a really touching and special experience for my kiddo and I.  He got all the letters right, then told me that I did a good job writing my letters.  Awwww!
This cake was very fun to make and at times a little challenging.  I am so happy to have done my first car!

Tuesday, October 12, 2010

Hair Stylist Cake

The cake is 2-10" yellow rounds with vanilla buttercream frosting and filling.  The blow dryer and straightener are RKT covered in marshmallow fondant.  The red clip is made of fondant, but the silver clip is gumpaste.  The scissors are gumpaste as well, and everything silver was painted silver with silver shimmer dust and lemon juice mixed together.

The cake itself was very simple, as it required no mixing of colors for the base.  Just plain white BC frosting plugs.  I think I need to post a link to the SeriousCakes video about that, as it's the bestest, most wonderful thing I've ever seen.
Aw heck I'll just post her video.  Te frosting plug part starts at 1:35.  I love her videos!  I don't pull the plastic wrap all the way through the tip.  I cut it off up close to the frosting before I plop it in the bag, but it still makes for super fast cleanup and changing of colors.
Anyway, I smoothed the cake and set the objects on top, ran a ribbon around it, wrote "Happy Birthday Cedric" (On a side note, I love LOVE the name Cedric), placed the "cords", and called it a cake!

Saturday, February 20, 2010

Wu-Tang parties with SpongeBob

 This week I had two cakes on my agenda. There was a SpongeBob smashcake for a little boy's 1st birthday and a Sweet 16 cake for a big party!  SpongeBob first, because I'm just aching to write about the Wu-Tang  cake and it's such sweet expectation!
  Dean is turning 1!  Grandma wanted a special cake just for him.  It's nothing incredibly outlandish, but it was a fun little cake.  It measures 7"x5".  I never watch SpongeBob so I had to go completely off of pictures, but I think it came out well.  The original cake we decided on was out of fondant, but of course, the one year old doesn't want fondant!  So this is me trying to make buttercream look more fondant-y.
The Wu-Tang cake was a MONSTER cake!  It weighed about 50 pounds.  The tiers are 12", 10", 8", and 6".  It took over 15 hours to decorate this cake (without baking times included).  It is all yellow cake with two layers of buttercream filling and two layers of strawberry filling.  There were five pictures we took inspiration from when the clients came to order.  From those five we came up with this concept drawing that became the Wu-Tang cake.  Why Wu-Tang?  Do you see the tops of the Wu-Tang symbol?
Well, I do!  It was truly wonderful working on this cake and I was so happy to see it's completion.  It feels like I haven't done laundry or answered emails since Tuesday!  On this cake I tried out a new technique of covering the cake board with fondant.  It was fairly simple and I really enjoy doing something new.  The stars were difficult to figure out how to put on.  I made the stars out of gumpaste and pressed two together to sandwich the wire, then painted them and let them dry.  I was going for a more "puffy" kind of look to the positioning of the wires, but the gumpaste proved to be just a little too heavy for the gauge of wire I selected.  I think it looks pretty good anyway, though!  The clients loved it, and that was the best part!
Well, my back aches and I'm ready to cuddle on the couch with my hubby for a while.  Long days and pleasant nights, everyone!