This cake was made for a birthday party for twins at Cartwheels and Coffee. I was told to include a monkey and Elmo and the colors pink and orange, so I came up with the idea of Elmo on safari, looking for a monkey. The flowers and the bow in the monkey's hair fulfilled the orange requirement, and the pink car took care of the pink. The waterfall was so cute and fun to make. The rocks are brown/orange fondant rippled with brown gel coloring. The cake itself is vanilla cake with vanilla buttercream frosting and filling. Everything else on the cake is fondant and entirely edible.
I made the monkey using a tutorial online and I was very happy with how it turned out. I love the bananas. And I'm getting better at Elmo, as I've made the little stinker about 45,000 times now. He really is the epitome of happy and glee, isn't he? I have a pair of binoculars tucked under Elmo's hand in this cake.
Showing posts with label elmo. Show all posts
Monday, June 13, 2011
Sunday, February 20, 2011
Sesame Street!
I have always loved Sesame Street. Always. Even now that they've changed the opening jingle and added such magical creatures as Abby and her flying faerie school, Rosita, and...yes, you guessed it, Elmo, among others. Though I'm still in love with what was, I can absolutely appreciate what Sesame Street is still doing in helping little ones (like my 3 year old) and their parents have some quality time together talking about the letter Q and the number 17.
My client sent me an inspiration photo for this cake and I was beyond excited. What a cute cake, what a great show, what a perfect 1st birthday party theme.
I used Americolor Super Red and Wilton Rose to get the red tint. The yellow is a mix of Wilton's golden yellow and lemon yellow. The cake itself is yellow cake, 2-10" layers and 2-6" layers with buttercream filling and frosting and fondant and gumpaste decor. The smash cake is yellow cake with buttercream frosting.
Cookie Monster, Elmo, Oscar, and Big Bird are made out of fondant, and it was SO much fun making them. The bow loops, spirals, and balloons are made out of gumpaste so they would dry nice and hard. The little border balls are fondant rolled to (approximately) the same size and randomly stuck on. The blue "ribbons" on the bottom tier are fondant rolled thin. The street sign is fondant rolled thin and cut to shape.\ with buttercream lettering and border.
I would love to explain in more detail what I did with this cake because I did truly have the best time making it, but I am just now overcoming bronchitis (hence the long wait on posting this cake I made two weeks ago!) so this will just be brief.
Happy Birthday to you, Avery!
Labels:
Americolor,
balloons,
bid bird,
cake,
cooke monster,
elmo,
fondant,
gumpaste,
multi loop bow,
oscar the grouch,
red,
sesame street,
smashcake,
yellow
Wednesday, December 8, 2010
My First Cube/Block Cake!
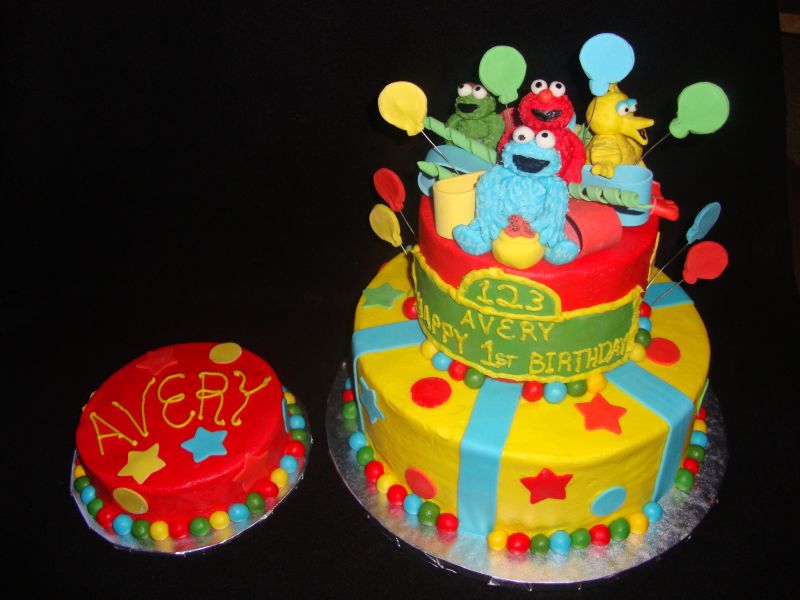
This cake was a different sort of challenge that I really enjoyed. The cake itself is 5 (5!) layers of chocolate cake with vanilla buttercream frosting and filling, with fondant accents. I decided to go with three layers on the bottom for stability, then a cake board, then the top two layers. The cake itself measures 8" on all sides. That may not sound very big, but TRUST ME, it's really really big and heavy!
I decided on a color palette using the color wheel and the split contrast color chart. The birthday was for a little girl, so I wanted some pink in there, so I went with a dark fuchsia, sky blue, and a bright lime for the base.
The picture I have here I took without the flash...the ones I took with flash came out fuzzy. I was hurrying to get the pictures taken so we could go, as my three year old was demanding we go to Cartwheels and Coffee. The coloring in the photo of the back of the cake is closer to the true shades.
I've notoriously had a problem getting my reds really red. It takes me forever to finally get it. I followed the directions by SeriousCakes to get red buttercream, but used it on the fondant instead, starting with the colors rose, golden yellow (she uses orange but I didn't have that) and the AmeriColor Super Red. That stuff is no joke! I dyed my hands like crazy, but in the end I did have a nice Elmo red to work with.
Other than the sheer size of this cake and the issues of making sure it measured the same on width and height, it was a pretty straightforward cake. I am so glad to have done one of these now!
Note: Elmo's eyes fell off when I put the cake in the car. I nixed those eyes and re-did them (with my engine running no less!) and after I took this picture I fixed the mouth to be more...puppet-like, I guess. I was in a hurry though so I didn't get a picture of the finished Elmo. It's not much different anyway.
I really hope they like their cake and enjoy eating cake for days!
Labels:
Americolor,
block,
blue,
buttercream,
Cartwheels and Coffee,
cube,
elmo,
fondant,
fuchsia,
lime,
red
Sunday, October 17, 2010
My first Elmo Cake
This cake was made for a party at Cartwheels and Coffee. The Elmo is RKT covered by tip 13 stars. The cake itself is 2-10" yellow cake rounds with vanilla buttercream filling and frosting. There is a little cake board under Elmo held up by dowels to provide support for the weight of the RKT.
When I made the RKT I used too much cereal and it was diffucult to pack tightly enough. What I do to pack RKT is take some plastic wrap, coat it in a little shortening or butter, coat my hands as well, and grab a large amount (about 3x as large as I want it to come out after packing). I set it down in the center of the plastic wrap, wrap it up, and start crushing. After I shaped the body and head, I put a wooden dowel in through the top of the head down through the bottom of the body to pre-make a hole for it. I learned that this was a good idea on the Frog and Monkey cake. I left the dowel in until it was time to decorate Elmo. It looked really funny as just RKT sitting in the fridge. We had a friend come over the night before the cake was due and he thought I had a voodoo doll hanging out in there.
The arms are being held on with uncooked spaghetti pasta. His mouth is a smile made of black fondant. Interesting side note, I had an awful time dying the frosting red. Awful. I ordered two different kinds of food dye online the night before this cake was due, knowing it wouldn't get here in time but knowing I'm not going through this again. After reading a whole lot online, I found that Americolor Super Red is the best for going straight to red, so I ordered some of that as well as dye powder. We'll see how it works. Anyway. I piped stars all over his body and arms, and the front and top of his head. I left the back bare so I could use that to support the head when I pushed the spaghetti in to help hold on the eyes and nose. They are simply fondant rolled to the right size and shape. The pupils are black fondant. I piped the back of his head in, applied the fondant star cutouts, and piped a shell border with #22. Then it was done and I delivered it to my favorite place to hang out with my kiddo, Cartwheels and Coffee in Carytown. Chris (my main man at CnC) said he had a #1 candle for the cake. I wish I had a picture of it with the candle in it!
Labels:
buttercream,
Cartwheels and Coffee,
elmo,
fondant,
orange,
red,
stars,
yellow
Subscribe to:
Posts (Atom)