Saturday, May 28, 2011

Babybug Baby Shower Cake

Last week I released 1000 ladybugs into my aphid-ridden, tiny garden.  So it seemed fitting that this week's cake was a fun take on a ladybug.

  The cake is yellow cake with chocolate BC frosting and filling.  The face, antennae, and butterfly are fondant.
  I never thought much about how difficult it would be to sculpt a baby's face out of fondant.  I kept trying and failing miserably.  After an hour and a half, I had come up with a dozen or so ways NOT to do it.  Every face I made looked like an adult.  I watched YouTube videos and pulled up pages on CakeCentral.com but had no luck.  I just couldn't get the lips right.  So I finally tried something completely different and came up with the finished product here.  I think I can do better next time, but I think it looks pretty good and it's definitely a far cry from what I started with!

  I carved the cakes and did a crumb coat, which I usually don't do but this time I got the urge for ease.  I set the crumb-coated cake into the freezer for about 15 minutes before doing the final frosting.
  The antennae are fondant shaped on wires.  Pretty easy peasy.  The leaves the babybug is laying on are buttercream.  The butterfly was fun to make.  I love making butterflies.  This one I wanted to be simple and pretty, so I put a simple pattern on the back in a darker pink and sprinkled it with shimmer dust.  I added GumTex to the fondant so it would dry hard and set it to dry on balled up cotton.  It works well.

  My client loved it and said "It's PERFECT!" when she saw it, and made my day.  It was a fun little cake and I learned that I need more work with my sculpting.  I'm very much looking forward to this next few weeks and the cakes I'm going to do.

Friday, May 20, 2011

Tie Dye Cuppies and Mondavi

I've been on a cake hiatus of sorts, getting ready for a few big ones coming up and resting a little bit. 

Wednesday was Stinkie's last day of gymnastics class and he wanted to make cupcakes for all his little friends, so I let him pick four colors (pink, red, blue, and yellow) to make tie dye cupcakes with.  He helped me make the batter and spoon it into the muffin tins, then it was bedtime for him.  I took them out (they were so pretty!) and decorated them with a really simple swirl of buttercream using the same colors that were inside the cupcakes.  Then I went to the dollar store and bought a package of the little white wedding favor boxes, a package of spring inspired cellophane gift bags, and some foam stickers.  My original plan was to let Stinkie decorate the bags but it was late and I didn't want to hassle with it in the morning sooooo...I did it!  And dang it, it was FUN!  The cupcakes were just a little big for the favor boxes, but that made for a nice tight fit.  I just stuck the cakes in the freezer for 10 minutes to harden up so I could put them in without squishing the frosting.  Then I put the boxes into the bags and tied them up with the twisties.  I think they came out really great!
 
The Mondavi cake was a rush job.  I forgot about my brother-in-law's birthday until yesterday morning!  So I hurried to make two 9x13 chocolate cakes and frosting without even knowing what I was going to make out of them.  After talking with my hubster, I decided on a nice 1987 Cab Sauv Mondavi Reserve.  It's something like $200 a bottle.  The shape didn't come out like I wanted, but it would have been so small had it really been to scale so I went with oddly shaped.  I didn't even have time to cover the cake board...but I figured, it's for family, so that's okay! 

I thought I would have a really hard time with the label but it was actually really fun and I'm pretty proud of it, other than the little goof under the Mondavi title.

Wednesday, March 23, 2011

The Castle Cake that keeps on giving...

I have made a few of these cakes to where I now have them down to science!  The color for this was was to be Barbie Purple (or as the birthday girl described it, pink-purple).  Neither of the photos I took captured the color just right (flash and low light) but you get the general idea.
The shoes here were the color I was going for:


Yes, they are amazing shoes and the price is $129.  I looked them up.  Fabulous shoes.
Here's with the flash:

And here's without the flash in my low light house:

It was a pretty fun and easy cake and I loved making it!

Friday, March 11, 2011

Betty Boop-boop de doop!

Two fun cakes for one fun event!  This Betty Boop cake was requested by the client based on her photo.  It is yellow cake with vanilla buttercream filling and marshmallow fondant (MMF) frosting.  I thought the composition of this cake would be more difficult than it was.  It turned out to be pretty fun!  I have always loved Betty Boop!

The hardest part for me was getting the flesh colored fondant.  It was a total pain.  The red fondant should have been the hardest, but I made up a special batch just of the red and added all the coloring to the melted marshmallows before adding all the sugar.  That made things very easy there.  I used powdered red as well because it has no taste whatsoever and the Americolor Super Red because it has very little flavor.  I will never again use the Wilton no-taste red...it certainly DOES have a bitter taste!
I love her little eyelashes.

The second cake is yellow cake with vanilla BC frosting and filling.  I usually use the chocolate BC as the base for any black frosting, but this time I tried something I read on a caking website.  I used the Wilton Juniper gel color first (man is that an ugly color) and then used a bit of the Americolor black (just a tiny bit) and a package and a half of the Chefmaster black food powder.  It darkened overnight and turned darker still when it was warmed by my hands.  The hearts are simply fondant cutouts.

The picture I took used flash and it came out looking gray, so I took another quick snapshot of it next to my Adidas bag in natural lighting and it looks much more true to life.  YAY! Oh, and yes, that is one of my custom made, super sturdy crazy awesome cake boxes.  I rock.
These cakes were not as stressful as I had anticipated and I am very glad I got a chance to make them!

Sunday, February 20, 2011

Sesame Street!


I have always loved Sesame Street.  Always.  Even now that they've changed the opening jingle and added such magical creatures as Abby and her flying faerie school, Rosita, and...yes, you guessed it, Elmo, among others.  Though I'm still in love with what was, I can absolutely appreciate what Sesame Street is still doing in helping little ones (like my 3 year old) and their parents have some quality time together talking about the letter Q and the number 17.

My client sent me an inspiration photo for this cake and I was beyond excited.  What a cute cake, what a great show, what a perfect 1st birthday party theme.
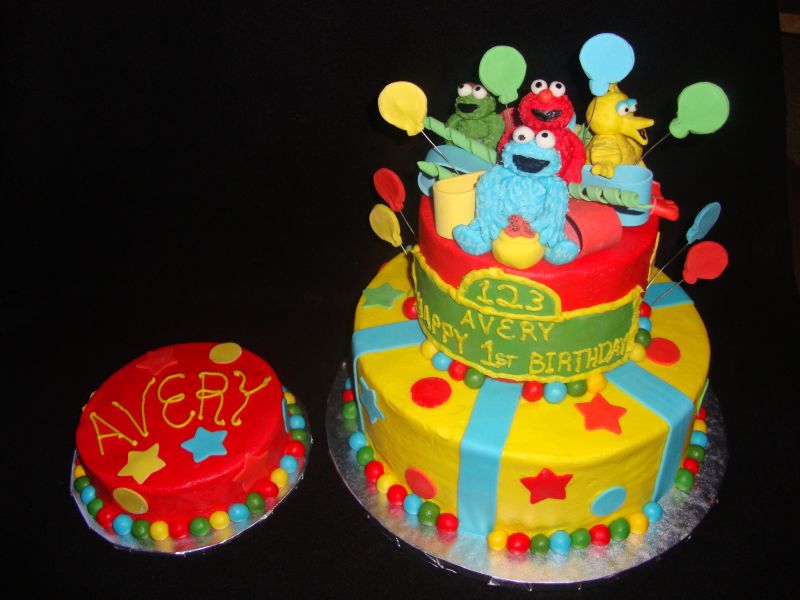
I used Americolor Super Red and Wilton Rose to get the red tint.  The yellow is a mix of Wilton's golden yellow and lemon yellow.  The cake itself is yellow cake, 2-10" layers and 2-6" layers with buttercream filling and frosting and fondant and gumpaste decor.  The smash cake is yellow cake with buttercream frosting.

Cookie Monster, Elmo, Oscar, and Big Bird are made out of fondant, and it was SO much fun making them.  The bow loops, spirals, and balloons are made out of gumpaste so they would dry nice and hard.  The little border balls are fondant rolled to (approximately) the same size and randomly stuck on.  The blue "ribbons" on the bottom tier are fondant rolled thin.  The street sign is fondant rolled thin and cut to shape.\ with buttercream lettering and border.
I would love to explain in more detail what I did with this cake because I did truly have the best time making it, but I am just now overcoming bronchitis (hence the long wait on posting this cake I made two weeks ago!) so this will just be brief.

Happy Birthday to you, Avery!

Sunday, February 6, 2011

A few Tinkerbells for your viewing pleasure!

Dollbaby's birthday was this past week, and her birthday was this weekend.  I made her two cakes because, well, a girl only turns 5 one time, right?  RIGHT?! This is my "AGREE WITH ME!" face.

The first cake was a doll cake (duh).  It's yellow cake with vanilla frosting, and since I made it just for a very small family gathering at Chick-Fil-A, I used up my "old" buttercream for the filling.  It was pink and blue inside!  I even made the cake board out of scraps I had left over (you can see the flat spot.  I'm so embarassed!  But, it WAS just for family!)  I baked the skirt in a Pyrex bowl (I have as yet to actually purchase the Wonder Mold pan, to my eternal shame) and stacked it on top of a 6" round cake.  I used the trimmings mixed with some buttercream to mold the top to my desired height and shape because well, I just felt too dang lazy to bake another 6" cake!  Dollbaby loved it and we had a great time.  I love Chick-Fil-A.

The cake for her party was a little more involved and a little more fun to make.  I had seen the inspiration photo of this cake a long time ago and wanted to make it for forever, but I didn't have anyone wanting a Tinkerbell cake.  FINALLY!  I got to make it for Dollbaby's Tinkerbell party.  The lily is a fondant/gumpaste mix, as is the bow and grass blades.  It surprised me how little time this cake actually took to put together compared to what I thought it would.  Of course, the Tinkerbell on top is just a candle and not hand molded or anything, so that cut out time right there.  The little mushrooms were so fun and easy.  I molded them on toothpicks.  The candles are those trick sparkling candles.  I liked that they looked like bamboo or grass blades so they fit into the motif of the cake.

I made another cake this past week too, but it was a cake I've made before.  It was cute and the party was at Cartwheels and Coffee, one of my favorite places in Richmond.  There's always a good vibe going around there.  Anyway, I could not for the life of me find my camera, so I had to take this with my webcam and it came out all washed out.  It's a very fun little cake and I loved making it again!

Sunday, January 30, 2011

A Bow and a Baby Shower

This is the first time I've done two cakes for an event, and it was pretty fun coordinating them without having them be too matchy-matchy.
This was also the first time I made a large loop bow for a cake, so it was a learning experience.  I mixed some GumTex into my pretty blue fondant and got going.  I wrapped a brand new (and clean) broom handle in wax paper and set it up near my work area and rolled my fondant, then cut strips just the right size and looped them and glued them on the broomstick.  Then I set the broom out of the way for the strips to dry for a few days.  When they were fully dried, I took them off carefully and arranged them into a bow pattern, and allowed that to dry for a few days.
  The letters are the same fast-drying fondant that I used for the bow, cut to shape and dried on the curled wires.  I put small straws in around the wires in the cake for stability during transport.  When I delivered this cake, the springs (of course) were bouncing around.  This was a fun cake but also stressful at times.

The baby and blanket were fun to do.  The fondant is chocolate fondant and SOOOOO yummy!  I broke off a piece at the beginning of shaping to set aside to nibble on later!  I just LOVE chocolate marshmallow fondant.

The most challenging part of these cakes (aside from the new experience with the bow) was trying to match fondant and buttercream colors perfectly.  I think I did pretty good!  The day before delivery, I baked up the cakes and clean frosted them (the coat of buttercream) and piped the little designs, let the frosting harden in the fridge for a few minutes, and wrapped them in Saran wrap.  The next day I put the fondant toppers on and sealed them up in their special boxes.  The box for the 10" round was a whopping 13"x13"x13"!  The smaller cake is a 6" round.  Both cakes are my super awesome yellow cake with vanilla buttercream frosting and filling.

Sunday, January 16, 2011

Crown and Draping

I should have posted this days ago!  I am a slacker :)

  This cake is a 2-layer 10" round, yellow cake with vanilla buttercream frosting and filling.  The accents are fondant.  The crown is fondant with a smidge of GumTex mixed in to help it harden.
  The crown was a hassle to make, but I figured it out. I wrapped it around an oatmeal container after cutting out the basic shape and sealed the back edge.  I wanted the tips to point outward but without support they would just flop down, so I decided to place the fondant wrapped oatmeal container into a large salad bowl and fill it with flour, then mound up the flour where necessary.  I left it to dry for a whole day then carefully removed it and brushed off the flour.  I painted it with a thick mixture of vodka and gold luster dust (the alcohol evaporates completely).
  The quilting was much faster this time, as I'd done it on the previous cake.  It's time consuming but simple once you get the distances marked.

  This was my first time making a drape, and it was fun and informative.  I love the way it looks.
  I made the rosettes by rolling a thin strip of fondant, shaping and rolling it up, then forming the frills.
  It still needed a little something, so I cut out about 40 little flowers, shaped them, and dusted the centers with red and pink petal dust.  I attached them using a smidge of buttercream.
  This was a fun cake and I had a blast making it.  It still surprises me that I love doing this so much.  What a blessing!
  I took a bunch of time off to concentrate on family stuff, but now I have quite a few cakes coming up and I'm really looking forward to them.  This is a blast.

Sunday, January 2, 2011

New Years Birthday Rush!

7:30pm:  I get a call from a great client and friend, asking if I can make a cake for 16 people at a little girl's 1st birthday party, the next day at 3pm.  I'm in the car on the way home from my In-law's house, it's my anniversary, and I have a bottle of Mango Rum that is calling hubster's and my name...but I LOVE CAKES!
8:15pm:  We arrive home, and I preheat the oven, get the ingredients together, put the cakes in and set the timer.  Then Hubby pours me a drink and we watch Psych.  We're wild party animals, I tell you!
8:50(ish):  The cakes come out of the oven, and just in time!  I'm about to start my third drink.  I wrap up the cakes and set them in the fridge.
The rest of the evening is filled with more Mango Rum and Louis C.K. standup comedy.  I was in stitches the rest of the night.  Midnight comes, we kiss, I flick the porch light on and off a few times, then the gunshots start and we scramble into our house as we hear a ricochet.  *Two more years until we buy a house!* I tell myself!  Up to bed!
6:00am:  Stinkie is up.  It's Hubby's day to wake up with him, so I lay in bed for a few minutes... then realize I have to go to the Walmartz for frosting ingredients!
7:30-8:00am:  Getting hit on by a weird guy in the Walmart parking lot...before AND after buying the things I need.

8:15am:  Make the fondant bow and the gumpaste curly ribbons so they have time to dry a little.  Make the cake board, mix the frosting, color the frosting, make frosting plugs, fill and stack layers, base coat the cake.
10:00am: Try to figure out how to do the quilted look and have it come out straight lines.  I marked 1" intervals around the bottom of the cake, then used a straight edge to copy the intervals on the top ridge.  After trial and error (this is my first quilted cake) I used a straight cake scraper to make the quilted lines, then painstakingly put in pearl non-pariels at each meeting point.  The bottom border went in about here.  Then I made the nameplate.  Side note...I love the name Lauren.
11:30ish:  I make the "1" on the top, fill, and outline.  Pipe the top border, then place the ribbon and the nameplate.

12:15pm:  I want to put my child down for a nap and he insists on Daddy.  I haven't seen the little guy all day and I MISS HIM!  Hubby has been entertaining and loving on him all day so much he hasn't hardly bothered with me.  I'm relieved...but a little sad too :(  He's getting so big now!  Daddy takes off afterward and...I realize I don't have tape to make the cake box.  I look everywhere.  All I have is blue and red electrical tape.  All my tape got eaten up with the Christmas wrapping.  EEK!  Since I don't have a car to use, that awesome client I mentioned earlier agrees to pick one up on the way over.  She is awesome.  I think I said that though!
1pm:  The kitchen is mostly cleaned and the cake is pretty much done.  All I have to do is take pictures.  I do that and wait for the pickup time (2pm-ish).  Then I rest for a few minutes.  My head is swimming and I realize I have the worst hangover I've ever had.  We have no Tylenol here and I'm stuck here!
The rest of the day is a blur.  We went to Outback and I got sick.  Hubby drove me home and took care of Stinkie.  What a great guy!  I took a bath and went to bed at 7:45.  Slept ALL night, and I feel much better now!

Wednesday, December 8, 2010

My First Cube/Block Cake!

This cake was a different sort of challenge that I really enjoyed.  The cake itself is 5 (5!) layers of chocolate cake with vanilla buttercream frosting and filling, with fondant accents.  I decided to go with three layers on the bottom for stability, then a cake board, then the top two layers.  The cake itself measures 8" on all sides.  That may not sound very big, but TRUST ME, it's really really big and heavy!
I decided on a color palette using the color wheel and the split contrast color chart.  The birthday was for a little girl, so I wanted some pink in there, so I went with a dark fuchsia, sky blue, and a bright lime for the base.
The picture I have here I took without the flash...the ones I took with flash came out fuzzy.  I was hurrying to get the pictures taken so we could go, as my three year old was demanding we go to Cartwheels and Coffee.   The coloring in the photo of the back of the cake is closer to the true shades.

I've notoriously had a problem getting my reds really red.  It takes me forever to finally get it.  I followed the directions by SeriousCakes to get red buttercream, but used it on the fondant instead, starting with the colors rose, golden yellow (she uses orange but I didn't have that) and the AmeriColor Super Red.  That stuff is no joke!  I dyed my hands like crazy, but in the end I did have a nice Elmo red to work with.
Other than the sheer size of this cake and the issues of making sure it measured the same on width and height, it was a pretty straightforward cake.  I am so glad to have done one of these now!

Note:  Elmo's eyes fell off when I put the cake in the car.  I nixed those eyes and re-did them (with my engine running no less!) and after I took this picture I fixed the mouth to be more...puppet-like, I guess.  I was in a hurry though so I didn't get a picture of the finished Elmo.  It's not much different anyway.
I really hope they like their cake and enjoy eating cake for days!

Monday, November 15, 2010

1967 Dodge Coronet R/T - AKA MY FIRST CAR!

I've been wanting to make a car for a while now but I haven't had the occasion.  Luckily, I got this order and I was SO excited to start!
The cake is 2-10" yellow cake layers with vanilla buttercream frosting and filling.  The car is RKT covered and decorated with fondant.

I put the Rice Krispies in my little Magic Bullet and ground up about 2/3 of them before adding them to the melted marshmallows.  I did this so that the finished RKT would be a smoother surface for my fondant.  I printed off a good side view of the R/T, scaled it by hand, and cut out two, then laid them against the RKT and carved the side view shape, minus the tire wells at first.  Then I carved the tire wells, and put small ribbons of fondant where the shape of the body needed swells and dips.  The windows are chocolate fondant dyed black with powdered food coloring.  I love the black powdered food coloring.  It is more spendy but has no taste.  The black gel smells awful and tastes very bitter.  The same goes with the red.  Anyway, I rolled it thin and cut it to fit the top half of the car, then used my powder puff (a nylon stocking, never been worn of course, that I fill with powdered sugar and tie off so I can easily dust my fondant evenly) to dust it.  This made it so the gray fondant I laid on top wouldn't stick to it and I could carve out the windows easily.  I made the accent pieces out of fondant, except the license plate which is gumpaste.  There is a board under the middle of the car (fully wrapped in foil) that is holding it above the cake so the tires won't sink into the frosting.

I found myself so proud of my lettering on this one.  My son came in the kitchen while I was finishing it off and wanted to help me, so I had him read off the letters and make sure I spelled everything right by comparing it to the "Happy 60th Birthday" I had written on regular paper to make sure of the size of the message so it would be centered.  This was a really touching and special experience for my kiddo and I.  He got all the letters right, then told me that I did a good job writing my letters.  Awwww!
This cake was very fun to make and at times a little challenging.  I am so happy to have done my first car!

Storybook Cake

M-Pie turned 3 just recently and I made her this fairytale storybook cake.  The cake is my yellow recipe with buttercream frosting.  I was expecting a very small intimate family gathering, so imagine my surprise when we pull up to my Mother-In-Law's house and there are easily 8 cars parked outside her house!  At a mere 1-layer, 9x13 inches, the cake was too small for everyone to have some, but the kids all got a piece and some of the adults got one too.  It was a really fun event and everyone raved about my "skillz" and how good the cake was.  It made me feel so great!

As I mentioned, I baked the cake in a regular rectangular 9x13 pan, then trimmed the short sides so there was a gentle angle.  The scraps I mixed with frosting and shaped the humped areas where the "pages" would naturally fall bowed.  I then frosted the top of the cake with pink and the edges with purple and did the Viva paper towel trick.  The princess was made out of a small wonder mold cake.  The body of the princess is fondant molded onto a dowel, then shoved through the top of the little half-egg shaped cake, then dressed in a gown of red fondant.  I hand rolled the hair thin and attached with regular water.  The crown and mouse are made of fondant as well.  The little princess gems were bought at the dollar store (admitted sheepishly).  It was very fun to make, even though the first princess I made was too big for the cake and I had to do it over again!
Happy Birthday M-Pie!

Monday, November 1, 2010

A Halloween Anniversary!

This cake was pretty straight forward, and I very much enjoyed it.  I used the leftover navy blue BC from the last cake and made black by adding yellow, red, and brown coloring gels and more black powder.  The cake itself is two 10" decadent chocolate cake layers with vanilla BC filling and frosting.  See the baking powder can?  That's for size analysis (Thank you Christyl!  I keep forgetting!)  The numbers on top are gumpaste painted with gold edible shimmer dust.

This cake also had a specialty sturdy box.  I hate commercial cake boxes.  Something always goes wrong with them.  I'm so glad I've started making my own.

Catching up again...Chicago Bears Slouch Cap

I need to stay current on this blog!  Yesterday was Halloween and I sit here eating my child's enormous stash of candy, feeling guilty for not knowing what cake I put on this blog last or which one comes next...I actually had to check my own blog!

This cake was exactly the same size as an NFL cap.  It is yellow cake with vanilla BC frosting.  The frosting had to be a dark navy blue, and I was worried about the darkness, since you have to use a LOT of black coloring to get anywhere close to it and black food dye tastes like butt.  Thankfully, I had bought some Chefmaster black food dye powder from EBay and used that.  There was no strange taste at all, and it colored it very well.
The brim is made out of gumpaste that I tried to dye the same color as the BC, but failed.  So I just attached the brim and covered it in BC.
The cake was baked in an 8" round and a pyrex bowl, so waste of cake due to carving was kept to a minimum.  I used the Wilton baking core for the bowl to make sure it got baked perfectly.  I usually just use the flower nail #7.  Anyway.
After frosting and doing the Viva paper towel method, I let it get hard in the fridge, then brought it out to do the stitching with the Wilton quilting tool.


The NFL logo is hand painted gumpaste.  I think it came out awesome.  Interesting sidenote, the logo on the 2009 Bears slouch cap is a resurrected 1970's NFL logo.  I don't know why, I guess they just felt like bringing it back to the old school.  The Reebok and C logos are buttercream.
It was placed in a special-made, super sturdy cake box and my new card was attached to that.  Did I mention I got new cards?  They are too cute.  You can get free ones from Vistaprint, but I loved the design I got on mine.
This was a fun cake, and nothing went wrong in the making of it.  Such a wonderful blessing!
It's been a while since I posted my email, so here it is... alesharaelane@yahoo.com.
Have the best day ever!

Sunday, October 17, 2010

My first Elmo Cake

This cake was made for a party at Cartwheels and Coffee.  The Elmo is RKT covered by tip 13 stars.  The cake itself is 2-10" yellow cake rounds with vanilla buttercream filling and frosting.  There is a little cake board under Elmo held up by dowels to provide support for the weight of the RKT.
When I made the RKT I used too much cereal and it was diffucult to pack tightly enough.  What I do to pack RKT is take some plastic wrap, coat it in a little shortening or butter, coat my hands as well, and grab a large amount (about 3x as large as I want it to come out after packing).  I set it down in the center of the plastic wrap, wrap it up, and start crushing.  After I shaped the body and head, I put a wooden dowel in through the top of the head down through the bottom of the body to pre-make a hole for it.  I learned that this was a good idea on the Frog and Monkey cake.  I left the dowel in until it was time to decorate Elmo.  It looked really funny as just RKT sitting in the fridge.  We had a friend come over the night before the cake was due and he thought I had a voodoo doll hanging out in there.
The arms are being held on with uncooked spaghetti pasta.  His mouth is a smile made of black fondant.  Interesting side note, I had an awful time dying the frosting red.  Awful.  I ordered two different kinds of food dye online the night before this cake was due, knowing it wouldn't get here in time but knowing I'm not going through this again.  After reading a whole lot online, I found that Americolor Super Red is the best for going straight to red, so I ordered some of that as well as dye powder.  We'll see how it works.  Anyway.  I piped stars all over his body and arms, and the front and top of his head.  I left the back bare so I could use that to support the head when I pushed the spaghetti in to help hold on the eyes and nose.  They are simply fondant rolled to the right size and shape.  The pupils are black fondant.  I piped the back of his head in, applied the fondant star cutouts, and piped a shell border with #22.  Then it was done and I delivered it to my favorite place to hang out with my kiddo, Cartwheels and Coffee in Carytown.  Chris (my main man at CnC) said he had a #1 candle for the cake.  I wish I had a picture of it with the candle in it!

Tie Dye Insides

This was a little personal cake for Stinkie's real birth day.  It was fun to make, but it did take some time.  I made my regular yellow cake to start off with, but I used two egg whites in place of one whole egg.  This cake is only 6" round, so it didn't take nearly as long as I suppose a larger cake would.  I'm thinking I might save this technique for family and friends' cakes.  Anyway, I divided the batter up into three separate bowl equally.  I added blue color to one and started pouring the cake.  One spoonful in the center of a sprayed-with-Baker's Joy 6" Wilton round cake pan.  I let it settle while I colored the yellow.  Then a spoonful of yellow directly in the center of the blue batter already in there, then I dyed the red and spooned in a little of that.  
I did have to rotate the pan (slowly!  Don't disturb the batter!) to make the batter spread evenly.  My counters are crooked :(.  Between each spoonful, I waited about 10 seconds to give the batter proper time to spread out.  Consistency of your batter is pretty important.  It must be able to spread but must not be too loose.  Finally finished, I stuck it in the oven and let it bake for about 30 minutes.  When I took it out, I was SO tickled pink!  I love the tie dye effect at the edges.  I think I might do some dragging from the center before baking next time for a more incorporated look.  Ethan of course had a special cake for his birthday party (see WordWorld cake post) but this little cake was just for his actual birth day, the day after his party.  I didn't put frosting on it, but left it as is to show off the pretty colors.  He dug into it like a boy possessed.  It was fun!
 I had been worried about the texture of the cake, as I had never substituted two whites for one egg in this recipe, but it baked up just fine (other than these little pinprick bubble looking things on the top...don't know what caused these, but it may have just been the layering of the batters gave rise to air trapped in the batter in the pan?)  I cannot wait to try this again and I am going to have the BEST time ever.  I might do zebra stripes.
I picked up a copy of Bakerella's Cake Pops book yesterday at Barnes and Noble.  It's so cool to hear her story and see all the wonderful things she's been creating.  I know I want to do some designed and decorated cake pops sometime soon...they are TOO great!

Friday, October 15, 2010

UPS Logo Cake

This was a quick little cake that was pretty fun to make!  The dimensions are roughly 10"x8"x2".  The brown frosting is chocolate, and the yellow is vanilla.  The cake itself is my favorite yellow cake.  People have been raving about this recipe. It took me a while to develop it, so I'm really glad it's working out!
Not much to say on this cake, other than the cake box I made for it.  I hate cake boxes.  I really hate them.  They give people a false sense of security because they can't see the cake and the flimsy boxes just DON'T do their job.  Anyway, the client needed a cake box for transport, so I made one out of foam posterboard. 
The thick stuff (it's about 1/8" thick).  It was pretty easy and incredibly sturdy, and I think I'm just going to make these from now and and include them in the cost of the cake.  I felt good, and the cake was totally protected.  I'll add a picture on another night, as I have a cake due tomorrow and I should be getting back to it!