Sunday, April 21, 2013

And Now, For Something Completely Different

Buying a house.
For the first time.
I'm completely terrified and completely thrilled.
  This journey started and stopped abruptly a year ago, when we had a junky agent who refused to show us short sales or anything she didn't "like".  We gave up a couple months into the process and figured we'd wait to move across the country and buy a home there.
  Then our apartment complex took a weird turn for the worse and we looked at our lives and realized that we needed someplace to call our own, someplace quiet, someplace where there weren't gunshots and loud car stereos.
  Commence finding a home.  We knew nothing at all about the process, even though we had looked just a year before, nothing had looked good enough to consider buying.
  We have pretty much no money down, so our lender said the FHA (specifically VHDA) loan would be the best option.  What's the difference between an FHA and a Conventional loan?  Put shortly as I understand it, FHA won't let you buy a home that needs repairs.  Our agent said "it can be God-Awful ugly but can't have wood rot on the windows or damaged siding."  The idea is that the bank has to know you won't have to come in and spend money right away.  This includes TINY things that, if necessary, you come in the middle of the night to fix before the FHA inspection.
  Now for something called the GFE (Good Faith Estimate).  When you go to a lender to get pre-approved, you can ask for or they will give you a GFE.  This lists ALL fees associated with them lending you money.  There's something called Junk Fees  (that's the clickable link to Investopedia, where there's a lot of good information) which is fluff matter that they don't really have to charge but they will because you don't know what the hell it means.  What the junk fees mean is they just get a little more money out of you in a contract form.  You NEED to read about the mortgage contract!  Learn what the terms all mean.  Ask the lender guy (or gal) to explain things to you AFTER you've spent a few hours learning about them so you can ask knowledgeable questions.  Click around at the Investopedia website I linked above for a couple hours and you will learn a ton.
  One very important thing I learned about is Private Mortgage Insurance.  This is $141 a month that you pay because you don't have 20% down.  It's a VERY BIG DEAL.  You pay this insurance until you owe less than 78% LTV (Loan to (assessment) Value), then you have to pay for an assessment to get it taken off.  Our broker said that after June, PMI will be PERMANENT for the life of an FHA loan (but I'm not certain on a conventional loan).
  So we are currently at the point where we have put a bid on a house and the other agent asked for $1000 more and we agreed, so we have a verbal agreement.  We will find out today if they signed the contract or not, and we go into a whirlpool of getting to closing in 34 days.


 Here's the house we picked.  There is no picture of the large back yard for some reason.  I don't know if the listing will stay up at that link after closing though.  If this is meant to be, it will be.  Keep us in your thoughts!

Thursday, March 28, 2013

100!

This is my 100th blog post.  It seems like such a large number and I am coming to grips with how many stinkin' cakes I've made!
This week's cupcakes were pulled from Southern Living's Big Book of Cupcakes (same place I got the recipes last week for the Key Lime Pie cupcakes).  That book is amazing.  Say what you will about the internet being a great resource for recipes, I've never had a recipe from a published book go awry.
These cupcakes are a Scattered Lavender cake (fancy way of saying there's lavender flowers in there) with a Honeyed Mascarpone frosting, topped with lavender brittle (SO fun to make!) and a few lavender flowers.

So happy with this recipe!  Instead of using the regular butter cake recipe as the book suggests, I added about 2t crushed lavender to the mix during creaming.  It really added something.  The brittle looks awesome in the pictures and is fun and delicious to eat by itself, but as part of a cupcake, for me, it was a bit annoying to have basically a piece of sugar glass messing up my creamy frosting!
Happy caking, happy eating, happy Spring!

Friday, March 22, 2013

Key Lime Cupcakes

I decided to try out a new recipe, and thus I present to you Key Lime Cupcakes!

SOOO yummy!  White Citrus cake with Key Lime filling and whipped cream frosting, dusted with graham cracker crumbs and a few strips of lime zest!
This was so good.

Saturday, March 16, 2013

More Princess Dresses!

So you remember a few posts back when I made some Disney Princess Dress cupcakes and fell in love with them?  I had another chance to make some so I did that with a few changes.  I didn't manage to take any pictures of the finished cupcakes myself but the client was kind enough to take these for me!
Snow White and her apple.  I think this one is my favorite.  You can see Rapunzel peeking out from behind her a little bit.  I didn't get a picture of Rapunzel by herself.  I like the little ruffled lace at the top of her corset and the painted scrollwork on the skirt.
Belle, a close second.  I love the draping.
Cinderella, a classic princess!
Aurora from Sleeping Beauty.
Tiana from Princess and the Frog, with her cute little leaves and vines!

My original thought was to make little items to go with each cupcake, like the apple on Snow White's dress.  However, I did the apple, then spent 20 minutes trying to make a tiny high heel out of fondant and just gave up.  I would put the slipper with Cinderella, a rose with Aurora, a book for Belle, a frog for Tiana, and a frying pan for Rapunzel.  Wouldn't that have been cute?  Yeah.  I think so too.  However, the client didn't ask for it and I just lost the inspiration trying to make that stinking little shoe :)
This is a great picture of the top view that I love!


Monday, March 11, 2013

Pastels and SpiderMan Cupcakes!

I think I'm really getting into doing cupcakes recently, which is something I always thought took more time than they were worth.


This first cake was...difficult.  I know it doesn't look like it, but for some reason everything went wrong!  I ended up finishing the cake at midnight and when I woke up in the morning at 5am, I hated everything about how it looked so I tore off all the frosting and made it all again!  Both the cakes and cupcakes were airbrushed to be pearly.


The Spiderman Cupcakes were a surprise.  We went to visit relatives down in Virginia Beach and through a series of miscommunications, I didn't make cupcakes to bring.  Then commenced a fun filled rush to the store with a packed car of family, including two teenage girls and two five year old boys :)  It really was fun!  The girls (who are my nieces) helped me pick out the design for these cupcakes and helped to decorate them.  I had more fun with these little cupcakes than I thought possible.  The picture was taken by my Niece's Instagram and I think there's some kind of filter on it but you get the general picture.

I heart my nieces!

Thursday, February 21, 2013

Cascading Flowers Rush Cake

I received a call at 9:15am asking for a cake for a 21st birthday - needed before 4:30pm today!  I got to work, baking 8" rounds of Decadent Chocolate cake and putting butter out to soften to room temperature for the buttercream.  By 3:15pm, I had finished putting together this pretty little cake!

I like the cascade of flowers, but I really love the swirly numbers.  I used the same sort of technique from my last post with the striped number.  I am so very much in love with doing lettering this way!  I had been in such a rush all day with the different things I was doing (I also had previous engagements already scheduled that I had to work in) that I forgot to take a picture of the finished cake.  The customer was very kind and took a photo for me, or this one might have falled into the black hole of cakes I've made and will never see again.

Tuesday, February 19, 2013

Eric Carle's Very Hungry Caterpillar!

I set out to make a cake for a one year old girl for her birthday.  This book has quickly turned into a classic and it was pretty easy to figure out where to go with this cake.  On the last day before the caterpillar turns into a chrysalis, he eats 10 foods.  Those are the foods around the base of the cake.

The cake itself is only 6" round as it was for a small family gathering.  That made making those little fondant foods very meticulous!  It's pound cake with vanilla buttercream frosting and filling, covered with marshmallow fondant.  As a cool sidenote, I found an amazing fondant recipe on CakeCentral.com!  I am just SO in love with how it works (so smooth, so stretchy!) and how it tastes!  I am able to get it pretty stinkin thin so it's not like getting a mouthful of chewing gum, it just melts in the mouth.
Anyway, here are the shots of all the different foods:


 I used a cool little technique for the number "1" on the front that I got off this amazing lady online.  I can't find the link for the life of me!  She did stripey letters and checkered letters and even some swirly letters.  She is awesome!  EDITED:  I found her website!  It's here!


Two Birthday Cakes At Once

Two women in one family have their birthdays on the same day, so I had to make sure the cakes were both beautiful in their own right, but didn't outshine the other.  I was only given that one lady loves birds, purple, simple but pretty, and glitter.  Nothing on the other lady.  I think I did pretty well picking out cakes that were simple and equal in beauty!
The Blue Ruffles cake is Vegan Chocolate with Silky Caramel Sauce filling, coated in milk chocolate ganache, and covered and decorated in fondant.  The flower is gumpaste and is actually gold but the picture didn't pick up the colors very well.
The Purple Birds cake is Vegan Chocolate (gosh, it's just my favorite recipe!  So tasty!) with Fresh Strawberry Filling and milk chocolate ganache, covered in fondant and decorated with fondant.  I used my airbrush to color the fondant.  The silhouettes are cut out of fondant, and the balls on top are glittery fondant (again, the prettiness didn't come through on the pictures!)


Friday, February 15, 2013

Pink Ruffles Cake

I underestimated how much buttercream I would need for this 10" and 8" two tiered cake.  It was OVER FIVE POUNDS.  Let that sink in for a minute.  Because it is a LOT!
The cake itself is Vanilla cake with pink buttercream frosting and filling.

I found the best thing to do was to crumb coat the cake and let it sit in the fridge for about 30 minutes.  Then I used the biggest petal tip I had to create the ruffles.  It was tedious but overall an easy technique.  I think on the next one I'd like to add a large ruffled flower made of gumpaste, perhaps out of black, and perhaps add a black ribbon of some kind.

Friday, February 8, 2013

Pulp Fiction Cupcake Re-Creation

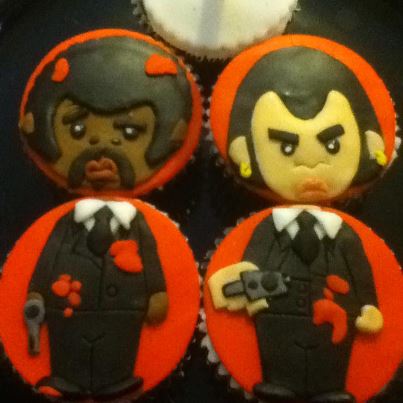
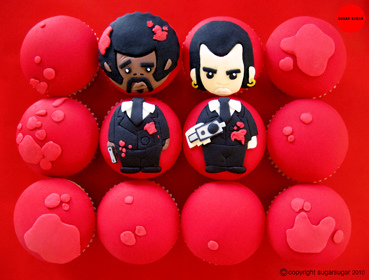
As my husband's birthday quickly approached and I found myself swamped with cakes, I went online in search of something to show him that he deserves cake love too!  I found these amazing Pulp Fiction cupcakes that featured Samuel L Jackson and John Travolta, and I had to re-create them!

I think I did pretty good copying the originals, for dealing with a fussy kid and not feeling too great today. The original creator of these was Jemma at Sugarsugar, I think.  So far as I can tell.  Here's the picture I used to go off of:
Aren't they incredible?  This Jemma person is awesome.  I love Pulp Fiction!
Also, how neat is it to be John Travolta or Samuel L Jackson right now?  Being immortalized in cupcake like this!?

Tiara and Bow Cake

This is "All Chocolate, Hold the Gluten" cake, smothered in ganache and filled with vanilla buttercream, then covered in marshmallow fondant.  The crown and bow are gumpaste.  The ball border is fondant, as well as the banner.  The board is covered in fondant as well.

I enjoyed doing the quilting on this cake.  I'd only done quilting on buttercream before and it is really different doing it on fondant.  SO much easier and cleaner, and you are able to really make it "puff" like it should.  I had to airbrush the non-pariels silver, since the silver dragees are deemed inedible and not locally available.  I found they are ILLEGAL to sell in California.  So weird.  I ate those things like they were going out of style back when I was a kid.
  So Happy Birthday Princess!

Tuesday, February 5, 2013

Princess Dress Cupcakes


When I set out to make these cupcakes, I didn't know if it would be as simple as it seemed or if I would be pulling my hair out by the end of things.  I ended up being really satisfied with how they came out and really enjoyed making them.  I've found myself really liking my new fondant recipe.  It's still marshmallow fondant, but the ingredients are tweaked.
One little tip I found out - real vanilla extract, while exceptionally expensive at Food Lion, is cheaper for twice as much at Costco.  I don't ever use vanilla flavoring or fake extracts, so it was great to see they carry a good quality vanilla for surprisingly cheap.
So, back to the cupcakes.  They are Chocolate Cake with vanilla buttercream and fondant.  I used a flower cutter to cut two shapes out of thin fondant, then rolled the edges to make them frilly for the skirt portion.  I used the same shape but larger cutter to make the top.  Then, it was just a matter of decorating, which was really fun!  I love Aurora's bust.  Of course, Tiana's dress was fun to make with the vine, leaves, and little yellow flower.  Cinderella's dress is simple and elegant, while Belle's dress (which is actually a shimmering gold) has a pretty tiny flower.
  I am so happy to be doing more cakes recently!  I can't wait until this weekend!

Monster High Cake

Fun little cake!  This is a Topsy Turvy Vegan Chocolate Cake with Double Chocolate Buttercream (so not completely vegan!) and marshmallow fondant.  The Monster High doll and skull are freehand painted gumpaste.

I made good use of my airbrush gun on this one, using the great colors I ordered off Amazon.com.

Sunday, January 27, 2013

Cakes of Winter so far!

Since I have been posting mostly to my new Facebook page, I suppose it is fitting that I am slacking here.  Just to make sure I keep things current, here are some pictures of the cakes I've been doing since last I posted!

This cake I made for an awesome boy named Eshan who is battling Neuroblastoma.  He was so grateful and sweet and his family was amazing.  I was connected to them by Icing Smiles, an amazing organization that puts volunteer bakers and families facing major health crisis together.

This Dinosaur and Crayons cake was designed to match the invitations.  Everything is edible, including the 60 crayons I hand rolled and painted!


These next three photos are gross, but they tasted amazing!  The cake was tie dyed inside, yellow cake with vanilla buttercream, airbrushed.  The flies and corn and toilet paper are fondant.  

The cupcakes are gluten free chocolate cake (this recipe called for coconut flour and tasted OMG wonderful!), soaked in syrup, topped with ganache and melted double chocolate buttercream.  The maggots are airbrushed marshmallow fondant.  I am loving my airbrush!

The next cake is just a little smash cake I made up this morning.  I broke my tooth yesterday and I've been a little out of sorts with the pain, but somehow managed to pull this off anyway.

This is my first time trying to do flames on a cake.  I cut out a stencil from parchment paper with a razor blade.  It was pretty easy, but I am glad I tried it today because I learned a lot.  The cake itself is vegan chocolate with double chocolate buttercream, covered in ganache, with marshmallow fondant around the sides and vanilla buttercream for the "grass".


Well, I think that's all for this year so far!  I have a few cakes coming up so check back in and I'll try to have everything updated on time!

Saturday, December 29, 2012

You Too Can "Like" Me on Facebook!

I have finally opened my Facebook page to the public!  If you wish, you can follow my posts and see all my latest creations there, as well as access ording information.
Thanks!

Friday, December 28, 2012

Yet Another Catch Up Post

Here are a few cakes I've done and haven't blogged about.  The Barbie Doll cake is actually a Bratz Doll Cake.  I made it for my niece MPie.  I love my airbrush kit.  The whole dress is covered in pearl and was so pretty.

She looks like she's dancing in a garden of little flowers!
The cupcakes were simple and classy.


Batman and Robin cake for a birthday party!

Pocoyo and Terminator cake for a Daddy and Daughter combo party.  If you haven't seen this show, you totally have to.  The episode I used for inspiration was a dance-off.

The back was "torn" looking to look like the cake is a robot inside.
A nautical Steampunk Octopus cake.  This was really fun to do and I used my airbrush on the whole thing.  The octopus and gears are gumpaste and the cake is wrapped in a mixture of modeling chocolate and fondant.

The gold was very shiny and the silver was standout, the copper was my favorite though.  I bought a wood grain impression mat for the sides and I didn't really like how it turned out.  I had to airbrush the "seams" of the wood to make the lines visible.
I love the gears on the side!  I made them using the daisy cutter and a round cutter.  First, cut a daisy, then use the appropriately sized round cutter to cut the tips off.
I made these cupcakes for Icing Smiles, this great organization that gathers volunteers from all over the place to make cakes for gravely ill children and their siblings.  These cupcakes went to the Ronald McDonald house and I just happened to have a Cat in the Hat movie that I was able to give them for a fun themed movie night.  I really look forward to my next cake with Icing Smiles. The staff there is awesome and I love giving a little of myself to bring a smile.


A Cake and an Angry Birds Universe Party!


I have been really slacking on both making cakes and taking photos of said cakes.  I just haven't had that drive to accomplish recently.  However, I have done a couple and one of them is this Rawr Dinosaur cake for a friend's child.  The dino is made out of rice krispie treats and fondant.  I used the #3 tip to make the "scales" impression and brushed on green petal dust for a nice shimmer.  It was fun to make and I loved making it!
Now, the most exciting part is that my son's birthday is coming up!  I love to plan birthday parties and being that my kiddo is turning 5, and wants an Angry Birds party, I'm really excited.  There's so much to work with when planning an Angry Birds party, so much inspiration to draw from!  I have of course used Pinterest to find many things and in the process of doing lots of AB crafts, I have found myself inspired.  (AUTHOR'S NOTE:  I did plan on covering his party in a few blog posts instead of all crammed into one so I can explain each thing, but then I put this blog on hold and didn't keep up, so here it all is.)


  The first is the Pig Pinata.  I had originally asked a friend to make the pinata, then realized that that is a pretty labor-intensive task to ask a friend to do and started off on my own.  I used a large paper lantern they had on clearance at Target ($7.50, and it came with the bottle lamp kit).  It's a 12" I think.  Anyway, I used that for the basic shape and put 3 layers of newspaper paper mache on.  The first layer was pretty tricky and the lantern warped a bit, but I figured it was really not that big of a deal.  If I had it to do again I'd do the first layer in a few sessions and not hang it to dry.  After putting on about 3 layers, I did a layer of white computer paper.  The paper mache glue I used was just about half and half white flour and water, sort of the consistency of pancake batter.  Tear the paper into 1" strips about 6" long, dip them in the glue, and squeegee the excess off with your fingers prior to applying to the lantern.  I left the hole in the top open and poured the pinata filler in.  I used toys instead of candy and the slingshot fodder (more on that later).  I bent the two little metal circles up so they would serve as easy hanging handles.  I hung it by bungee cords and stuck a crown made out of paper on it.  King Pig, yo.
The cupcakes were fun to make, and not as technical as I'd feared.  They are different flavors (as shown on the following picture) with fondant.
The smash cake (okay, yes, he's old enough for just a regular cupcake, but how boring is that!?) was the Black Bird, the bomb.  That's Stinkie's favorite.  He was impressed.

The goody bags were just plain paper bags.  I cut out the faces and glued them on while watching Stinkie learn how to roller skate.  Cuz that's how I roll.  Inside the bags are slingshots that I bought off Oriental Trading company and some felt masks I made.  The slingshots were not the greatest quality but they held together and served their purpose.  I made these baked cotton balls for slingshot ammo and loaded the pinata with the balls.
Here's the kids eating cake and wearing their masks.  Too fun!  I used this pattern for the masks but then altered it, because I didn't really like how low it came on my kid's face.
A green paper lantern bought on clearance turns into a pig with the addition of a nose!
Stinkie wanted all the different Angry Birds games represented.  Well, maybe I wanted to do that.  Okay.  It was all me.  He couldn't decide so I went with and Angry Birds Universe party.  Blame my inner Martha.  So anyway, here's the different tables.


Space Table, with Galaxy Playdoh (black Playdoh with tons of glitter mixed in) and Red Vines.  I made these signs for each of the tables by printing stuff off the internet and coloring them in with crayons.  Haha.    There are paper lanterns painted as planets hanging above the Space table.  You can see the food table in the background.  The food was pulled pork (get it?  Dead pigs.  Har de har har.) and rolls with fruit skewers.  The fruit skewers were a chunk of fresh pineapple, three blueberries, a strawberry, and a green grape (representing the yellow, blue, and red birds and a pig).  They were a big hit but took a lot of time.
Some of the plushies were homemade using the link here, and some of them were bought from Costco as dog toys.  Hey don't judge, the kid toys were $10-20 a piece, but the dog toys were $10 for 6!  And yeah, I totally bought the table toppers from Party City.  I had a lot of tables to fill!  I like the AB tablecloth but it would have been fine to use regular tablecloths.
Anyway, I needed the plushies because I made bowling pins out of knockoff Sprite 2 liters and some coloring sheets that I taped on.  The cans in the foreground I saved from making crockpot chili, spraypainted dark green, then painted noses on.  So easy, and boom, there were two neat little games.  The kids used their slingshots on the cans.  I took a kickball and painted the face of a red bird on it for the bowling game.  I put enough water in the "pins" to fill them about 1/5-1/4 full.  You can buy the kickballs already made but I saved $7 doing it myself.  Dang.  I didn't get a picture and now it's sitting out in my back patio all covered in mud.
For the Angry Birds Seasons table, I did Easter, Christmas, St. Patrick's Day, Halloween and Valentine's Day.  Easter was the cookie pops I got from the dollar store and the egg streamer shown.  I made it out of paint chips and talk about a pain in the rear.  Christmas was sprigs of pine and a wreath (not pictured).  Valentine's day was the hearts I cut out with a heart punch.  St. Patrick's was little felt leprechaun hats I made out of scraps and hot glue.  There's one hidden in the cookies. Halloween was some paper lanterns with Halloween stuff on them.  The "Angry Art" was coloring pages took out of dollar store AB coloring books and a bunch of crayons.

The following pictures are here for two reasons.  To show you the Angry Birds Rio table (drinks) and how massively it was raining while I set this whole thing up by myself.  Whoa.  I thought we were going to be rained out completely, but the rain stopped 5 minutes before the party started and tons of friends actually showed up!
The monkey and the birds were little blowups that I got in a grab bag from another mom here in the Richmond area for $5 from her kid's Rio party.  I used that table as the hydration station.

Wow.  See the puddle!?  The entire ground was water.  You can see the leis hanging there, and there are hair clips set in the centerpiece for the taking.
Not pictured are the glass marbles.  I used a 1" punch to cut out printed birds and pigs, then glued one to the bottom of those clear rocks you can get at the dollar store.  You just put a drop on the bottom of the clear glass marble and press it onto the picture, then paint clear nail polish over the paper after it dries.  In hindsight, it was probably not the best idea to provide kids with slingshots and glass marbles.  Nobody put the two together though until after the party!  You can see them in the foreground of this picture, on the purple tablecloth.  I used them as table scatter.

Also, the ruffled streamers are like the ones I made last year for his Mario party.  You just get two colors and ruffle stitch them together.  I'm so glad I did this because the humidity was through the roof and regular streamers would have collapsed.  The stitching makes the streamers much more hardy.
  That's all I can think of for now!  And now I have to get to posting all the cakes I've done since his birthday!  I have definitely slacked off and now I'm just doing cakes that strike my fancy.
TaaTaa, Friendlies!