Friday, February 8, 2013

Tiara and Bow Cake

This is "All Chocolate, Hold the Gluten" cake, smothered in ganache and filled with vanilla buttercream, then covered in marshmallow fondant.  The crown and bow are gumpaste.  The ball border is fondant, as well as the banner.  The board is covered in fondant as well.

I enjoyed doing the quilting on this cake.  I'd only done quilting on buttercream before and it is really different doing it on fondant.  SO much easier and cleaner, and you are able to really make it "puff" like it should.  I had to airbrush the non-pariels silver, since the silver dragees are deemed inedible and not locally available.  I found they are ILLEGAL to sell in California.  So weird.  I ate those things like they were going out of style back when I was a kid.
  So Happy Birthday Princess!

Tuesday, February 5, 2013

Princess Dress Cupcakes


When I set out to make these cupcakes, I didn't know if it would be as simple as it seemed or if I would be pulling my hair out by the end of things.  I ended up being really satisfied with how they came out and really enjoyed making them.  I've found myself really liking my new fondant recipe.  It's still marshmallow fondant, but the ingredients are tweaked.
One little tip I found out - real vanilla extract, while exceptionally expensive at Food Lion, is cheaper for twice as much at Costco.  I don't ever use vanilla flavoring or fake extracts, so it was great to see they carry a good quality vanilla for surprisingly cheap.
So, back to the cupcakes.  They are Chocolate Cake with vanilla buttercream and fondant.  I used a flower cutter to cut two shapes out of thin fondant, then rolled the edges to make them frilly for the skirt portion.  I used the same shape but larger cutter to make the top.  Then, it was just a matter of decorating, which was really fun!  I love Aurora's bust.  Of course, Tiana's dress was fun to make with the vine, leaves, and little yellow flower.  Cinderella's dress is simple and elegant, while Belle's dress (which is actually a shimmering gold) has a pretty tiny flower.
  I am so happy to be doing more cakes recently!  I can't wait until this weekend!

Monster High Cake

Fun little cake!  This is a Topsy Turvy Vegan Chocolate Cake with Double Chocolate Buttercream (so not completely vegan!) and marshmallow fondant.  The Monster High doll and skull are freehand painted gumpaste.

I made good use of my airbrush gun on this one, using the great colors I ordered off Amazon.com.

Sunday, January 27, 2013

Cakes of Winter so far!

Since I have been posting mostly to my new Facebook page, I suppose it is fitting that I am slacking here.  Just to make sure I keep things current, here are some pictures of the cakes I've been doing since last I posted!

This cake I made for an awesome boy named Eshan who is battling Neuroblastoma.  He was so grateful and sweet and his family was amazing.  I was connected to them by Icing Smiles, an amazing organization that puts volunteer bakers and families facing major health crisis together.

This Dinosaur and Crayons cake was designed to match the invitations.  Everything is edible, including the 60 crayons I hand rolled and painted!


These next three photos are gross, but they tasted amazing!  The cake was tie dyed inside, yellow cake with vanilla buttercream, airbrushed.  The flies and corn and toilet paper are fondant.  

The cupcakes are gluten free chocolate cake (this recipe called for coconut flour and tasted OMG wonderful!), soaked in syrup, topped with ganache and melted double chocolate buttercream.  The maggots are airbrushed marshmallow fondant.  I am loving my airbrush!

The next cake is just a little smash cake I made up this morning.  I broke my tooth yesterday and I've been a little out of sorts with the pain, but somehow managed to pull this off anyway.

This is my first time trying to do flames on a cake.  I cut out a stencil from parchment paper with a razor blade.  It was pretty easy, but I am glad I tried it today because I learned a lot.  The cake itself is vegan chocolate with double chocolate buttercream, covered in ganache, with marshmallow fondant around the sides and vanilla buttercream for the "grass".


Well, I think that's all for this year so far!  I have a few cakes coming up so check back in and I'll try to have everything updated on time!

Saturday, December 29, 2012

You Too Can "Like" Me on Facebook!

I have finally opened my Facebook page to the public!  If you wish, you can follow my posts and see all my latest creations there, as well as access ording information.
Thanks!

Friday, December 28, 2012

Yet Another Catch Up Post

Here are a few cakes I've done and haven't blogged about.  The Barbie Doll cake is actually a Bratz Doll Cake.  I made it for my niece MPie.  I love my airbrush kit.  The whole dress is covered in pearl and was so pretty.

She looks like she's dancing in a garden of little flowers!
The cupcakes were simple and classy.


Batman and Robin cake for a birthday party!

Pocoyo and Terminator cake for a Daddy and Daughter combo party.  If you haven't seen this show, you totally have to.  The episode I used for inspiration was a dance-off.

The back was "torn" looking to look like the cake is a robot inside.
A nautical Steampunk Octopus cake.  This was really fun to do and I used my airbrush on the whole thing.  The octopus and gears are gumpaste and the cake is wrapped in a mixture of modeling chocolate and fondant.

The gold was very shiny and the silver was standout, the copper was my favorite though.  I bought a wood grain impression mat for the sides and I didn't really like how it turned out.  I had to airbrush the "seams" of the wood to make the lines visible.
I love the gears on the side!  I made them using the daisy cutter and a round cutter.  First, cut a daisy, then use the appropriately sized round cutter to cut the tips off.
I made these cupcakes for Icing Smiles, this great organization that gathers volunteers from all over the place to make cakes for gravely ill children and their siblings.  These cupcakes went to the Ronald McDonald house and I just happened to have a Cat in the Hat movie that I was able to give them for a fun themed movie night.  I really look forward to my next cake with Icing Smiles. The staff there is awesome and I love giving a little of myself to bring a smile.


A Cake and an Angry Birds Universe Party!


I have been really slacking on both making cakes and taking photos of said cakes.  I just haven't had that drive to accomplish recently.  However, I have done a couple and one of them is this Rawr Dinosaur cake for a friend's child.  The dino is made out of rice krispie treats and fondant.  I used the #3 tip to make the "scales" impression and brushed on green petal dust for a nice shimmer.  It was fun to make and I loved making it!
Now, the most exciting part is that my son's birthday is coming up!  I love to plan birthday parties and being that my kiddo is turning 5, and wants an Angry Birds party, I'm really excited.  There's so much to work with when planning an Angry Birds party, so much inspiration to draw from!  I have of course used Pinterest to find many things and in the process of doing lots of AB crafts, I have found myself inspired.  (AUTHOR'S NOTE:  I did plan on covering his party in a few blog posts instead of all crammed into one so I can explain each thing, but then I put this blog on hold and didn't keep up, so here it all is.)


  The first is the Pig Pinata.  I had originally asked a friend to make the pinata, then realized that that is a pretty labor-intensive task to ask a friend to do and started off on my own.  I used a large paper lantern they had on clearance at Target ($7.50, and it came with the bottle lamp kit).  It's a 12" I think.  Anyway, I used that for the basic shape and put 3 layers of newspaper paper mache on.  The first layer was pretty tricky and the lantern warped a bit, but I figured it was really not that big of a deal.  If I had it to do again I'd do the first layer in a few sessions and not hang it to dry.  After putting on about 3 layers, I did a layer of white computer paper.  The paper mache glue I used was just about half and half white flour and water, sort of the consistency of pancake batter.  Tear the paper into 1" strips about 6" long, dip them in the glue, and squeegee the excess off with your fingers prior to applying to the lantern.  I left the hole in the top open and poured the pinata filler in.  I used toys instead of candy and the slingshot fodder (more on that later).  I bent the two little metal circles up so they would serve as easy hanging handles.  I hung it by bungee cords and stuck a crown made out of paper on it.  King Pig, yo.
The cupcakes were fun to make, and not as technical as I'd feared.  They are different flavors (as shown on the following picture) with fondant.
The smash cake (okay, yes, he's old enough for just a regular cupcake, but how boring is that!?) was the Black Bird, the bomb.  That's Stinkie's favorite.  He was impressed.

The goody bags were just plain paper bags.  I cut out the faces and glued them on while watching Stinkie learn how to roller skate.  Cuz that's how I roll.  Inside the bags are slingshots that I bought off Oriental Trading company and some felt masks I made.  The slingshots were not the greatest quality but they held together and served their purpose.  I made these baked cotton balls for slingshot ammo and loaded the pinata with the balls.
Here's the kids eating cake and wearing their masks.  Too fun!  I used this pattern for the masks but then altered it, because I didn't really like how low it came on my kid's face.
A green paper lantern bought on clearance turns into a pig with the addition of a nose!
Stinkie wanted all the different Angry Birds games represented.  Well, maybe I wanted to do that.  Okay.  It was all me.  He couldn't decide so I went with and Angry Birds Universe party.  Blame my inner Martha.  So anyway, here's the different tables.


Space Table, with Galaxy Playdoh (black Playdoh with tons of glitter mixed in) and Red Vines.  I made these signs for each of the tables by printing stuff off the internet and coloring them in with crayons.  Haha.    There are paper lanterns painted as planets hanging above the Space table.  You can see the food table in the background.  The food was pulled pork (get it?  Dead pigs.  Har de har har.) and rolls with fruit skewers.  The fruit skewers were a chunk of fresh pineapple, three blueberries, a strawberry, and a green grape (representing the yellow, blue, and red birds and a pig).  They were a big hit but took a lot of time.
Some of the plushies were homemade using the link here, and some of them were bought from Costco as dog toys.  Hey don't judge, the kid toys were $10-20 a piece, but the dog toys were $10 for 6!  And yeah, I totally bought the table toppers from Party City.  I had a lot of tables to fill!  I like the AB tablecloth but it would have been fine to use regular tablecloths.
Anyway, I needed the plushies because I made bowling pins out of knockoff Sprite 2 liters and some coloring sheets that I taped on.  The cans in the foreground I saved from making crockpot chili, spraypainted dark green, then painted noses on.  So easy, and boom, there were two neat little games.  The kids used their slingshots on the cans.  I took a kickball and painted the face of a red bird on it for the bowling game.  I put enough water in the "pins" to fill them about 1/5-1/4 full.  You can buy the kickballs already made but I saved $7 doing it myself.  Dang.  I didn't get a picture and now it's sitting out in my back patio all covered in mud.
For the Angry Birds Seasons table, I did Easter, Christmas, St. Patrick's Day, Halloween and Valentine's Day.  Easter was the cookie pops I got from the dollar store and the egg streamer shown.  I made it out of paint chips and talk about a pain in the rear.  Christmas was sprigs of pine and a wreath (not pictured).  Valentine's day was the hearts I cut out with a heart punch.  St. Patrick's was little felt leprechaun hats I made out of scraps and hot glue.  There's one hidden in the cookies. Halloween was some paper lanterns with Halloween stuff on them.  The "Angry Art" was coloring pages took out of dollar store AB coloring books and a bunch of crayons.

The following pictures are here for two reasons.  To show you the Angry Birds Rio table (drinks) and how massively it was raining while I set this whole thing up by myself.  Whoa.  I thought we were going to be rained out completely, but the rain stopped 5 minutes before the party started and tons of friends actually showed up!
The monkey and the birds were little blowups that I got in a grab bag from another mom here in the Richmond area for $5 from her kid's Rio party.  I used that table as the hydration station.

Wow.  See the puddle!?  The entire ground was water.  You can see the leis hanging there, and there are hair clips set in the centerpiece for the taking.
Not pictured are the glass marbles.  I used a 1" punch to cut out printed birds and pigs, then glued one to the bottom of those clear rocks you can get at the dollar store.  You just put a drop on the bottom of the clear glass marble and press it onto the picture, then paint clear nail polish over the paper after it dries.  In hindsight, it was probably not the best idea to provide kids with slingshots and glass marbles.  Nobody put the two together though until after the party!  You can see them in the foreground of this picture, on the purple tablecloth.  I used them as table scatter.

Also, the ruffled streamers are like the ones I made last year for his Mario party.  You just get two colors and ruffle stitch them together.  I'm so glad I did this because the humidity was through the roof and regular streamers would have collapsed.  The stitching makes the streamers much more hardy.
  That's all I can think of for now!  And now I have to get to posting all the cakes I've done since his birthday!  I have definitely slacked off and now I'm just doing cakes that strike my fancy.
TaaTaa, Friendlies!

Wednesday, August 29, 2012

On a Hiatus

It's been a while since I posted (goodness!  A really long time)!  I have done a few cakes (and even forgot to photograph some of them) but mostly I've been taking a break.  There has been some pretty heavy family emergencies that have left me not feeling much like making cakes, and I've been recovering for a few months.  I think I'm finally feeling better and I'm ready to start up doing all this again!
Let's see, the last cake I posted here was WAY back in March!?  I guess that sounds about right.  I ended up taking an emergency trip to Oregon in April and then was blessed to be able to visit again in July for my mother's 60th birthday and bake her a cake.  That was one of the ones I didn't catch a picture of :(.
Well, enough about that, and onto the cakes!

This Mario cake was so fun to make!  It is chocolate on bottom and yellow cake on top, with vanilla buttercream and fondant accents.  I love how the Mario came out!

Another Thomas the Tank Engine cake!  I swear I've made more Thomas cakes than anything else!  They added the train after delivery.

Noah's Ark cupcakes for a baby shower.  I thought it would be crazy to make but it ended up being exhilarating.  I wish I had gotten better pictures.  Everyone raved about the new recipe I'm trying out!

I have a few cakes in the works for this weekend and I'm really happy about it!   

Sunday, March 18, 2012

Princess and the Frog go Bowling!

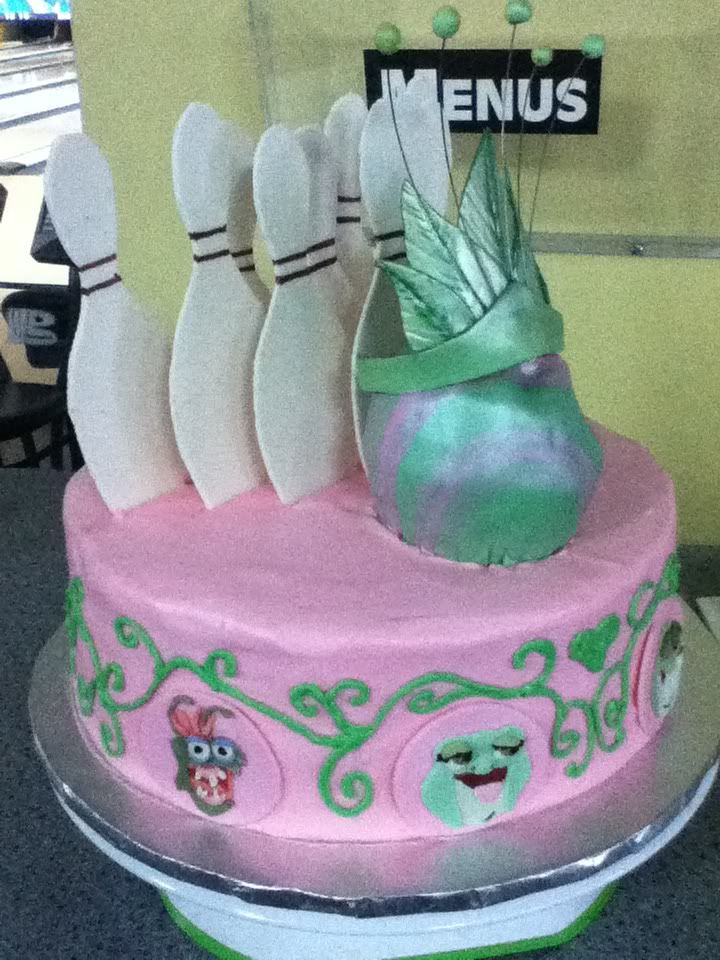
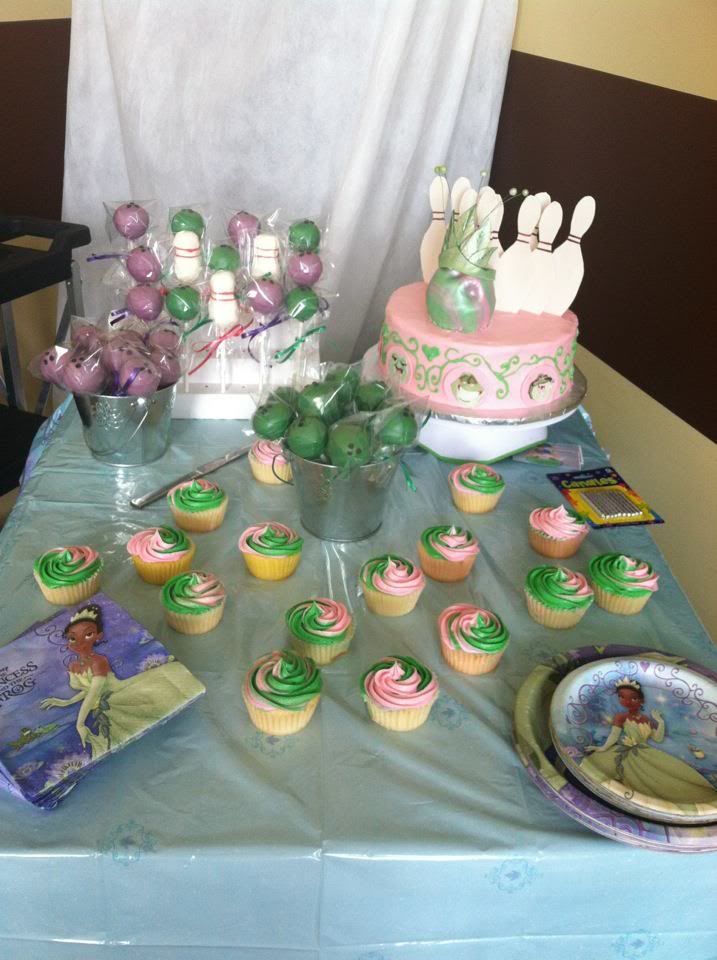
Let me start off saying that I had a major case of zero confidence when I started this cake.  The first thing I made was the crown, and I got to use my brand new silicone flower/leaf impression mat.  This thing is awesome.  So anyway, it was really fun.  It's been a while since I made a cake and I got back into the spirit of things really quickly.  I made up the bowling pins by making a template out of paper and using that to guide my cuts on the gumpaste.  I made the bottom part of the pins long, so there is gumpaste sticking into the cake as well as wooden picks.  I thought it would give a little extra stability.  The characters were fun to make.  I was giggling as I made Ray, the Cajun firefly.  I love the teeth.

I used my old recipe and I have to say I think I'm going back to it.  It took me over a year to develop it and it is dense and moist.  The new recipe is a little easier to make and it is more consistent, but goodness, this cake was good!

The bowling ball is two little cakes I made in my Wilton Wonder Mold, layered with buttercream and carved into a ball, and covered in marbled marshmallow fondant.

I also made 16 cupcakes to complement the cake.  The cake pops in this photo were made by another amazing cake lady!  It was fun to talk cake for a while.  The kids had a ball eating the bowling pins and the characters.

Tuesday, February 28, 2012

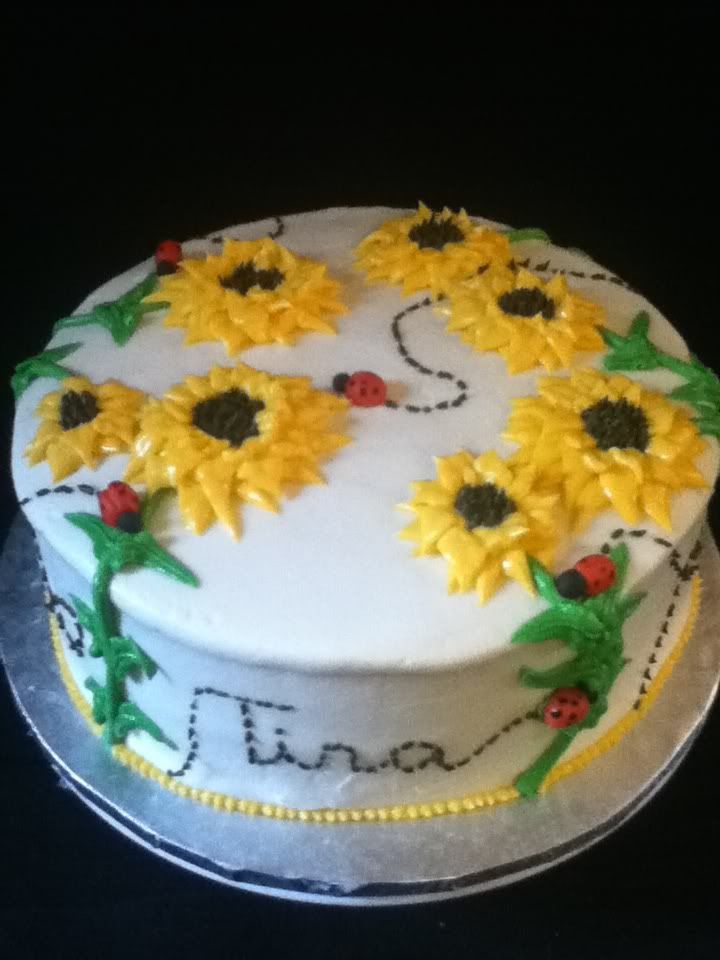
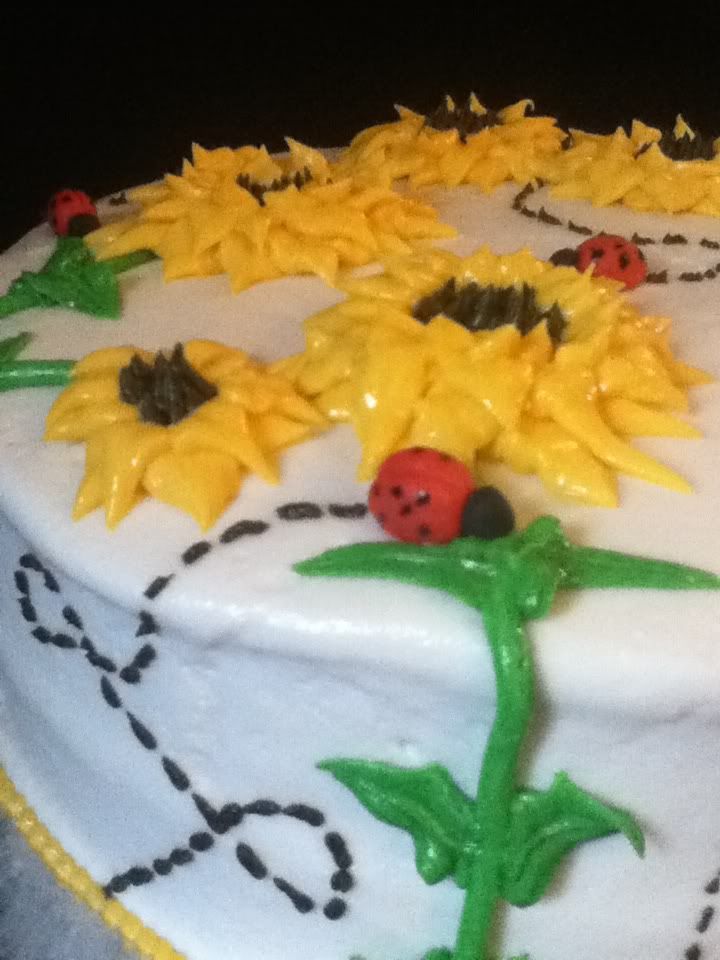
Sunflowers and Ladybugs!


This cute little sunflower and ladybug cake was FUN to make!  It was my first time making sunflowers out of buttercream, but it proved to be simple enough.  The ladybugs were so interesting to place, and the little crawl marks made me giggle.  Cakes like this are why I love to make cakes.  The cake itself is yellow cake with vanilla buttercream frosting and filling.


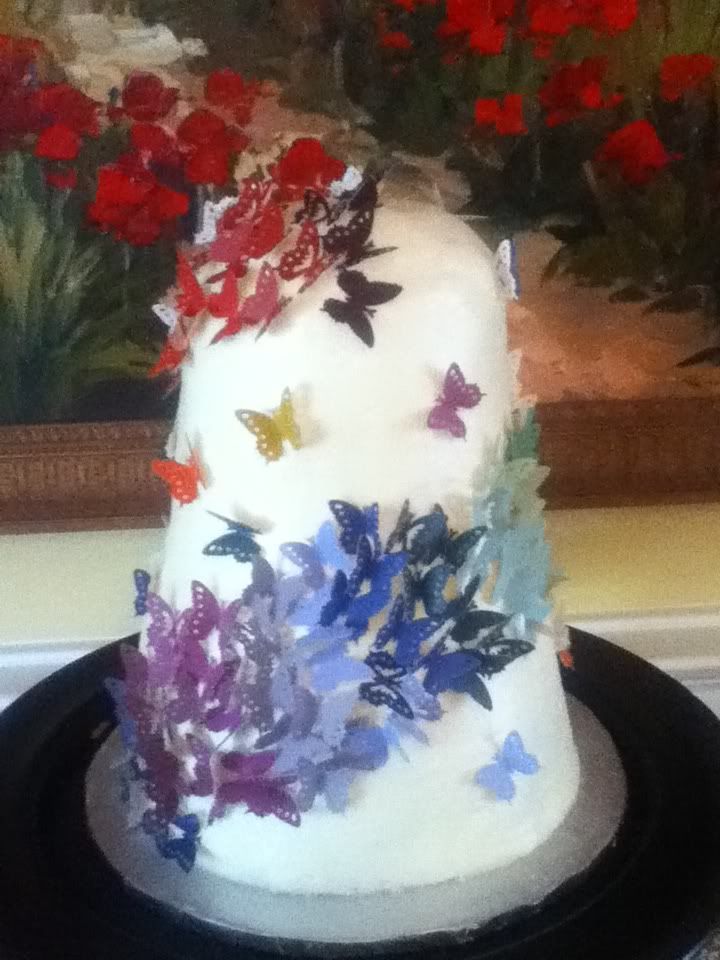
Butterfly Rainbow Cake

This cake is for a wonderful lady's 80th birthday!  While it didn't come out exactly like I had imagined it, I was still very happy with it.  It was about 2' tall, 9" round at the base.
I cheated on the butterflies.  I used paint chips and a great little Martha Stewart punch.  I know, I should have made the 100 butterflies out of gumpaste - but I'm lazy, and nobody minded.  It's buttercream frosting and filling covering chocolate and almond cake.

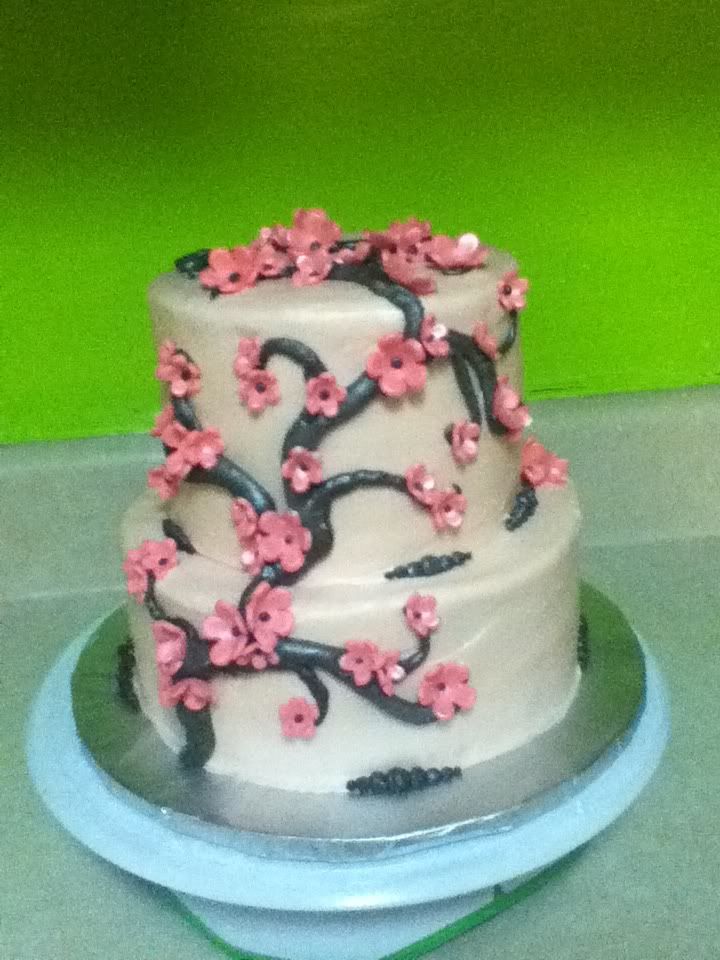
Sakura Cake


I really enjoyed making this simple Sakura cake.  Cherry blossoms are too cute and pretty!  The cake itself is my old yellow recipe.  There is a monogrammed letter at the top, "K" for Kristen, my sister-in-law.  I was given zero direction for her birthday cake, just that it was her 30th birthday (yay!)  I frosted the whole cake (the light pink) and used my airbrush to pearlize the whole thing, then added chocolate frosting "branches" and border dots.  I liked the idea of the randomness of them.  The flowers are fondant with chocolate buttercream centers. As a finishing touch, I airbrushed some silver on the branches for highlighting and pearlized the blossoms.
  One tip I would like to share about tiered cakes is how to stack them without making it impossible to remove the top tier without tearing off the buttercream on the top of the bottom tier.  I make the dowels just a tiny bit taller than they should be and put a massive amount of (sifted) powdered sugar where the top tier will rest. The powdered sugar absorbs perfectly into the bottom buttercream and makes it a little more durable.
  YAY for cakes!

Saturday, February 11, 2012

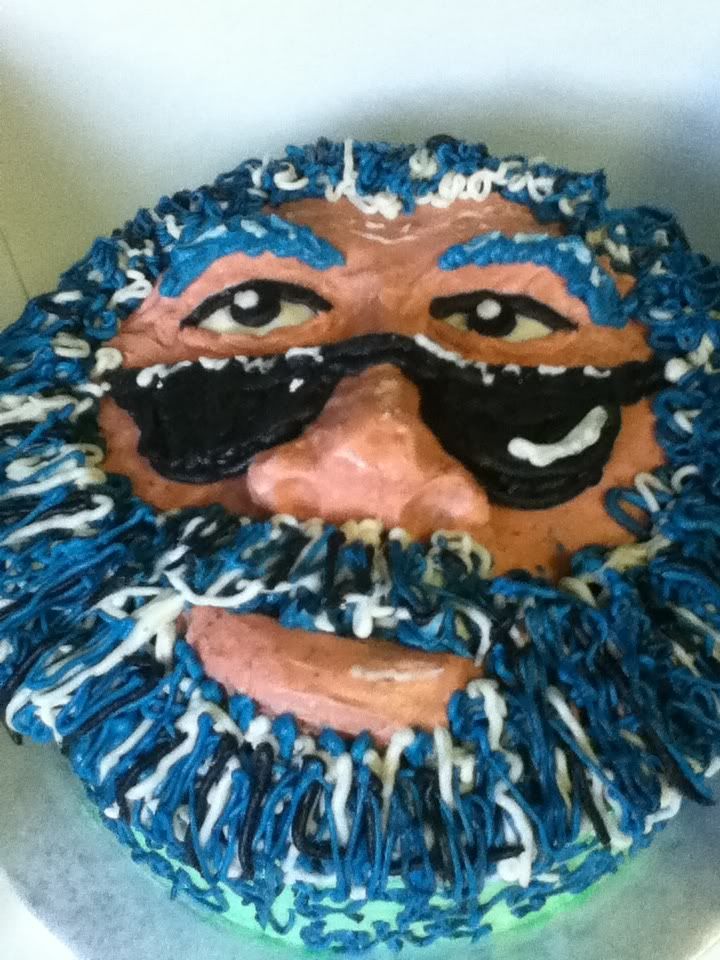
Jerry Garcia


There are just so many Dead fans in my life it seems.  My wonderful, awesome hubster turned 37 on the 9th and I wanted to make him a cool cake, so I picked this one!  I built up the features using cake spackle (cake mushed up with some buttercream), dyed the frosting, and smoothed it on with my fingers.  I was a pure mess by the end of it.  The hair I just applied with different size round tips.  I wrote lyrics real quickly around the sides to "Saturday  Night".  It seemed to fit!
Happy Birthday Honey!  I love you!